
 100% FREE ACCESS
12th Standard Syllabus & Materials
12th Standard
TN 12th Computer Applications மின்னணு தரவு பரிமாற்றம் Sample Question Papers Study Material - QB365 Set A
NEW12th Standard
TN 12th Computer Applications மின் - வணிக பாதுகாப்பு அமைப்புகள் Sample Question Papers Study Material - QB365 Set A
NEW12th Standard
TN 12th Computer Applications மின்னணு செலுத்தல் முறைகள் Sample Question Papers Study Material - QB365 Set A
NEW12th Standard
TN 12th Computer Applications மின் - வணிகம் Sample Question Papers Study Material - QB365 Set A
NEW12th Standard
TN 12th Computer Applications திறந்த மூல கருத்துருக்கள் Sample Question Papers Study Material - QB365 Set A
NEW12th Standard
TN 12th Computer Applications வலையமைப்பு வடமிடல் Sample Question Papers Study Material - QB365 Set A

Published on: 16/09/2019
Download Tamil Nadu 12th Standard Computer Technology question papers, model tests, one-mark questions, important questions, and public exam papers in PDF format. Free study materials and answer keys for TN State Board students.
Questions + Answers key
Take MCQ Computer Technology Test
1.
Write about AutoCAD Interface.
2.
Describe some of the tools displayed in Tools Panel.
3.
Explain in detail Techniques of Animation.
4.
Write the steps to draw a polygon.
5.
Write the steps to create type on a path.
6.
1.
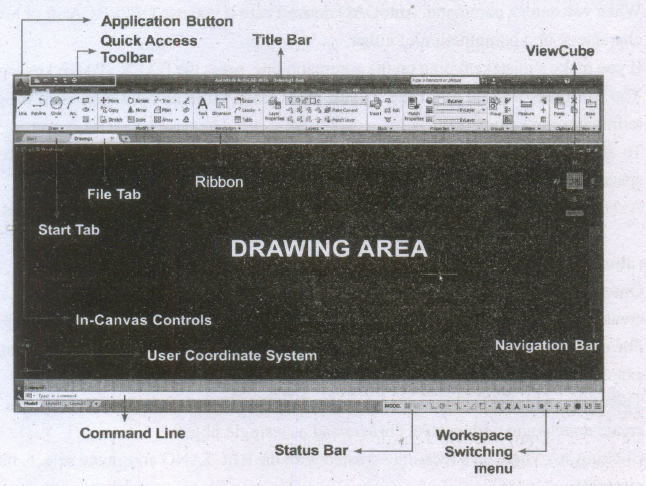
The AutoCAD 2016 interface is based on Ribbons and the Application Menu,
The important feature of this interface is that the size of the Graphical Area will be bigger.
2.
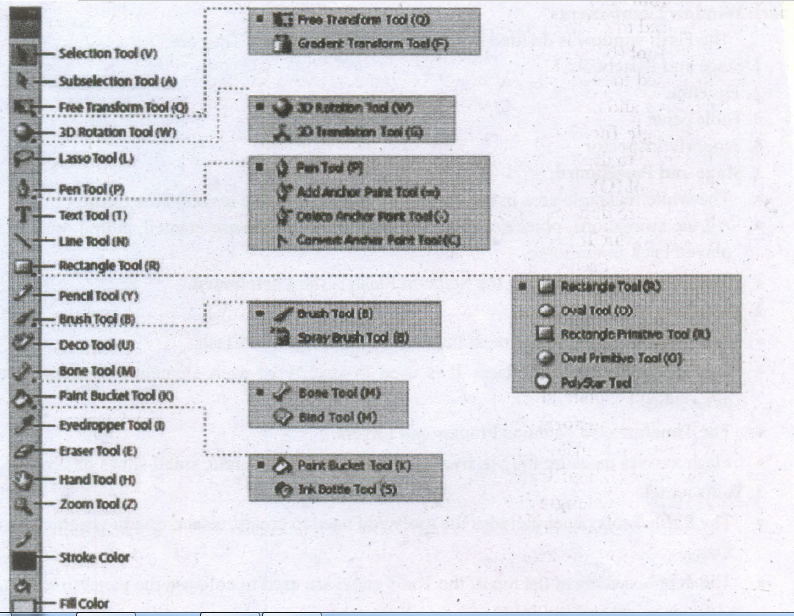
The Flash Tools panel includes the tools you need to create, select, or edit graphics on the Stage.
(i) The double arrows at the top of the Tools panel are used to collapse the panel to icon only view, or to expand the panel and see all the tools.
(ii) By default, the toolbar is on the right side of your screen.
(iii) The single capital letter in parentheses indicates tile keyboard shortcuts to select those tools.
3D Rotation Tool (W)
It is used to create 3D effects by rotating movie clips in 3D space on the Stage.
3D Translation Tool (G)
It is used to create 3D effects by moving movie clips in 3D space on the Stage. The 3D Rotation and the 3D Translation tools are grouped within one icon on the Tools panel.
Lasso Tool (L)
It is used to select objects or parts of objects by drawing a freehand.
Pen Tool (P)
It is used to draw lines and curves by creating a series of dots, known as anchor points, that are automatically connected. Other tools used to add, delete, and convert the anchor points created by the Pen tool are grouped with the Pen tool.
Text Tool (T)
It is used to create and edit text.
Line Tool (N)
It is used to draw straight lines. You can draw vertical, horizontal, and 45° diagonal lines by pressing and holding Shift key while drawing the line.
Rectangle Tool(R)
It is used to draw rectangular shapes. Press and hold Shift key to draw a perfect square.
Oval Tool (O)
It is used to draw oval shapes. Press and hold Shift key to draw a perfect circle.
Subselection Tool (A)
This tool is used to select, drag, and reshape an object. We know that vector graphics are composed of lines and curves (each of which is a segment) connected by anchor points. When you select art object with this tool, it displays the anchor points and allows you to use them to edit the object.
Free Transform Tool (Q)
It is used to rotate, scale, skew, and distort objects.
Gradient Transform Tool (F)
It is used to transform a gradient fill by adjusting the size, direction, or center of the fill. The Free and Gradient Transform tools are grouped within one icon on the Tools panel.
Primitive Rectangle and Oval (R)
It is used to draw objects with properties such as corner radius or inner radius, that can be changed using the Properties panel.
PolyStar Tool
It is used to draw polygons and stars. The Rectangle, Oval, Primitive, and PolyStar tools are grouped within one tool on the Tools panel.
3.
(i) Animation is the process displaying still images so quickly so that they give the impression of continuous movement.
(ii) In animation the screen object is a vector image in animation. Using numerical transformations the movement of that image along its paths is calculated for their defining coordinates.
(iii) The least frame rate of at least 16 frames per second gives the impression of smoothness and for natural looking it should be at least 25 frames per second.
(iv) Animations may be in two or three dimensional.
(v) The two dimensional animation, bring an image alive, that occur on the flat X and Y axis of the screen.
(vi) While in three dimensional animation it occurs along the three axis X, Y and Z. Animation tools are very powerful and effective.
(vii) The two basic types of animations are Path animation and Frame animation.
Path Animation:
(i) Path animation involves moving an object on a screen that has a constant background.
(ii) e.g. a cartoon character, may move across the screen regardless of any change in the background or the character.
Frame Animation:
(i) In frame animations, multiple objects are allowed to travel simultaneously and the background or the objects also changes.
4.
Creating Polygons
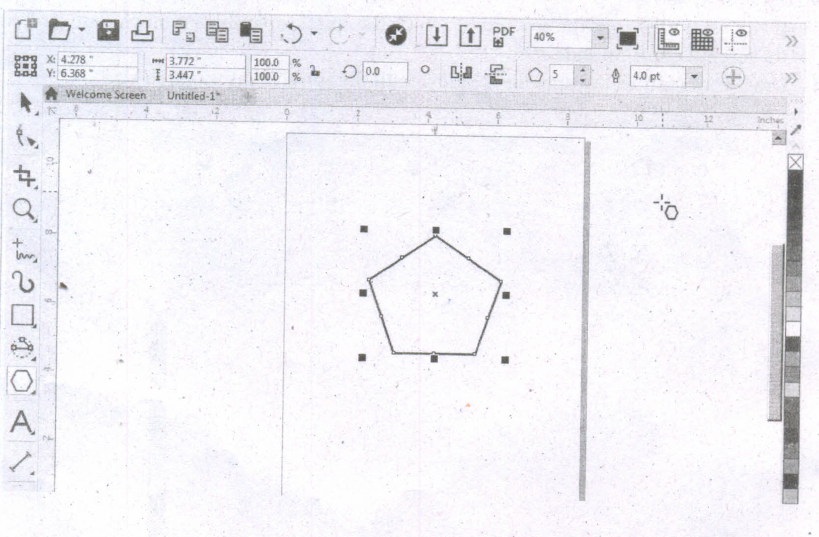
1. To draw a polygon Cabo known as pentagon: a five-sided figure, select the Polygon tool in the toolbox. The mouse pointer changes to a crosshair with a small polygon beneath it.
2. Click on anywhere in the drawing area and drag the mouse pointer.
3. Release the mouse button where you like the end of the polygon.
4. To increase the number of sides of your polygon, select the polygon you have drawn using the Pick tool.
5. Place the mouse pointer on the Number of Points on Polygon text box and type the number of sides you like for you polygon. You can also set the number of sides for your polygon and then draw it.
5.
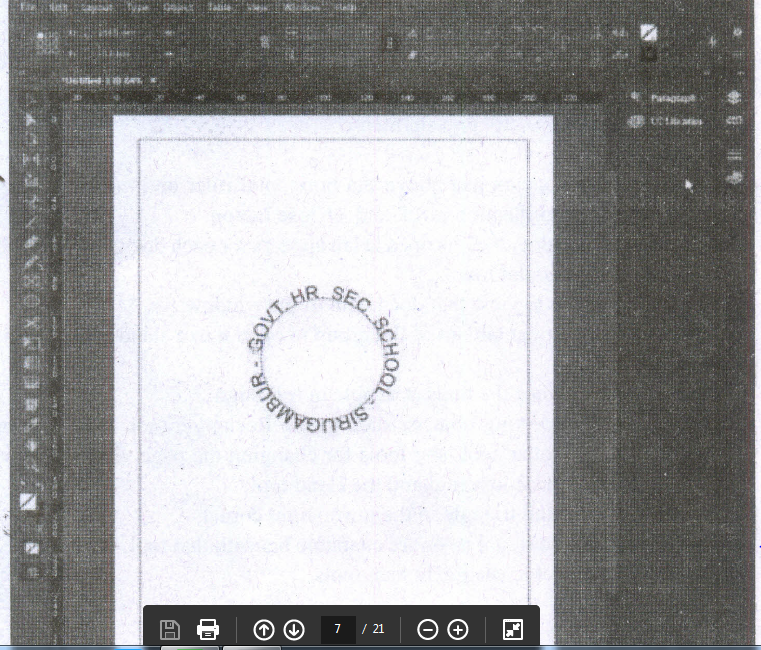
Creating Path Type
(i) With the Type on a Path tool, you can add type along the inner or outer edge of a path.
(ii) You can place the text on either side of the path, but not on both.
(iii) If you initially place it on the inner part of the path, you can always move it to the outer part of the path later.
(iv) When you select text on a path, brackets appear that you can drag to adjust the position and placement of the text.
Create Type on a Path
1. Select the Type on a Path tool on the Tools panel.
2. Click on the edge of the path (closed or open) to which you want to add type. A flashing insertion point appears in the text frame. Any fill or stroke on the object is removed.
3. Type some text. The text automatically wraps to the shape of the text frame. Don't press Enter key. The type appears along the edge of the object, conforms to its shape, and removes the fill and stroke. If the overflow symbol appears, deselect the text frame, select the Direct Selection tool on the Tools panel, and then drag a corner to reshape the text frame.
4. Select a Selection tool or select the Type tool again.
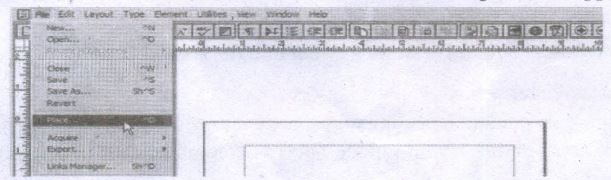
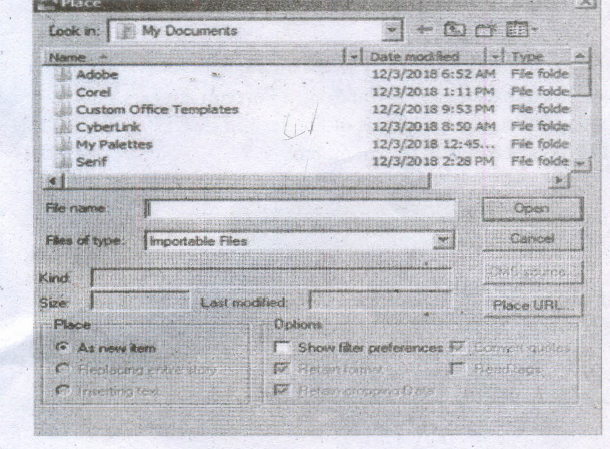
6.

12th Standard Syllabus & Materials
12th Standard
TN 12th Computer Applications களப்பெயர் முறைமை (DNS) Sample Question Papers Study Material - QB365 Set A
NEW12th Standard
TN 12th Computer Applications வலையமைப்பு எடுத்துக்காட்டுகள் மற்றும் நெறிமுறைகள் Sample Question Papers Study Material - QB365 Set A
NEW12th Standard
TN 12th Computer Applications கணினி வலையமைப்பு ஓர் அறிமுகம் Sample Question Papers Study Material - QB365 Set A
NEW12th Standard
TN 12th Computer Applications PHP-உடன் MySQL-ஐ இணைத்தல் Sample Question Papers Study Material - QB365 Set A



Tamilnadu Stateboard 12th Standard Subjects

Maths

Chemistry

Physics

Biology

Computer Science

Business Maths and Statistics

Economics

Commerce

Accountancy

History
Computer Applications
Biology
Computer Technology
Computer Applications
Computer Science
Business Maths and Statistics
Commerce
Economics
Maths
Chemistry
Physics
Computer Technology
History
Accountancy

Tamil

English

French
Tamilnadu Stateboard Standards
