
 100% FREE ACCESS
12th Standard Syllabus & Materials
12th Standard
TN 12th Computer Applications மின்னணு தரவு பரிமாற்றம் Sample Question Papers Study Material - QB365 Set A
NEW12th Standard
TN 12th Computer Applications மின் - வணிக பாதுகாப்பு அமைப்புகள் Sample Question Papers Study Material - QB365 Set A
NEW12th Standard
TN 12th Computer Applications மின்னணு செலுத்தல் முறைகள் Sample Question Papers Study Material - QB365 Set A
NEW12th Standard
TN 12th Computer Applications மின் - வணிகம் Sample Question Papers Study Material - QB365 Set A
NEW12th Standard
TN 12th Computer Applications திறந்த மூல கருத்துருக்கள் Sample Question Papers Study Material - QB365 Set A
NEW12th Standard
TN 12th Computer Applications வலையமைப்பு வடமிடல் Sample Question Papers Study Material - QB365 Set A

Published on: 05/09/2022
QB365 provides a detailed and simple solution for every Possible Creative Questions in Class 12 Computer Technology Subject - Adobe InDesign CC 2019, English Medium. It will help Students to get more practice questions, Students can Practice these question papers in addition to score best marks.
Download Tamil Nadu 12th Standard Computer Technology question papers, model tests, one-mark questions, important questions, and public exam papers in PDF format. Free study materials and answer keys for TN State Board students.
Questions + Answers key
Take MCQ Computer Technology Test
1.
Write in detail about the various alignment in formatting paragraph?
2.
How will you transform an object?
3.
Explain in detail about the printing the documents?
1.
| Type of alignment | Description | |
 |
Align left | Lines are aligned on the left border of a text box. |
 |
Align center | Lines are centered between the left and right borders of a text box. |
 |
Align right | Lines are aligned on the right border of a text box. |
 |
Justify with last line aligned left | Lines are evenly distributed so that they align on both the right and left borders of a text frame. The last line in the paragraph is aligned on the left border. |
 |
Justify with last line aligned right | Lines are evenly distributed so that they align on both the right and left borders of a text frame. The last line in the paragraph is aligned on the right border. |
 |
Justify with last line aligned centered |
Lines are evenly distributed so that they align on both the right and left borders of a text frame. The last line in the paragraph is centered. |
 |
Justify all lines | Lines are evenly distributed so that they align on both the right and left borders of the text box. |
 |
Align towards spine | Used with left and right pages; text in a text box on a left page is right-aligned and any text that flows onto a right page is left-aligned. |
 |
Align away from spine | Used with left and right pages; text in a text box on a left page is left-aligned and any text that flows onto a right page is right-aligned. |
2.
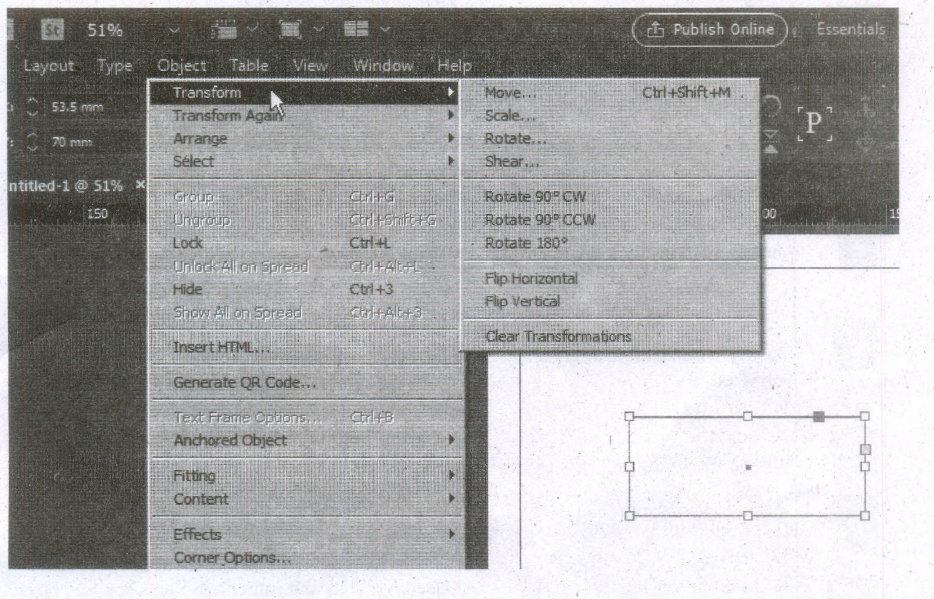
(i) Transform is a term used to describe the act of moving an object, scaling it, skewing it, or rotating it. You can do all of the above in the Transform or Control panels.
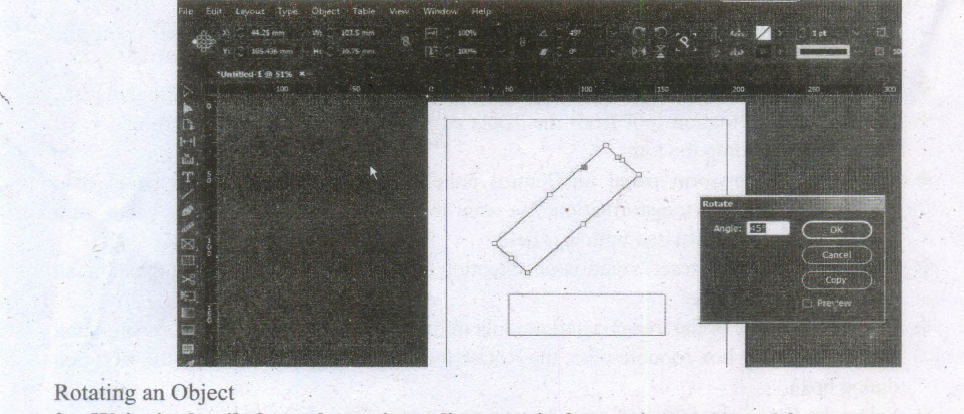
(ii) When you transform something, you change its appearance. For example, you can rotate an object 450 or scale an object 50% to make it half its original size.
(iii) The Transform commands in InDesign include Move, Scale, Rotate, Shear, and Flip. You can also transform objects using buttons on the Transform panel or the Control panel.
(iv) You can change the width and height of an object and its location on the page. Before you transform an object, you choose a reference point from which to transform it.
(v) This point is called the point of origin, and it is the point of the selected object that remains fixed during the transformation.
Transformation Basics:
There are many ways to transform an object in InDesign. Select the object using the Selection tool, then:
(i) Drag a selection handle to scale the object (but not necessarily the contents of that object).
(ii) Select a transformation tool from the Tools panel, set the center of transformation (if necessary), and drag the tool.
(iii) Display the Transform panel or Control panel and enter values in the panel field corresponding to the transformation you want to apply or choose a preset value from the pop-up menu associated with that field.
(iv) Choose one of the "preset" rotation or reflection options from the Transform panel menu or Control panel menu.
(v) Double-click one of the transformation tools in the Toolbox to display the corresponding transform dialog box (double-click the Rotate tool, for example, to display the Rotation dialog box).
(vi) Select the Free Transform tool, and drag the tool around the object.
(vii) Press keyboard shortcuts. There's no "right" or "best" way to do transformations-you can experiment with the different methods and see which you like best. We change methods depending on the situation (and our mood).
3.
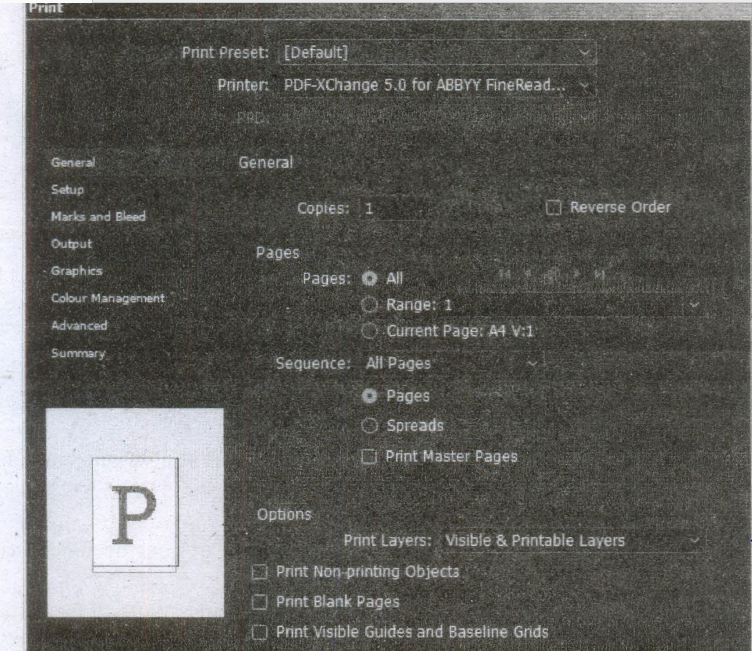
(i) When you press Ctrl-P, InDesign displays the Print dialog box.
(ii) There are so many features packed into this dialog box that Adobe had to break it up into eight different panes, each listed along the left side of the dialog box:
(iii) General, Setup, Marks and Bleeds, Output, Graphics, Color Management, Advanced, and Summary.
Printers:
(i) Before you go anywhere in the Print dialog box, you've got to make one or two important decisions.
(ii) First, you must choose from the options on the Printer pop-up menu, which lists the printers you have installed on your computer.
(iii) When you choose a printer, InDesign looks to the printer driver to see what PPD (PostScript Printer Description) file is associated with that printer, and it displays it-grayed out-in the PPD pop-up menu. In the case of a non-PostScript device, InDesign leaves this pop-up menu blank.
General:
The General pane of the Print dialog box contains basic printing features: which pages do you want to print, how many copies do you want, and how do you want them to come out of the printer.

Copies:
(i) Enter the number of copies of page you want to print in the Copies field. You can print up to 9999 copies of your publication.
Collate:
(i) When you turn on the Collate option, InDesign prints the range of pages you've specified, in order, for each copy of the publication you print. This makes for much slower printing.
(ii) When you print multiple copies of a page, your printer only needs to process each page once (and then prints multiple copies of the page using the same image);
(iii) when you turn on the Collate option, your printer must process each page once for every copy of the print job.
Reverse Order:
(i) When you print a multipage document, do you want the first page to come out first or last? Turning on the Reverse Order check box tells InDesign to print the last page first, then print "backwards" to the first page.
(ii) You'll want to turn this on if your pages come out of the laser printer face up.
Page Ranges:
(i) Turn on the All Pages option to print all of the pages in the publication.
(ii) To print a range of pages, turn on the Rang option. Enter the page range in the Range field as shown in the following Table.
| jka To print | dfdN Enter M | Example |
| A continuous range of pages | first page - last page | 12-21. |
| Up to a specific page | -last page | -5 |
| From a page to the end of the document | first page - | 5- |
| Non-contiguous pages | page, page | 1, 3 |
| Mixed page ranges | page, range | -3, 6-9, 12, 15- |
| Pages by section | section.page | Sec1:1, Sec2:5 |
Sequence:
(i) To print even and odd pages, select the All Pages option from the Sequence pop-up menu; to print even pages, select Even Pages Only; and to print odd pages select Odd Pages Only.
(ii) These choices affect all page ranges, including page ranges you've entered in the Range field.
Print Master Pages:
(i) Sometimes you need to print your master pages instead of your document pages. No problem: Just turn on the Print Master Pages check box.
(ii) When you do this, you cannot specify page ranges. InDesign prints all the master pages in the document.
Print Blank Pages:
(i) What happens when you print a three-page document that has nothing. on page 2? By default, only pages 1 and 3 print out. If you want the blank page 2 to print, too, you'd better turn on the Print Blank Pages check box.
Print:
(i) Finally press the Print button to print the document.

12th Standard Syllabus & Materials
12th Standard
TN 12th Computer Applications களப்பெயர் முறைமை (DNS) Sample Question Papers Study Material - QB365 Set A
NEW12th Standard
TN 12th Computer Applications வலையமைப்பு எடுத்துக்காட்டுகள் மற்றும் நெறிமுறைகள் Sample Question Papers Study Material - QB365 Set A
NEW12th Standard
TN 12th Computer Applications கணினி வலையமைப்பு ஓர் அறிமுகம் Sample Question Papers Study Material - QB365 Set A
NEW12th Standard
TN 12th Computer Applications PHP-உடன் MySQL-ஐ இணைத்தல் Sample Question Papers Study Material - QB365 Set A



Tamilnadu Stateboard 12th Standard Subjects

Maths

Chemistry

Physics

Biology

Computer Science

Business Maths and Statistics

Economics

Commerce

Accountancy

History
Computer Applications
Biology
Computer Technology
Computer Applications
Computer Science
Business Maths and Statistics
Commerce
Economics
Maths
Chemistry
Physics
Computer Technology
History
Accountancy

Tamil

English

French
Tamilnadu Stateboard Standards
