
 100% FREE ACCESS
12th Standard Syllabus & Materials
12th Standard
TN 12th Maths Applications of Matrices and Determinants Sample Question Papers Study Material - QB365 Set A
NEW12th Standard
TN 12th Computer Applications மின்னணு தரவு பரிமாற்றம் Sample Question Papers Study Material - QB365 Set A
NEW12th Standard
TN 12th Computer Applications மின் - வணிக பாதுகாப்பு அமைப்புகள் Sample Question Papers Study Material - QB365 Set A
NEW12th Standard
TN 12th Computer Applications மின்னணு செலுத்தல் முறைகள் Sample Question Papers Study Material - QB365 Set A
NEW12th Standard
TN 12th Computer Applications மின் - வணிகம் Sample Question Papers Study Material - QB365 Set A
NEW12th Standard
TN 12th Computer Applications திறந்த மூல கருத்துருக்கள் Sample Question Papers Study Material - QB365 Set A

Published on: 01/03/2021
12th Standard English Medium Computer Technology Reduced Syllabus Annual Exam Model Question Paper - 2021
Download Tamil Nadu 12th Standard Computer Technology question papers, model tests, one-mark questions, important questions, and public exam papers in PDF format. Free study materials and answer keys for TN State Board students.
Questions + Answers key
Take MCQ Computer Technology Test
1.
What Is Multimedia?
2.
What is meant by bitmaps?
3.
Name the menus in the pagemaker?
4.
Which Function key turns the OSNAP feature on and off?
5.
What is the purpose of Timeline?
6.
Classify the IMAGE component in multimedia.
7.
What is an object in CorelDRAW?
8.
Write the steps for opening and closing the tools panel.
9.
What is text block?
10.
Write about flash tool panel?
11.
Give the shortcuts of the following?
1. New
2. Open
3. Import
4. Export
5. Print
12.
How will open and close the tools panels?
13.
How will you magnify the part of a page by dragging?
14.
Explain the use of the LINE Undo option.
15.
Write roles and responsibilities of Production team members.
16.
What do you do to convert a line into an arrow?
17.
Explain briefly how you can create an object.
18.
How do you rejoin split blocks?
19.
Explain Do You Shoot Raw Or Jpeg?
20.
Write in detail about the various alignment in formatting paragraph?
21.
How will you work will the pagemaker pages?
22.
What are the shortcut keys for the tools in the pagemaker?
23.
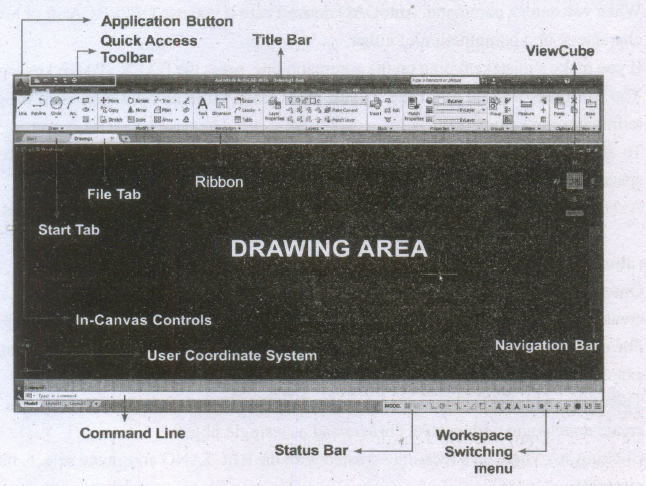
Write about AutoCAD Interface.
24.
Describe some of the tools displayed in Tools Panel.
25.
Explore the opportunities Animation filed movie industry.
26.
Write the steps to draw a grid.
27.
Write the steps to create type on a path.
28.
Explain the tools in PageMaker toolbox.
29.
The step in production is performed to add more detailed to your scene.
Improvement of design
Action Scripting
Polishing
Create a storyboard
30.
The____________ master controls the format and placement of the titles and text you type on slides, as well as, background items and graphics you want to appear on every slide
slide
copyright
layout
design
31.
Primary uses of business interactive multimedia include all of the following except
Product demonstrations
Web page development
Entertainment
High-quality presentations
32.
You can create preset guidelines using the _________?
Replace wizard
Options dialog box
Collect for output option
None
33.
The ________ is located directly beneath the Application bar and above the horizontal ruler.
Bleed and Slug
InDesign CC 2019
Application bar
Control panel
34.
Which of the following is not an example for library?
Company logos
legal jargon
contact information
Image editors
35.
Choose the correct option:
Assertion: The main components of the above window are Title bar, Menu bar, Toolbar, Ruler, Scroll bars and Text area.
Reason: The Minimize button the document window is minimised to a small icon and kept in the task bar, Maximise button is used for maximising the current document window to fit the whole screen area, and the Close button closes the software itself.
Both (A) and (R) are true and (R) explains (A)
Both (A) and (R) are true and (R) does not explains (A)
(A) is true, but (R) is false
(A) is false, but (R) is true.
36.
Which of these software can be a master page?
PageMaker
Painting
Photoshop
All of these
37.
Which menu of Page Maker contains the font option?
layout
type
utilities
element
38.
Which menu contains the Document Setup command
Edit
File
View
Document
39.
UCS is short for
User Coordinate System
User Currency System
User Control System
User Computer System
40.
The tool used to draw brush-like strokes as is you were painting is known as
Brush Tool
Lasso Tool
Text Tool
Zoom Tool
41.
RTF file format was introduced by ________
TCS
Microsoft
Apple
IBM
42.
Which tool is used to draw a circle?
Shape tool
Ellipse tool
Rectangle tool
Crop tool
43.
A _________ is a graduated blend of two or more colors.
Gradient
Color Mix
Color Palette
none
1.
Multimedia is simply multiple forms of media integrated together. Media can be text, graphics, audio, animation, video, data, etc
2.
(i) Bitmaps are also known as raster images.
(ii) They are composed of small squares called pixels.
(iii) Each pixel is mapped to a location in an image and has numerical colour values.
3.
File, Edit, Layout, Type, Element, Utilities, View, Window, Help.
4.
(i) If the SNAP MODE button is chosen, the, snap mode will turn ON.
(ii) When snap is on, the cursor under mouse control can only be moved in jumps from one snap point to another.
(iii) The F9 key acts as a toggle key to turn the snap off or on.
5.
(i) Timeline is the record of every frame, layer and scene that makes up a movie.
(ii) It controls and organizes the movie's content over time using layers and frames.
6.
(i) Images acts as an vital component in multimedia.
(ii) These images are generated by the computer in two ways, as bitmap or raster images and as vector images.
7.
An object is an element in a drawing such as an image, shape, line, text, curve, symbol, or layer.
8.
To open or close the Tools panel
(i) Choose Window > Tools to close the Tools panel.
(ii) To reopen the Tools panel, choose Window > Tools again. (or)
(iii) Press Tab key (with any tool but the Type tool selected) to close all open panels, including the Tools panel.
(iv) To reopen those panels, press Tab again.
(v) We can also close a floating Tools panel by clicking its Close box.
9.
In PageMaker the text of the document can be typed inside a text block.
10.
(i) The Flash Tools panel includes the tools you need to create, select, or edit graphics on the Stage.
(ii) The double, arrows at the top of the Tools panel are used to collapse the panel to icon only view, or to expand the panel and see all the tools.
(iii) By default, the toolbar is on the right side of your screen.
11.
1. New - Ctrl + N
2. Open - Ctrl + O
3. Import - Ctrl + I
4. Export - Ctrl + E
5. Print - Ctrl + P
12.
To open or close the Tools panel
(i) Choose Window > Tools to close the Tools panel. To reopen the Tools panel, choose Window > Tools again. (or)
(ii) Press Tab key (with any tool but the Type tool selected) to close all open panels, including the Tools panel. To reopen those panels, press Tab again.
(iii) We can also close a floating Tools panel by clicking its Close box.
13.
To magnify part of a page by dragging:
i) Select the zoom tool.
ii) Drag to draw a marquee around the area you want to magnify.
iii) To zoom in or out while using another tool:
Press Ctrl+Spacebar to zoom in. Press Ctrl+Alt+Spacebar to zoom out
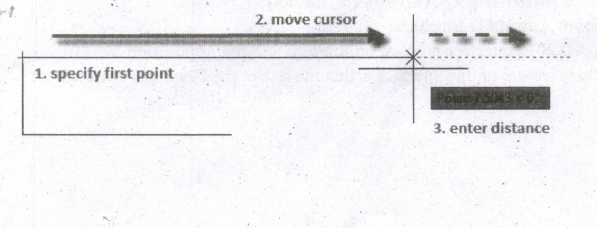
14.
The following prompts are displayed.
Specify first point
(i) Sets the starting point for the line.
(ii) Click a point location.
(iii) With object snaps or grid snap turned on, the points will be placed precisely.
(iv) You can also enter coordinates.
(v) If instead, you press Enter at the prompt, a new line starts from the endpoint of the most recently created line, polyline, or arc.
(vi) If the most recently created object is an arc, its endpoint defines the starting point of the line.
(viii) The line is tangent to the arc.
Specify next point
(i) Specifies the endpoint of the line segment.
(ii) You can also use polar and object snap tracking together with direct distance entry.
Close
Connects the first and last segments.
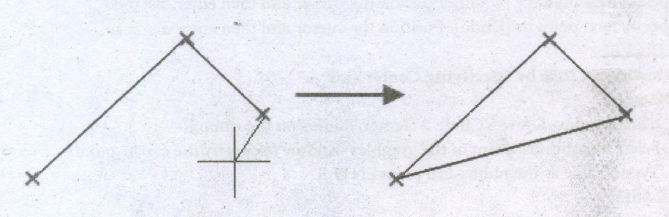
Undo
Removes the most recent segment of a line sequence.
15.
Production Manager
(i) In a multimedia production, the role of production manager is to define, and coordinate, the production of the multimedia project in time and with full quality.
(ii) The production manager should be an expertise in the technology expert, good at proposal writing, good communication skills and budget management skills.
(iii) Also must have experience in human resource management and act as an efficient team leader.
Content Specialist
(i) Content specialist is responsible for performing all research activities concerned with the proposed application's content.
(ii) Program content refers to projects information, graphics, data or facts presented through the multimedia production.
Script Writer
(i) Video and film scripts represents a linear sequence of events.
(ii) The script writer visualizes the concepts in three dimensional environments and if needed uses the virtual reality integration into the program.
16.
To add arrowhead to a line
(i) Using the Freehand tool draw a line.
(ii) Select the line.
(iii) Click the drop-down button on the End Arrowhead Selector on the Property tool bar.
(iv) Then click the desired arrow tip.
Now the line appears with an arrow.
You can set the line style, width, and the colour of the line using the Properties bar.
17.
Creating an Object:
(i) Shapes can add visual interest to a document and serve as a background for text.
(ii) The tools for creating shapes include the Rectangle, Ellipse, and Polygon tools.
(iii) To select a shape tool, click and hold down the mouse button on the Rectangle tool (or currently selected shape tool) on the Tools panel, and then select the shape tool you want to use.
(iv) With a shape tool selected, you can create a shape manually by dragging in the document, or you can click in the document to open the shape's dialog box and define its settings.
(v) You use the Swatches panel to add color to the fill and stroke (border) of your shape, and the Stroke panel to change the weight (thickness) and style of the stroke.
18.
Rejoining split blocks To rejoin the two text blocks
1. Place the cursor on the bottom handle of the second text block, click and drag the bottom handle up to the top.
2. Then place the cursor on the bottom handle of the first text block, and click and drag the bottom handle down if necessary.
19.
(i) I shoot entirely in RAW, basically as a just in case, but I extract the JPGs from my RAW files in Photo Mechanic and edit those.
(ii) Most of the. RAW files will never see the light of day, unless there is a great shot that was extremely over-/under-exposed,
(iii) I prefer this method because it allows me to have the security of RAW while getting all the great color, contrast, and vibrancy of an in-camera JPG.
20.
| Type of alignment | Description | |
 |
Align left | Lines are aligned on the left border of a text box. |
 |
Align center | Lines are centered between the left and right borders of a text box. |
 |
Align right | Lines are aligned on the right border of a text box. |
 |
Justify with last line aligned left | Lines are evenly distributed so that they align on both the right and left borders of a text frame. The last line in the paragraph is aligned on the left border. |
 |
Justify with last line aligned right | Lines are evenly distributed so that they align on both the right and left borders of a text frame. The last line in the paragraph is aligned on the right border. |
 |
Justify with last line aligned centered |
Lines are evenly distributed so that they align on both the right and left borders of a text frame. The last line in the paragraph is centered. |
 |
Justify all lines | Lines are evenly distributed so that they align on both the right and left borders of the text box. |
 |
Align towards spine | Used with left and right pages; text in a text box on a left page is right-aligned and any text that flows onto a right page is left-aligned. |
 |
Align away from spine | Used with left and right pages; text in a text box on a left page is left-aligned and any text that flows onto a right page is right-aligned. |
21.
(i) The main purpose of PageMaker is composing pages. You can insert new pages into a document, remove existing pages, move between pages, and sort pages in a large document.
Going to a specific Page:
PageMaker provides several methods for navigating the pages in your publication.
Method 1:
(i) You can move from one page to another by using the Page up and Page down keys on your keyboard.
(ii) This is probably the navigation methods you will use most often.
Method 2:
(i) You can move from one page to another by using the page icons. at the left bottom of the screen. Click on the page icon that corresponds to the page that you want to view. The page is displayed.
Method 3:
Using the Go to Page dialog box. Refer Figure 1.52 and 1.53
To go to a specific page in a document.
(i) Choose Layout > Go to Page in the menu bar (or) Press Alt + Ctrl + G in the keyboard.
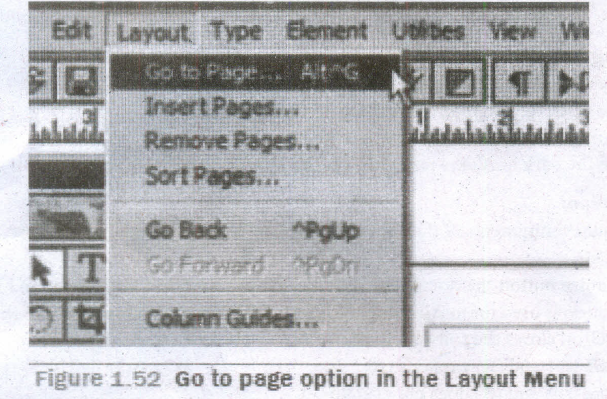
Go to page option in the Layout Menu
Now the Go to Page dialog box appears.
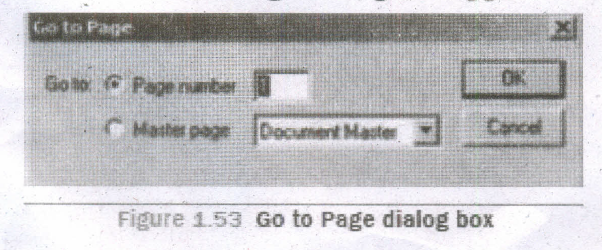
Go to Page dialog box
(i) In the dialog box, type the page number that you want to view.
(ii) Then click on OK button. The required page is displayed on the screen.
22.
Table 1.1 Keyboard Shortcuts
| S. No. | Tools | Keyboard Shortcut |
| 1. | Pointer Tool | F9 |
| 2. | Rotating Tool | Shift + F2 |
| 3. | Line Tool | Shift + F3 |
| 4. | Rectangle Tool | Shift + F4 |
| 5. | Ellipse Tool | Shift + F5 |
| 6. | Polygon Tool | Shift + F6 |
| 7. | Hand Tool | Shift + Alt + Drag Left mouse button |
| 8. | Text Tool | Shift + AIt + F1 |
| 9. | Cropping Tool | Shift + Alt + F2 |
| 10. | Constrained Line Tool | Shift + Alt + F3 |
| 11. | Rectangle Frame Tool | Shift + Alt + F4 |
23.
The AutoCAD 2016 interface is based on Ribbons and the Application Menu,
The important feature of this interface is that the size of the Graphical Area will be bigger.
24.
The Flash Tools panel includes the tools you need to create, select, or edit graphics on the Stage.
(i) The double arrows at the top of the Tools panel are used to collapse the panel to icon only view, or to expand the panel and see all the tools.
(ii) By default, the toolbar is on the right side of your screen.
(iii) The single capital letter in parentheses indicates tile keyboard shortcuts to select those tools.
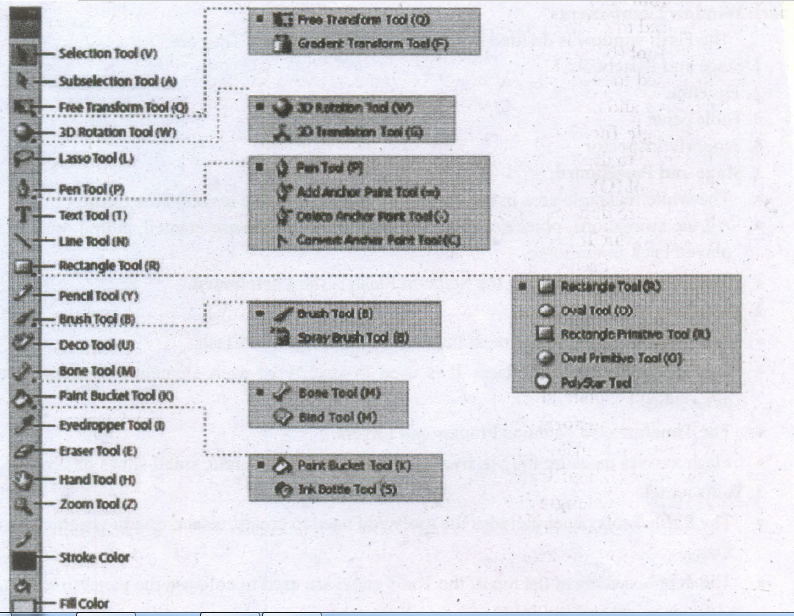
3D Rotation Tool (W)
It is used to create 3D effects by rotating movie clips in 3D space on the Stage.
3D Translation Tool (G)
It is used to create 3D effects by moving movie clips in 3D space on the Stage. The 3D Rotation and the 3D Translation tools are grouped within one icon on the Tools panel.
Lasso Tool (L)
It is used to select objects or parts of objects by drawing a freehand.
Pen Tool (P)
It is used to draw lines and curves by creating a series of dots, known as anchor points, that are automatically connected. Other tools used to add, delete, and convert the anchor points created by the Pen tool are grouped with the Pen tool.
Text Tool (T)
It is used to create and edit text.
Line Tool (N)
It is used to draw straight lines. You can draw vertical, horizontal, and 45° diagonal lines by pressing and holding Shift key while drawing the line.
Rectangle Tool(R)
It is used to draw rectangular shapes. Press and hold Shift key to draw a perfect square.
Oval Tool (O)
It is used to draw oval shapes. Press and hold Shift key to draw a perfect circle.
Subselection Tool (A)
This tool is used to select, drag, and reshape an object. We know that vector graphics are composed of lines and curves (each of which is a segment) connected by anchor points. When you select art object with this tool, it displays the anchor points and allows you to use them to edit the object.
Free Transform Tool (Q)
It is used to rotate, scale, skew, and distort objects.
Gradient Transform Tool (F)
It is used to transform a gradient fill by adjusting the size, direction, or center of the fill. The Free and Gradient Transform tools are grouped within one icon on the Tools panel.
Primitive Rectangle and Oval (R)
It is used to draw objects with properties such as corner radius or inner radius, that can be changed using the Properties panel.
PolyStar Tool
It is used to draw polygons and stars. The Rectangle, Oval, Primitive, and PolyStar tools are grouped within one tool on the Tools panel.
25.
(i) The remarkable advancement in the entertainment industry is due to the Multimedia Technology mainly
(ii) This technology is needed in all mode of entertainment like radio, TV, online gaming, video on demand etc.
(iii) Video on demand or movies on demand is a service that provides movies to television sets on an individual basis at homes.
(iv) Movies are stored in a central server and transmitted through a communication network.
(v) A set-top box connected to the communication network converts the digital information to analog signals and inputs it to the television set.
26.
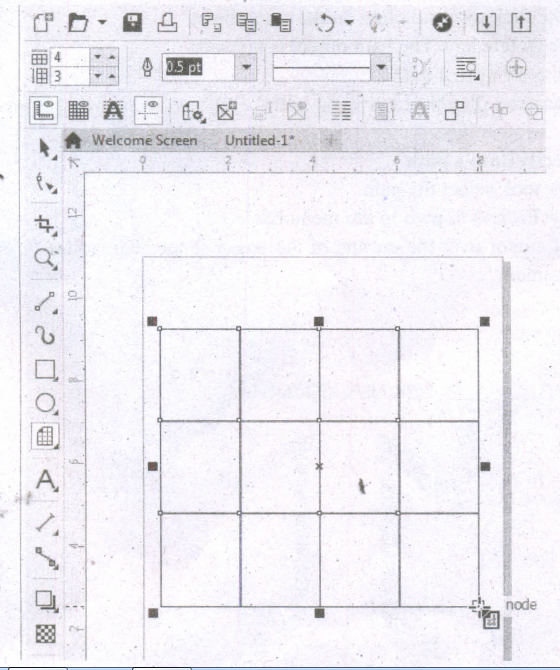
Drawing Grids
Using Graph Paper tool, you can draw a grid and set the number of rows and columns. A grid is a grouped set of rectangles that you can break apart.
To draw a grid,
1. Click and hold the Polygon tool. A flyout menu will appear.
2. Select the Graph Paper tool from the flyout menu.
3. Now type values in the top and bottom portions of the Columns and rows box on the property bar. The value you type in the top portion of the Columns and rows box specifies the number of columns; the value you type in the bottom portion specifies the number of rows.
4. Click on anywhere in the drawing area where you want the grid to appear.
5. Drag diagonally to draw the required grid.
If you want to draw the grid from its center point outward, hold down Shift key as you drag; if you want to draw a grid with square cells, hold down Ctrl key as you drag.
27.
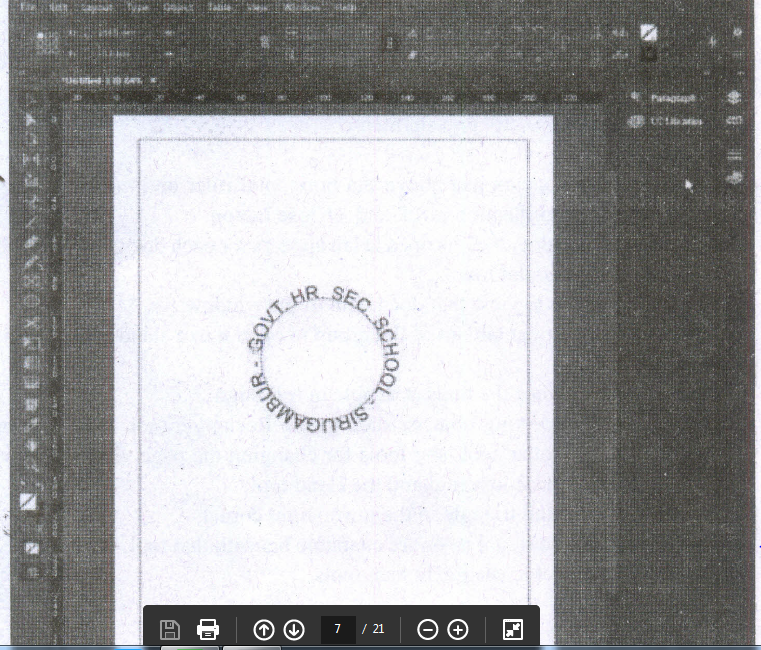
Creating Path Type
(i) With the Type on a Path tool, you can add type along the inner or outer edge of a path.
(ii) You can place the text on either side of the path, but not on both.
(iii) If you initially place it on the inner part of the path, you can always move it to the outer part of the path later.
(iv) When you select text on a path, brackets appear that you can drag to adjust the position and placement of the text.
Create Type on a Path
1. Select the Type on a Path tool on the Tools panel.
2. Click on the edge of the path (closed or open) to which you want to add type. A flashing insertion point appears in the text frame. Any fill or stroke on the object is removed.
3. Type some text. The text automatically wraps to the shape of the text frame. Don't press Enter key. The type appears along the edge of the object, conforms to its shape, and removes the fill and stroke. If the overflow symbol appears, deselect the text frame, select the Direct Selection tool on the Tools panel, and then drag a corner to reshape the text frame.
4. Select a Selection tool or select the Type tool again.
28.
Tool Toolbox Cursor Use
| Pointer Tool | Used to select, move, and resize text objects and graphics |
| Text tool | Used to type, select, and edit text. |
| Rotating tool | Used to select and rotate objects |
| Cropping tool | Used to trim imported graphics. |
| Line tool | Used to draw straight lines in any direction. |
| Constrained line tool | Used to draw vertical or horizontal lines. |
| Rectangle frame tool | Used to create rectangular placeholders for text and graphics. |
| Ellipse tool | Used to draw circles and ellipses. |
| Ellipse frame tool | Used to create elliptical placeholders for text and graphics. |
| Polygon tool | Used to draw polygons. |
| Polygon frame tool | Used to create polygonal placeholders for text and graphics. |
| Hand tool | Used to scroll the page (an alternative to the scroll bar) |
| Zoom tool | Used to magnify or reduce an area of the page |
29.
(b)
Action Scripting
30.
(d)
design
31.
(c)
Entertainment
32.
(b)
Options dialog box
33.
(d)
Control panel
34.
(d)
Image editors
35.
(a)
Both (A) and (R) are true and (R) explains (A)
36.
(a)
PageMaker
37.
(b)
type
38.
(b)
File
39.
(a)
User Coordinate System
40.
(a)
Brush Tool
41.
(b)
Microsoft
42.
(b)
Ellipse tool
43.
(a)
Gradient

12th Standard Syllabus & Materials
12th Standard
TN 12th Computer Applications வலையமைப்பு வடமிடல் Sample Question Papers Study Material - QB365 Set A
NEW12th Standard
TN 12th Computer Applications களப்பெயர் முறைமை (DNS) Sample Question Papers Study Material - QB365 Set A
NEW12th Standard
TN 12th Computer Applications வலையமைப்பு எடுத்துக்காட்டுகள் மற்றும் நெறிமுறைகள் Sample Question Papers Study Material - QB365 Set A
NEW12th Standard
TN 12th Computer Applications கணினி வலையமைப்பு ஓர் அறிமுகம் Sample Question Papers Study Material - QB365 Set A



Tamilnadu Stateboard 12th Standard Subjects

Maths

Chemistry

Physics

Biology

Computer Science

Business Maths and Statistics

Economics

Commerce

Accountancy

History
Computer Applications
Biology
Computer Technology
Computer Applications
Computer Science
Business Maths and Statistics
Commerce
Economics
Maths
Chemistry
Physics
Computer Technology
History
Accountancy

Tamil

English

French
Tamilnadu Stateboard Standards
