
 100% FREE ACCESS
12th Standard Syllabus & Materials
12th Standard
TN 12th Computer Applications மின்னணு தரவு பரிமாற்றம் Sample Question Papers Study Material - QB365 Set A
NEW12th Standard
TN 12th Computer Applications மின் - வணிக பாதுகாப்பு அமைப்புகள் Sample Question Papers Study Material - QB365 Set A
NEW12th Standard
TN 12th Computer Applications மின்னணு செலுத்தல் முறைகள் Sample Question Papers Study Material - QB365 Set A
NEW12th Standard
TN 12th Computer Applications மின் - வணிகம் Sample Question Papers Study Material - QB365 Set A
NEW12th Standard
TN 12th Computer Applications திறந்த மூல கருத்துருக்கள் Sample Question Papers Study Material - QB365 Set A
NEW12th Standard
TN 12th Computer Applications வலையமைப்பு வடமிடல் Sample Question Papers Study Material - QB365 Set A

Published on: 01/03/2021
12th Standard English Medium Computer Technology Reduced Syllabus Five mark Important Questions with Answer key - 2021(Public Exam)
Download Tamil Nadu 12th Standard Computer Technology question papers, model tests, one-mark questions, important questions, and public exam papers in PDF format. Free study materials and answer keys for TN State Board students.
Questions + Answers key
Take MCQ Computer Technology Test
1.
How will you draw a oval using oval tool?
2.
Explain Do You Shoot Raw Or Jpeg?
3.
How Can I View Video Files On The Web Site?
4.
How Do I Change My Home Page?
5.
What Are The Multimedia Authoring Tools?
6.
How will you transform an object?
7.
How will you work will the pagemaker pages?
8.
Mention the shortcut using keyboard movement keys?
9.
How will you connert text in a text block to a frame?
10.
What are the shortcut keys for the tools in the pagemaker?
11.
Write briefly about Command window.
12.
Describe some of the tools displayed in Tools Panel.
13.
Explain the components used in Flash Window.
14.
Explain about different file formats in multimedia files.
15.
Explore the opportunities Animation filed movie industry.
16.
Explain in detail Techniques of Animation.
17.
Explain in detail Process of Multimedia.
18.
Write the steps to draw a grid.
19.
How to create a star in CorelDRAW?
20.
Write the steps to draw a polygon.
21.
How can you insert picture in a graphic frame? Write the steps.
22.
Write the steps to create type on a path.
23.
Write the steps to create a new document in InDesign.
24.
How can you convert text in a text block to a frame?
25.
Explain the tools in PageMaker toolbox.
1.
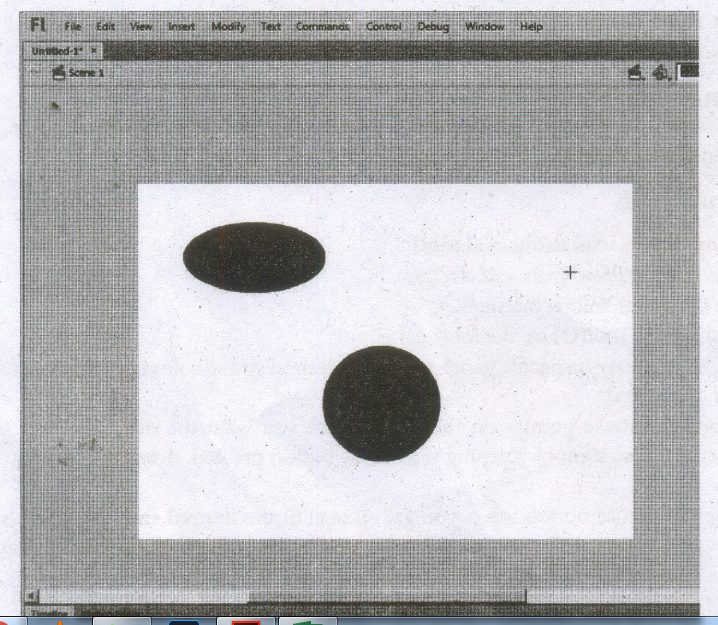
This tool is used to draw ovals and circles.
To use the Oval tool, follow the steps.
1. Click the Oval Tool( O) on the tools panel.
2. From the Property Inspector panel, select the desired stroke colour, thickness, style and fill colour of the oval.
3. Position the mouse pointer on the stage where you want the oval. The mouse pointer changes to a plus sign(+). Keeping the mouse button pressed, drag the mouse to draw the oval.
4. Release the mouse button when you get an oval of the desired size. You can also draw a circle using the Oval Tool by just pressing and holding the Shift key while dragging the mouse.
2.
(i) I shoot entirely in RAW, basically as a just in case, but I extract the JPGs from my RAW files in Photo Mechanic and edit those.
(ii) Most of the. RAW files will never see the light of day, unless there is a great shot that was extremely over-/under-exposed,
(iii) I prefer this method because it allows me to have the security of RAW while getting all the great color, contrast, and vibrancy of an in-camera JPG.
3.
There are two ways to view the online video clips.
Because of variations in browsers and operating systems, both methods might not work for all individuals. However, one of the two methods should work if you have the Windows Media Player installed.
1. Click on the link to the video. Depending on what your plug-in settings are in your browser, Windows Media Player may launch. and begin downloading the video clip. The video should begin to play after enough is downloaded for it to play smoothly.
2. Right click (PC) or click and hold (Mac) the link to the video. Choose "Save Target As .." (It) or "Save Link As ..." (Netscape) to save the file. Make sure that the correct file type is selected in the drop down list below the file name. After the file has been saved to your computer, double click on it to launch it in Windows Media Player. If your computer is not set up to launch the player upon double clicking, first open Windows Media Player and then choose "File" and "Open" to load the video clip. Press the play button to begin playing.
4.
Internet Explorer for Windows.
(i) Browse normally to the web page you want as your home page.
(ii) Pull down the "Tools" menu of Internet Explorer.
(iii) Select "Internet Options."
(iv) The "General" tab appears.
(v) You'll see the "Home page" box at the top.
(vi) Click the "Use Current" button in that box.
(vii) Click "OK."
(viii) Close and open Internet Explorer. You should see your new home page.
5.
Multimedia authoring tools make it easier to create full scale multimedia projects.
Fortunately, there are assortments of tools available to choose from.
1. Apple Media Tool
2. Astound
3. Asymmetric Multimedia ToolBook1
4. Authorware
5. Cinemation
6. Course Builder
7. CT Professional
8. Digital Chisel
9. Director
10. Director Multimedia Studio
11. FireWalker
12. Formula Graphics
13. HM-Card Hypermedia Authoring System
14. HyperCard
15. HyperPlus
16. Hyperstudio
17. HyperWriter
18. IconAuthor
19. Klik & Play
20. MediaLink
21. MM100
22. MovieWorks Interactive
23. mPower
24. mTropolis
25. Oracle Media Objects
26. Ozone
27. Pegasus
28. PowerMedia for Visual Basic
29. Quest
30. Shockwave
31. ShowBasic
32. Special Delivery
33. SuperCard
6.
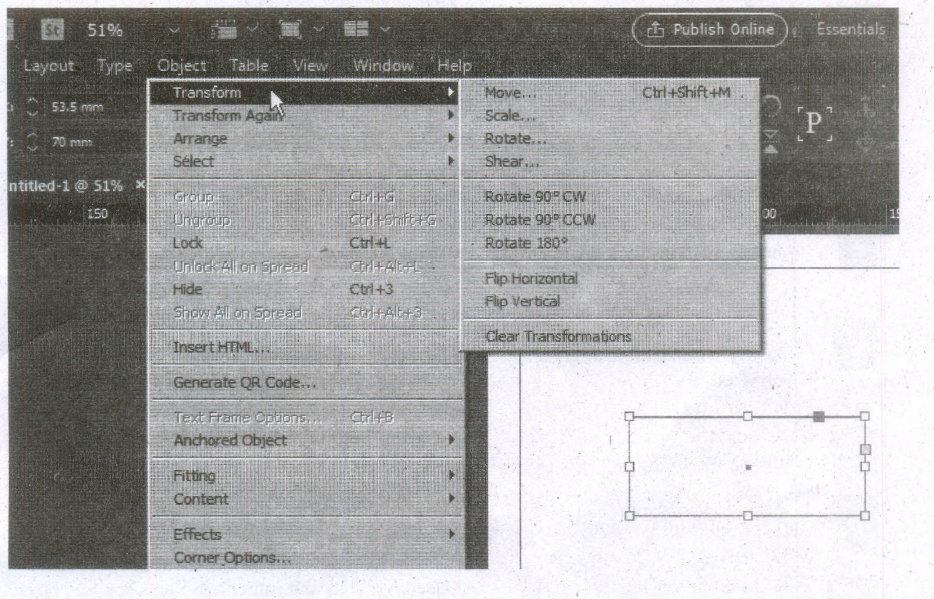
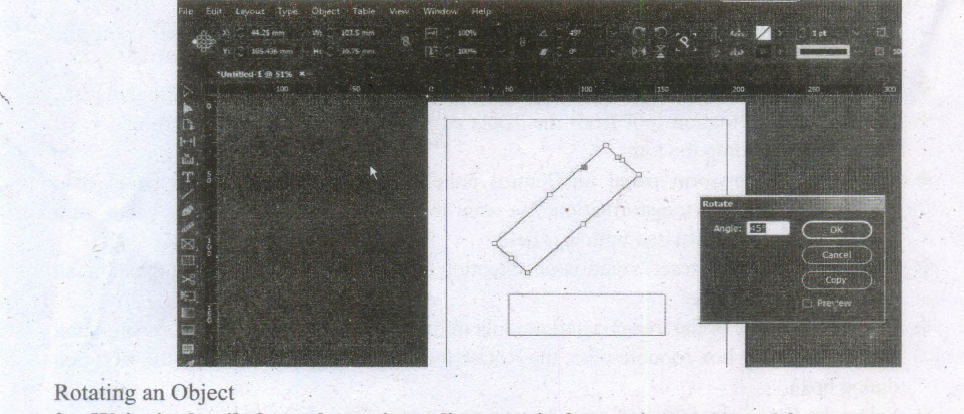
(i) Transform is a term used to describe the act of moving an object, scaling it, skewing it, or rotating it. You can do all of the above in the Transform or Control panels.
(ii) When you transform something, you change its appearance. For example, you can rotate an object 450 or scale an object 50% to make it half its original size.
(iii) The Transform commands in InDesign include Move, Scale, Rotate, Shear, and Flip. You can also transform objects using buttons on the Transform panel or the Control panel.
(iv) You can change the width and height of an object and its location on the page. Before you transform an object, you choose a reference point from which to transform it.
(v) This point is called the point of origin, and it is the point of the selected object that remains fixed during the transformation.
Transformation Basics:
There are many ways to transform an object in InDesign. Select the object using the Selection tool, then:
(i) Drag a selection handle to scale the object (but not necessarily the contents of that object).
(ii) Select a transformation tool from the Tools panel, set the center of transformation (if necessary), and drag the tool.
(iii) Display the Transform panel or Control panel and enter values in the panel field corresponding to the transformation you want to apply or choose a preset value from the pop-up menu associated with that field.
(iv) Choose one of the "preset" rotation or reflection options from the Transform panel menu or Control panel menu.
(v) Double-click one of the transformation tools in the Toolbox to display the corresponding transform dialog box (double-click the Rotate tool, for example, to display the Rotation dialog box).
(vi) Select the Free Transform tool, and drag the tool around the object.
(vii) Press keyboard shortcuts. There's no "right" or "best" way to do transformations-you can experiment with the different methods and see which you like best. We change methods depending on the situation (and our mood).
7.
(i) The main purpose of PageMaker is composing pages. You can insert new pages into a document, remove existing pages, move between pages, and sort pages in a large document.
Going to a specific Page:
PageMaker provides several methods for navigating the pages in your publication.
Method 1:
(i) You can move from one page to another by using the Page up and Page down keys on your keyboard.
(ii) This is probably the navigation methods you will use most often.
Method 2:
(i) You can move from one page to another by using the page icons. at the left bottom of the screen. Click on the page icon that corresponds to the page that you want to view. The page is displayed.
Method 3:
Using the Go to Page dialog box. Refer Figure 1.52 and 1.53
To go to a specific page in a document.
(i) Choose Layout > Go to Page in the menu bar (or) Press Alt + Ctrl + G in the keyboard.
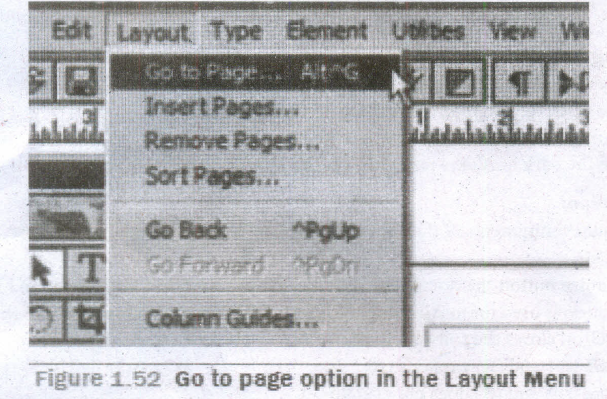
Go to page option in the Layout Menu
Now the Go to Page dialog box appears.
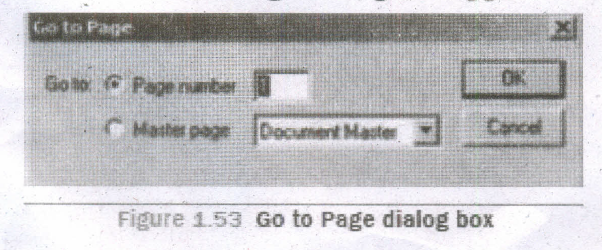
Go to Page dialog box
(i) In the dialog box, type the page number that you want to view.
(ii) Then click on OK button. The required page is displayed on the screen.
8.
Table 1.1 Keyboard Movement Keys
| Move | Press |
| One character the left | Left Arrow |
| One character to the right | Right Arrow |
| One word to the left | Ctrl+ Left Arrow |
| One word to the right | Ctrl + Right Arrow |
| Up one line | Up Arrow |
| Down one line | Down Arrow |
| To the end of a line | End |
| To the beginning of a line | Home |
| Up one paragraph | Ctrl + Up Arrow |
| Down one paragraph | Ctrl + Down Arrow |
9.
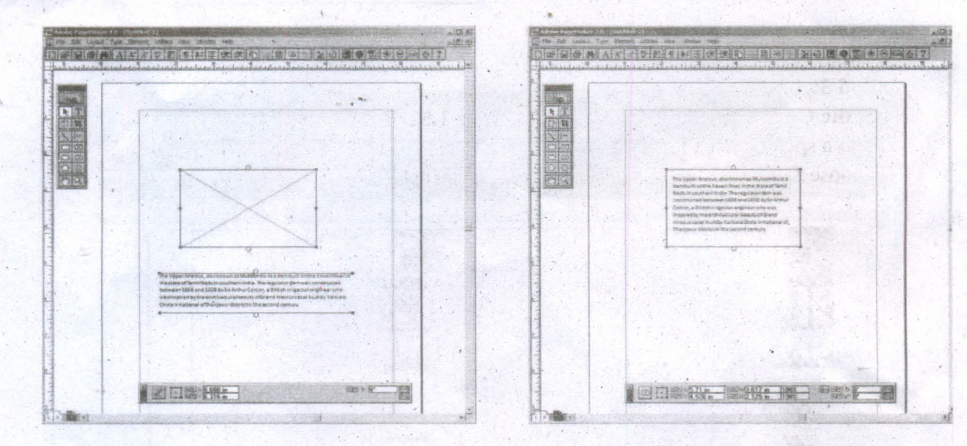
After created text in a text block, if you want to convert it to a frame. You can do this by using these steps.
(i) Draw the frame of your choice using one of the PageMaker's Frame tool.
(ii) Select the text block you want to insert in the frame.
(iii) Click the frame while pressing the Shift key. Now both elements will be selected.
(iv) Choose Element > Frame > Attach Content on the Menu bar.
(v) Now the text appears in the frame.
10.
Table 1.1 Keyboard Shortcuts
| S. No. | Tools | Keyboard Shortcut |
| 1. | Pointer Tool | F9 |
| 2. | Rotating Tool | Shift + F2 |
| 3. | Line Tool | Shift + F3 |
| 4. | Rectangle Tool | Shift + F4 |
| 5. | Ellipse Tool | Shift + F5 |
| 6. | Polygon Tool | Shift + F6 |
| 7. | Hand Tool | Shift + Alt + Drag Left mouse button |
| 8. | Text Tool | Shift + AIt + F1 |
| 9. | Cropping Tool | Shift + Alt + F2 |
| 10. | Constrained Line Tool | Shift + Alt + F3 |
| 11. | Rectangle Frame Tool | Shift + Alt + F4 |
11.
Command Window
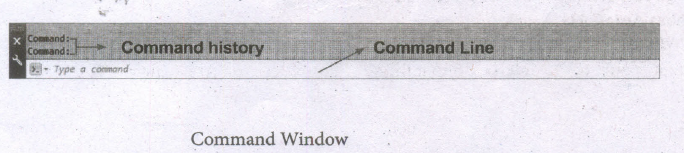
(i) The command window is normally located at the bottom of the application window, just above the statusbar.
(ii) This window normally contains three lines of text and the first two lines list the immediate command history,
(iii) The bottom line is the command line. If you do not see the command window, press Ctrl + 9 to make it appear.
(iv) You can enter a command manually at the command line.
(v) You can type at the cursor position on the command line, that is, the Command: prompt.
(vi) If you just type the first letter of a command, it will list all the commands starting with that letter.
(vii) Note: Always press ENTER after you type values on the command line.
(viii) You can drag this window to a different place on the screen and resize it.
(ix) When you enter a command, AutoCAD doesn't care if you use UPPERCASE or lowercase characters, or a combination of either.
(x) If you make a mistake typing on the command line, press the BACKSPACE key to correct.
(xi) You can press ESC at any time. If you press ESC while an operation is in progress, it terminates the command.
(xii) To repeat the command you previously entered in AutoCAD, press ENTER (or the spacebar) at the 'Command:' prompt.
(xiii) As an alternative, right-click to display the cursor menu, and then select the Repeat option.
12.
The Flash Tools panel includes the tools you need to create, select, or edit graphics on the Stage.
(i) The double arrows at the top of the Tools panel are used to collapse the panel to icon only view, or to expand the panel and see all the tools.
(ii) By default, the toolbar is on the right side of your screen.
(iii) The single capital letter in parentheses indicates tile keyboard shortcuts to select those tools.
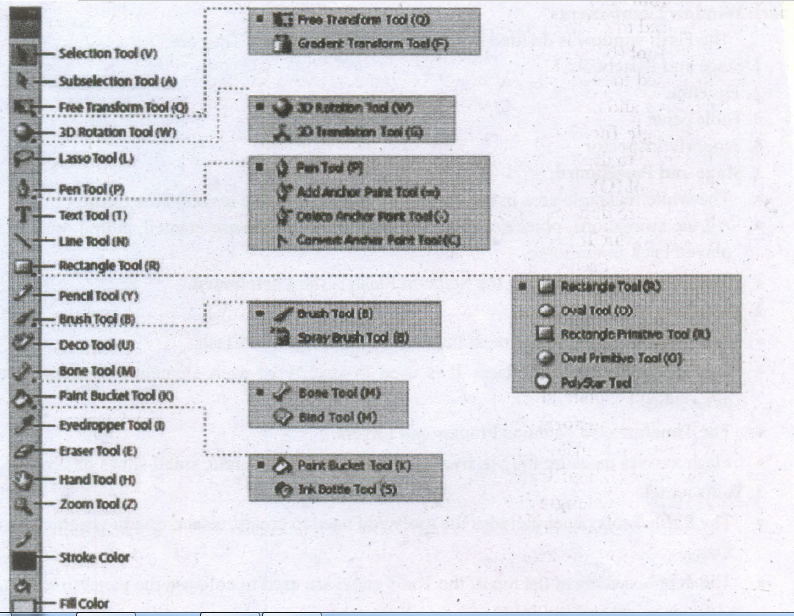
3D Rotation Tool (W)
It is used to create 3D effects by rotating movie clips in 3D space on the Stage.
3D Translation Tool (G)
It is used to create 3D effects by moving movie clips in 3D space on the Stage. The 3D Rotation and the 3D Translation tools are grouped within one icon on the Tools panel.
Lasso Tool (L)
It is used to select objects or parts of objects by drawing a freehand.
Pen Tool (P)
It is used to draw lines and curves by creating a series of dots, known as anchor points, that are automatically connected. Other tools used to add, delete, and convert the anchor points created by the Pen tool are grouped with the Pen tool.
Text Tool (T)
It is used to create and edit text.
Line Tool (N)
It is used to draw straight lines. You can draw vertical, horizontal, and 45° diagonal lines by pressing and holding Shift key while drawing the line.
Rectangle Tool(R)
It is used to draw rectangular shapes. Press and hold Shift key to draw a perfect square.
Oval Tool (O)
It is used to draw oval shapes. Press and hold Shift key to draw a perfect circle.
Subselection Tool (A)
This tool is used to select, drag, and reshape an object. We know that vector graphics are composed of lines and curves (each of which is a segment) connected by anchor points. When you select art object with this tool, it displays the anchor points and allows you to use them to edit the object.
Free Transform Tool (Q)
It is used to rotate, scale, skew, and distort objects.
Gradient Transform Tool (F)
It is used to transform a gradient fill by adjusting the size, direction, or center of the fill. The Free and Gradient Transform tools are grouped within one icon on the Tools panel.
Primitive Rectangle and Oval (R)
It is used to draw objects with properties such as corner radius or inner radius, that can be changed using the Properties panel.
PolyStar Tool
It is used to draw polygons and stars. The Rectangle, Oval, Primitive, and PolyStar tools are grouped within one tool on the Tools panel.
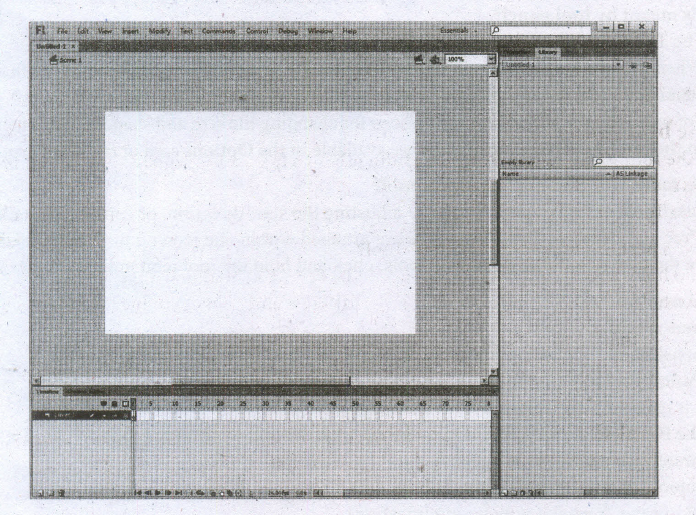
13.
The Flash CS6 workspace includes a variety of tools and other components that you work with to create Flash applications.
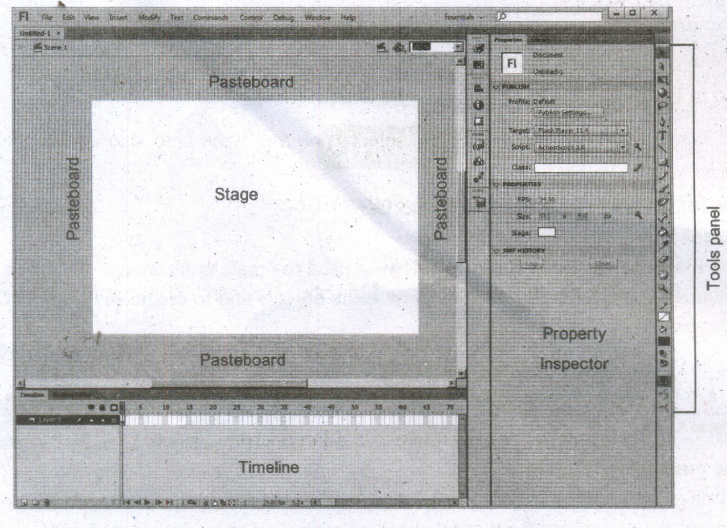
Flash Window Components
The Flash window is divided into four main components. They are
1. Stage and Pasteboard
2. Timeline
3. Tools panel
4. Property Inspector
1. Stage and Pasteboard:
(i) The white rectangle area in the middle of your workspace is called the Stage.
(ii) All the animations, objects and scenes for a Flash movie are created, edited, placed and played back in the stage.
(iii) The gray area surrounding the Stage in Flash is the Pasteboard.
2. Timeline
(i) The time line is one of the most important components of Flash.
(ii) It is located below the Stage. It is used to specify of each element's appearance and animation.
(iii) The Timeline also contains Frames and Layers.
(iv) Flash movies measure time in frames. Frames are the discrete, small slices of time.
3. Tools panel
(i) The Flash Tools panel includes the tools you need to create, select, or edit graphics on the Stage.
(ii) The double arrows at the top of the Tools panel are used to collapse the panel to icon only view, or to expand the panel and see all the tools.
4. Property Inspector
(i) The Property Inspector appears on the right side of your Flash workspace by default.
(ii) It is grouped with the Library panel.
(iii) It displays properties and options for objects selected on the Stage, and also allows you to modify them.
(iv) The object can be text, an image, a line, or any other shape.
14.
The following is an outline of current file formats used for the production and delivery of multimedia data.
Text Formats:
RTF
(i) Rich Text Format is the primary file format introduced in 1987 by Microsoft with the specification of their published products and for cross-platform documents interchange.
Plain text
(i) Plain text files can be opened, read and edited with most text editors. Commonly used are Notepad (Windows), Gedit or nano (Unix, Linux), TextEdit (Mac as X) and so on.
(ii) Other computer programs are also capable of reading and importing plain text. Plain text is the original and popular way of conveying an e-mail.
Image Formats:
TIFF (Tagged Image File Format)
(i) This format is common in desktop publishing world (high quality output), and is supported by almost all software packages.
(ii) Recent versions of TIFF allows image compression, and the format is comfortable for moving large files between computers.
BMP (Bitmap)
(i) Initially this format is in use with Windows 3.1. It is quite large and uncompressed and hence BMP is used for the high-resolution or large images.
DIB (Device Independent Bitmap)
(i) This format which is similar to BMP, allows the files to be displayed on a variety of devices.
GIF (Graphics Interchange Format)
(i) GIF is a compressed image format. Most of the computer color images and backgrounds are GIF files.
(ii) This file format is best suitable for graphics that uses only limited colors, and it is the most popular format used for online color photos.
(iii) 13-bit Color look up table is used by the GIF format to identify its color values. This format is supported widely.
JPEG (Joint Photographic Experts Group)
(i) JPEG was designed to attain maximum image compression.
(ii) It uses lossy compression technique, where a compression method is referred that loses some of the data required for the image reconstruction.
(iii) It works good with photographs, naturalistic artwork, and similar material but functions less on lettering, live drawings or simple cartoons.
TGA (Targa)
(i) It is the first popular format for high resolution images. TGA is supported by Most of the video-capture boards.
PNG (Portable Network Graphics)
(i) An extensible file format for the less loss, portable and well compressed storage of raster Images.
(ii) PNG acts as replacement for GIF and also replaces multiple common uses of TIFF.
(iii) PNG works good with online viewing applications like worldwide web, so it is fully streameable with a best display option.
Digital Audio File Formats:
WAV (Waveform Audio File Format)
(i) It is the most popular audio file format in windows for storing uncompressed sound files.
(ii) In order to attain the reduced file size it can also be converted to other file formats like MP3.
MP3 (MPEG Layer-3 Format)
(i) MPEG Layer-3 format is the most popular format for storing and downloading music.
(ii) The MP3 files are roughly compressed to one-tenth the size of an equivalent WAV file.
OGG
(i) A free, open source container format that is designed for obtaining better streaming and evolving at high end quality digital multimedia.
(ii) it can be compared to MP3 files in terms of quality.
AIFF (Audio Interchange File Format)
(i) A standard audio file format used by Apple which is like a WAY file for the Mac.
WMA (Windows Media Audio)
(i) It is a popular windows media audio format owned by Microsoft and designed with Digital Right Management (DRM) abilities for copyright protection.
RA (Real Audio Format)
(i) Real Audio format is designed for streaming audio over the Internet.
(ii) The digital audio resources are usually stored as a computer file in computer's hard drive or CD/DVD.
Besides the variety of audio file formats available, the most common formats are wave files (.WAV) and MPEG Layer-3 files (.MP3), WMA and RA.
Digital Video File Formats
AVI (Audio/Video Interleave)
(i) AVI is the video file format for Windows.
(ii) Here sound and picture elements are stored in alternate interleaved chunks in the file.
MPEG (Moving Picture Experts Group)
(i) MPEG is a standard for generating digital video and audio compression under the International Standards Organization (ISO) by the group of people.
(ii) The group has developed MPEG-1, the standard on which Video CD and MP3 are based, MPEG-2, the standard that supports products as Digital Television set top boxes and DVD, MPEG-4, the standard for multimedia and mobile web.
(iii) MPEG-7, the standard for search of audio and visual content. Research on MPEG-21 "Multimedia Framework" has started in 2000. Simply MPEG is the standards for digital video and audio compression.
15.
(i) The remarkable advancement in the entertainment industry is due to the Multimedia Technology mainly
(ii) This technology is needed in all mode of entertainment like radio, TV, online gaming, video on demand etc.
(iii) Video on demand or movies on demand is a service that provides movies to television sets on an individual basis at homes.
(iv) Movies are stored in a central server and transmitted through a communication network.
(v) A set-top box connected to the communication network converts the digital information to analog signals and inputs it to the television set.
16.
(i) Animation is the process displaying still images so quickly so that they give the impression of continuous movement.
(ii) In animation the screen object is a vector image in animation. Using numerical transformations the movement of that image along its paths is calculated for their defining coordinates.
(iii) The least frame rate of at least 16 frames per second gives the impression of smoothness and for natural looking it should be at least 25 frames per second.
(iv) Animations may be in two or three dimensional.
(v) The two dimensional animation, bring an image alive, that occur on the flat X and Y axis of the screen.
(vi) While in three dimensional animation it occurs along the three axis X, Y and Z. Animation tools are very powerful and effective.
(vii) The two basic types of animations are Path animation and Frame animation.
Path Animation:
(i) Path animation involves moving an object on a screen that has a constant background.
(ii) e.g. a cartoon character, may move across the screen regardless of any change in the background or the character.
Frame Animation:
(i) In frame animations, multiple objects are allowed to travel simultaneously and the background or the objects also changes.
17.
1. Conceptual Analysis and Planning
(i) The process of multimedia making begins with a conceptual ignition point.
(ii) Conceptual analysis identifies a appropriate theme, budget arid content availability on that selected theme.
(iii) Additional criteria like copyright issues also are considered in this phase.
2. Project design:
(i) Once the theme is finalized objectives, goals, and activities are drawn for the multimedia project.
(ii) General statements are termed as goals.
(iii) The specific statements in the project is known as the objectives.
(iv) Activities are series of actions performed to implement an objective.
(v) These activities contribute to the Project design phase.
3. Pre-production:
(i) Based on the planning and design, it is necessary to develop the project.
(ii) The following are the steps involved in pre-production:
4. Budgeting:
(i) Budgeting for each phases like consultants, hardware, software, travel, communication and publishing is estimated for all the multimedia projects.
5. Multimedia Production Team:
(i) The production team for a highend multimedia project requires a team efforts,
(ii) The team comprises of members playing various roles and responsibilities like Scriptwriter, Production manager, Editor, Graphics Architect, Multimedia Architect and Web Master.
18.
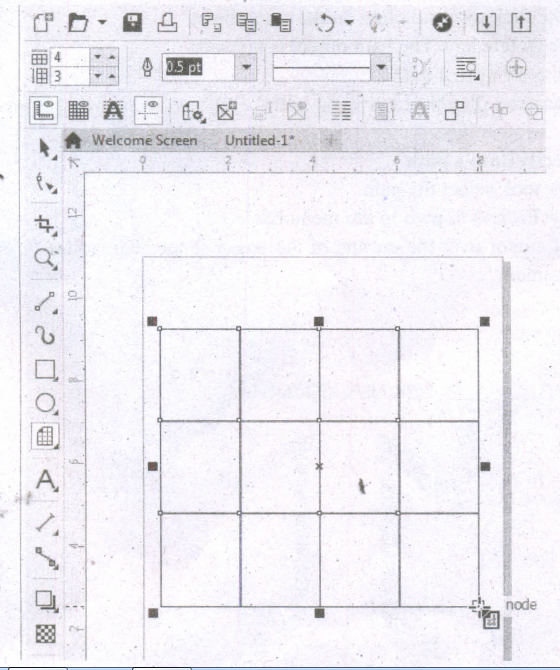
Drawing Grids
Using Graph Paper tool, you can draw a grid and set the number of rows and columns. A grid is a grouped set of rectangles that you can break apart.
To draw a grid,
1. Click and hold the Polygon tool. A flyout menu will appear.
2. Select the Graph Paper tool from the flyout menu.
3. Now type values in the top and bottom portions of the Columns and rows box on the property bar. The value you type in the top portion of the Columns and rows box specifies the number of columns; the value you type in the bottom portion specifies the number of rows.
4. Click on anywhere in the drawing area where you want the grid to appear.
5. Drag diagonally to draw the required grid.
If you want to draw the grid from its center point outward, hold down Shift key as you drag; if you want to draw a grid with square cells, hold down Ctrl key as you drag.
19.
Creating Stars
Polygon-tool has a small arrow in the lower-right corner of the tool. That little arrow indicates that this tool has a flyout.
To draw a star,
1. Click on the Polygon tool and hold down the mouse key. A flyout menu will appear showing you other tools.
2. Click on the Star tool from the flyout menu.
3. Click on anywhere in the drawing area and drag the mouse pointer.
4. Release the mouse button where you would like the end of the star.
20.
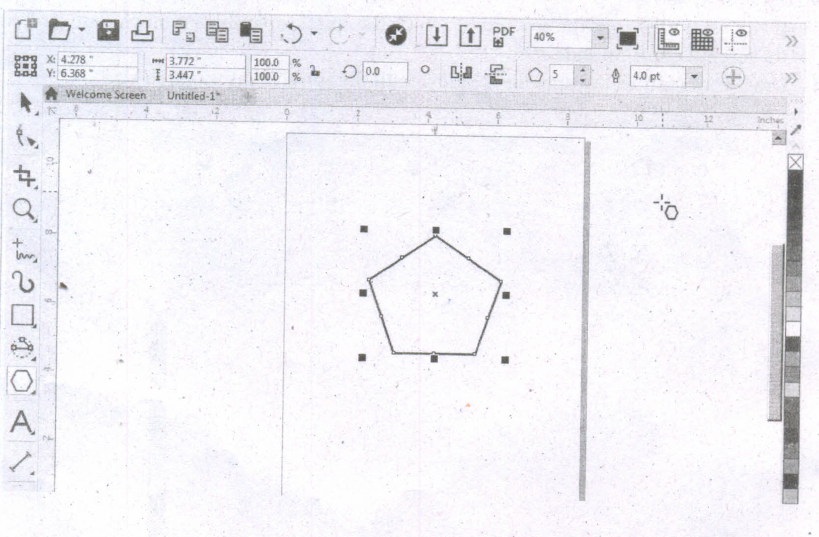
Creating Polygons
1. To draw a polygon Cabo known as pentagon: a five-sided figure, select the Polygon tool in the toolbox. The mouse pointer changes to a crosshair with a small polygon beneath it.
2. Click on anywhere in the drawing area and drag the mouse pointer.
3. Release the mouse button where you like the end of the polygon.
4. To increase the number of sides of your polygon, select the polygon you have drawn using the Pick tool.
5. Place the mouse pointer on the Number of Points on Polygon text box and type the number of sides you like for you polygon. You can also set the number of sides for your polygon and then draw it.
21.
Creating Graphic Frame
(i) Graphic frame can hold graphic content.
(ii) You can distinguish a text frame from a normal graphic frame because the graphic frames display a non-printing 'X' in their centres.
(iii) Graphic frames are used to import pictures of other software programs. In InDesign, all imported images are contained within graphic frames.
(iv) The Tools panel contains three tools for drawing graphic frames.
1. Ellipse Frame - This tool lets you create oval and round frames.
2. Rectangle Frame - This tool lets you create rectangular and square frames.
3. Polygon Frame - This tool lets you create equilateral polygons frames.
To create a Rectangle frame
1. Click on the Rectangle Frame tool in the Tools panel (or) Press F in the keyboard.
2. Position the Rectangle Frame tool pointer on the page.
3. Drag to create a rectangle frame that is approximately the size and shape you want, then release the mouse button.
When you release the mouse button after creating a Rectangle frame, the frame you created is active.
If the Selection tool was previously selected, the frame is displayed within its bounding box, which contains eight resizing handles, which help you to change the shape or size of the bounding box or the frame.
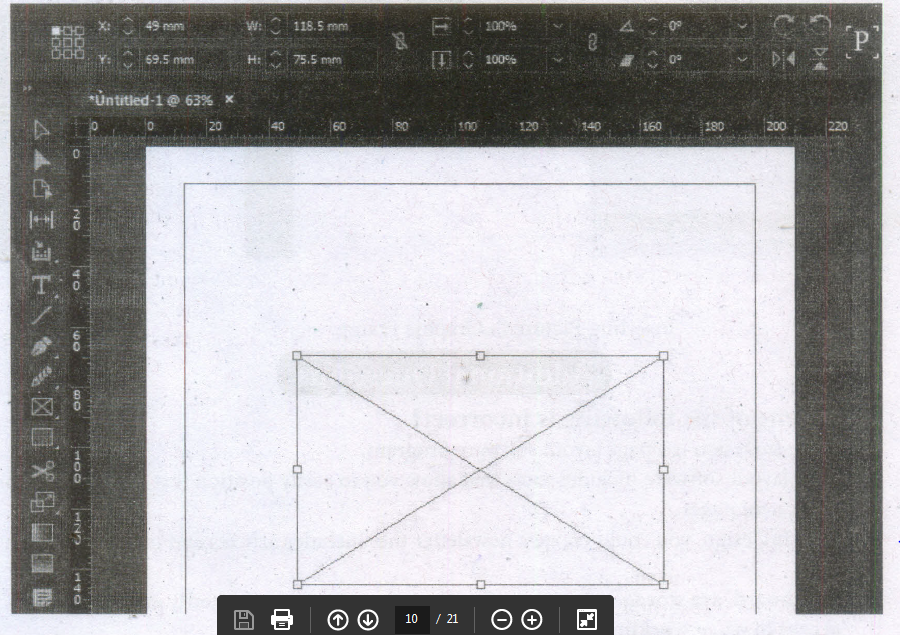
Creating a Rectangle frame
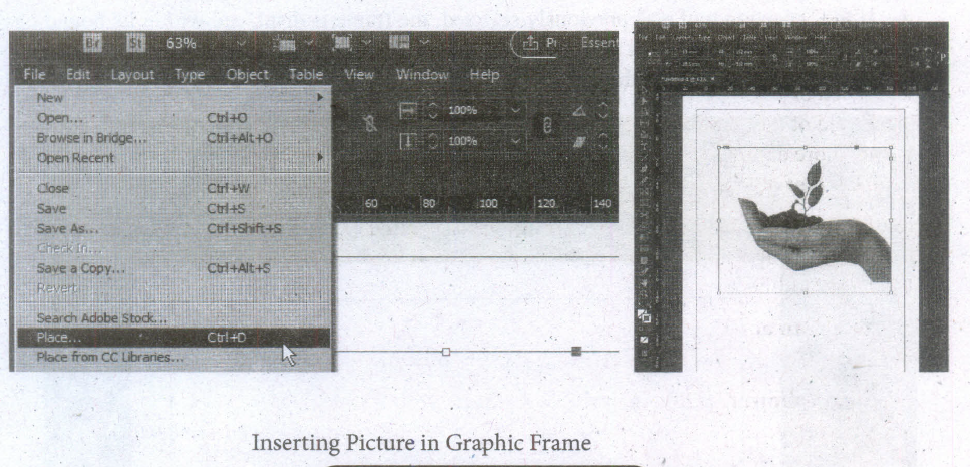
Inserting Picture in Graphic Frame
Graphic frames are used to import pictures of other software programs. You can insert the picture in the frame.
1. Make a graphic frame.
2. Choose File > Place in the menu.
The Place dialog box appears.
3. Locate and select the picture you want to insert the frame.
4. Click on Open.
The picture will appear in the graphic frame.
22.
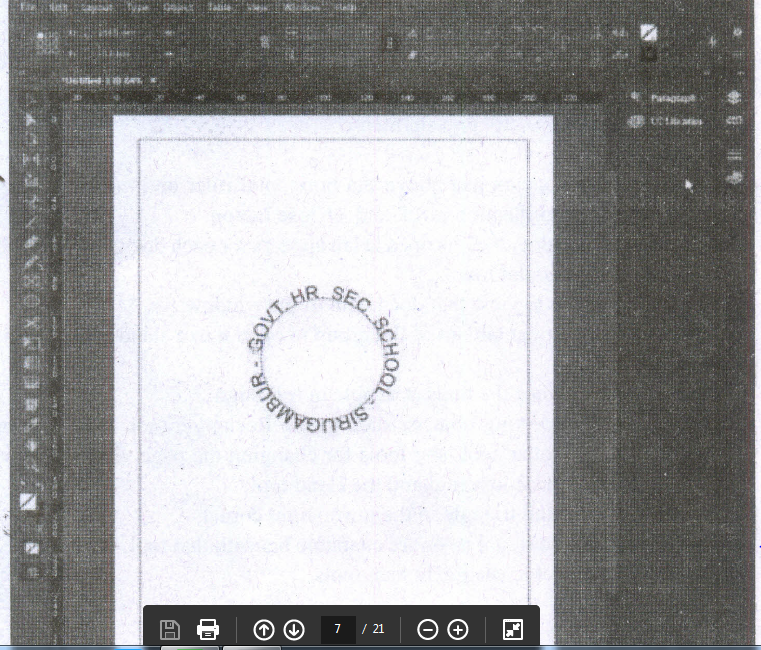
Creating Path Type
(i) With the Type on a Path tool, you can add type along the inner or outer edge of a path.
(ii) You can place the text on either side of the path, but not on both.
(iii) If you initially place it on the inner part of the path, you can always move it to the outer part of the path later.
(iv) When you select text on a path, brackets appear that you can drag to adjust the position and placement of the text.
Create Type on a Path
1. Select the Type on a Path tool on the Tools panel.
2. Click on the edge of the path (closed or open) to which you want to add type. A flashing insertion point appears in the text frame. Any fill or stroke on the object is removed.
3. Type some text. The text automatically wraps to the shape of the text frame. Don't press Enter key. The type appears along the edge of the object, conforms to its shape, and removes the fill and stroke. If the overflow symbol appears, deselect the text frame, select the Direct Selection tool on the Tools panel, and then drag a corner to reshape the text frame.
4. Select a Selection tool or select the Type tool again.
23.
Starting Adobe InDesign CC
1. Choose Start> All Programs> Adobe lriDesign CC 2019 (or)
Click on the InDesign short cut on the desktop.
2. Welcome to InDesign window will open. Now click on Create New ... button.
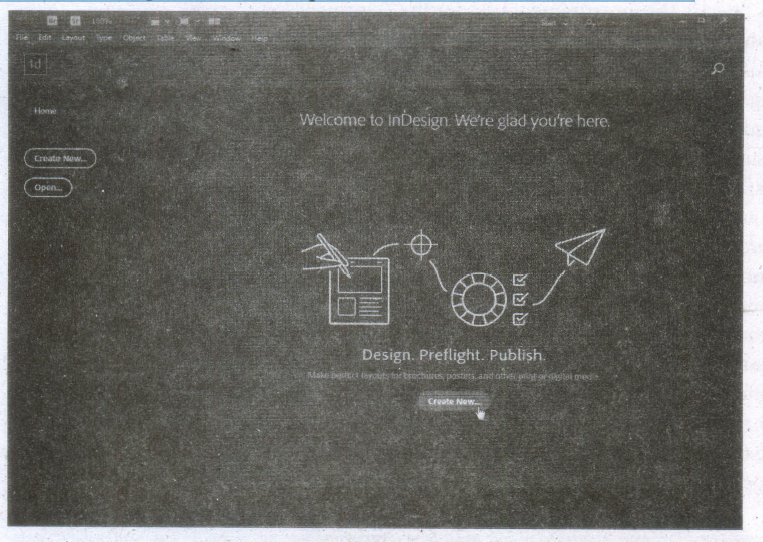
3. Now a New Document window will open.
When You create a new document, you have the opportunity to set many options in the New Document dialog box.
To set the basic options for a new document:
i) In the New Document dialog box, click a category tab: Print, Web, or Mobile.
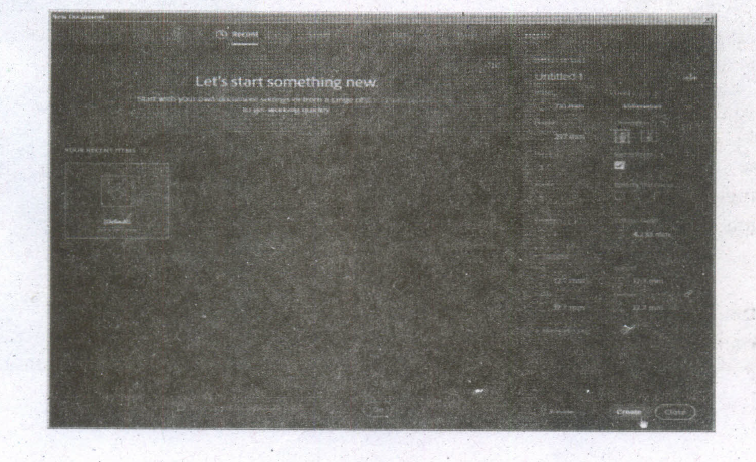
Specify the following options.for the selected preset:
Width and Height: Specify the size of the document.
Units: Specify the measurement unit for the document.
Orientation: Specify a page orientation for the document: Landscape or Portrait.
Pages: Specify the number M pages to create in the document.
Facing pages: If you're creating a single-sided document-like an advertisement, poster, or handbill-leave Pacing Pages turned off. Turn it on for books and magazines, which usually have both left-hand and right-hand pages.
Start#: Specify which number the document starts on. If you specify an even number (such as 2) with Pacing Pages selected, the first spread in the document begins witha two-page spread.
Primary Text Frame: Select this option to add a primary text frame on the master page.
Columns: Specify the number of columns to add in the document.
Column Gutter: Specify the amount of whitespace between columns.
Margins: Specify the margins for each side of the document. To use. different values for different sides, delink the dimensions by clicking the chain icon.
Bleed and Slug: Specify the position of the bleed and slug along each side of the document. To use different values for different sides, delink the dimensions by clicking the chain icon.
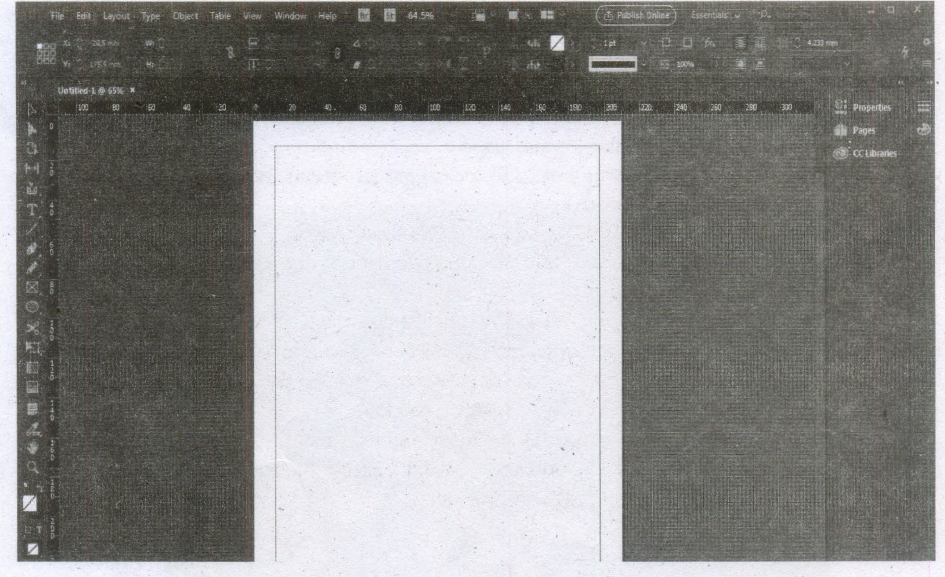
4. Click the Create button to open a document with the preset settings.
24.
Converting text in a Text block to a Frame
After created text in a text block, if you want to convert it to a frame. You can do this by using these steps.
1. Draw the frame of your choice using one of the Pagemaker's Frame tool.
2. Select the text block you want to insert in the frame.
3. Click the frame while pressing the Shift key. Now both elements will be selected.
4. Choose Element > Frame > Attach Content on the Menu bar.
5. Now the text appears in the frame.
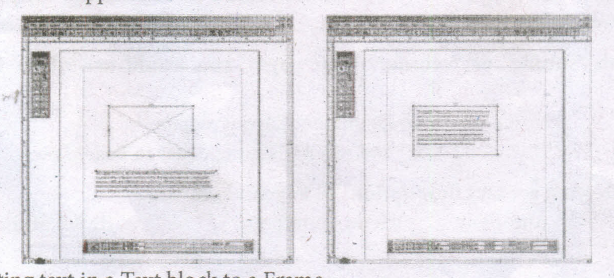
Converting text in a Text block to a Frame
25.
Tool Toolbox Cursor Use
| Pointer Tool | Used to select, move, and resize text objects and graphics |
| Text tool | Used to type, select, and edit text. |
| Rotating tool | Used to select and rotate objects |
| Cropping tool | Used to trim imported graphics. |
| Line tool | Used to draw straight lines in any direction. |
| Constrained line tool | Used to draw vertical or horizontal lines. |
| Rectangle frame tool | Used to create rectangular placeholders for text and graphics. |
| Ellipse tool | Used to draw circles and ellipses. |
| Ellipse frame tool | Used to create elliptical placeholders for text and graphics. |
| Polygon tool | Used to draw polygons. |
| Polygon frame tool | Used to create polygonal placeholders for text and graphics. |
| Hand tool | Used to scroll the page (an alternative to the scroll bar) |
| Zoom tool | Used to magnify or reduce an area of the page |

12th Standard Syllabus & Materials
12th Standard
TN 12th Computer Applications களப்பெயர் முறைமை (DNS) Sample Question Papers Study Material - QB365 Set A
NEW12th Standard
TN 12th Computer Applications வலையமைப்பு எடுத்துக்காட்டுகள் மற்றும் நெறிமுறைகள் Sample Question Papers Study Material - QB365 Set A
NEW12th Standard
TN 12th Computer Applications கணினி வலையமைப்பு ஓர் அறிமுகம் Sample Question Papers Study Material - QB365 Set A
NEW12th Standard
TN 12th Computer Applications PHP-உடன் MySQL-ஐ இணைத்தல் Sample Question Papers Study Material - QB365 Set A



Tamilnadu Stateboard 12th Standard Subjects

Maths

Chemistry

Physics

Biology

Computer Science

Business Maths and Statistics

Economics

Commerce

Accountancy

History
Computer Applications
Biology
Computer Technology
Computer Applications
Computer Science
Business Maths and Statistics
Commerce
Economics
Maths
Chemistry
Physics
Computer Technology
History
Accountancy

Tamil

English

French
Tamilnadu Stateboard Standards
