
 100% FREE ACCESS
12th Standard Syllabus & Materials
12th Standard
TN 12th Maths Applications of Matrices and Determinants Sample Question Papers Study Material - QB365 Set A
NEW12th Standard
TN 12th Computer Applications மின்னணு தரவு பரிமாற்றம் Sample Question Papers Study Material - QB365 Set A
NEW12th Standard
TN 12th Computer Applications மின் - வணிக பாதுகாப்பு அமைப்புகள் Sample Question Papers Study Material - QB365 Set A
NEW12th Standard
TN 12th Computer Applications மின்னணு செலுத்தல் முறைகள் Sample Question Papers Study Material - QB365 Set A
NEW12th Standard
TN 12th Computer Applications மின் - வணிகம் Sample Question Papers Study Material - QB365 Set A
NEW12th Standard
TN 12th Computer Applications திறந்த மூல கருத்துருக்கள் Sample Question Papers Study Material - QB365 Set A

Published on: 01/03/2021
12th Standard English Medium Computer Technology Reduced Syllabus Public Exam Model Question Paper - 2021
Download Tamil Nadu 12th Standard Computer Technology question papers, model tests, one-mark questions, important questions, and public exam papers in PDF format. Free study materials and answer keys for TN State Board students.
Questions + Answers key
Take MCQ Computer Technology Test
1.
This view that is similar to the old interface offlash and is perfect for old Flash users.
Debug View
Classic View
Twining
Transition View
2.
____________is the special effect used to introduce each slide in a slide presentation.
Animation
Bulleting
Transition
Mapping
3.
Clicking on special areas called activates the various features of a___________multimedia presentation.
Activators
Starters
Pages
Buttons
4.
Once saved the new filename followed by the In Design filename extension _______ appears on the document tab.
.docx
.exls
.indd
.ppt
5.
Which of the following is not an example for library?
Company logos
legal jargon
contact information
Image editors
6.
Which of the following statement is incorrect?
To create a new file using icon Choose File > New in the menu bar
To create a new file using keyboard Press Ctrl + N in the keyboard
A new document called Untitled - 1 opens on the screen
The area outside of the dark border is referred to as the writing board
7.
Which company had developed PageMaker?
Microsoft
Adobe Corporation
Aldus Corporation
Intel
8.
Which menu of Page Maker contains the font option?
layout
type
utilities
element
9.
How many master pages can you have?
Unlimited
255
172
2
10.
If you do not see the command window, press _________ to make it appear.
Ctrl + 1
Ctrl + 9
Ctrl + 8
Ctrl + 7
11.
Any content you generate with Flash is called
A graphic
An interface
An animation
An application
12.
you need hardware, software and __________ to make multimedia
network
compact disk drive
good idea
programming knowledge
13.
To close a document in CorelDRAW, press _________
Ctrl + F4
Ctrl + F3
Shift + F4
Ctrl + F2
14.
A color you apply to the inside of an object is called
Fill
Stroke
Paint
In-Color
15.
Place option is present in ______ menu.
File
Edit
Layout
Window
16.
How will the the flash background appears in default?
17.
Mention the buttons and controls in standard toolbar?
18.
Name the menus in the pagemaker?
19.
What is a fast method of closing a polygon when you are using the LINE command?
20.
What is the purpose of Timeline?
21.
List out image file formats.
22.
What is a property bar in CorelDRAW?
23.
What is the use of page tool?
Stroke
Fill
Out-Color
Paint
24.
How do you create a New document in PageMaker?
25.
What is meant by tool panel?
26.
Write a note on status bar?
27.
How will you work will text?
28.
Give the drawing tools in the pagemaker?
29.
Explain the use of the LINE Undo option.
30.
Differentiate between Zoom Tool and Hand Tool.
31.
What are the two types of spirals? Explain.
32.
Explain briefly how you can create an object.
33.
How do you rejoin split blocks?
34.
How will you draw a oval using oval tool?
35.
Explain How Do I Take Good Portraits?
36.
Explain in detail about the printing the documents?
37.
How will you connert text in a text block to a frame?
38.
Write briefly about Command window.
39.
Explore the opportunities Animation filed movie industry.
40.
Explain in detail Techniques of Animation.
41.
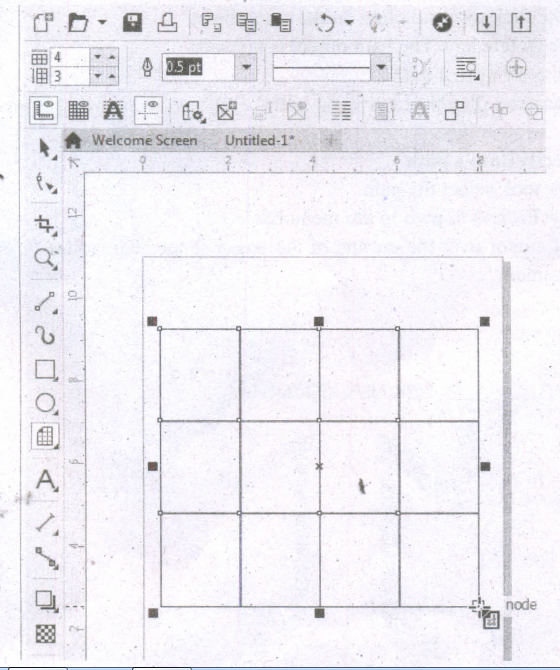
Write the steps to draw a grid.
42.
Write the steps to place text into a document.
43.
Explain the tools in PageMaker toolbox.
1.
(b)
Classic View
2.
(c)
Transition
3.
(d)
Buttons
4.
(c)
.indd
5.
(d)
Image editors
6.
(d)
The area outside of the dark border is referred to as the writing board
7.
(c)
Aldus Corporation
8.
(b)
type
9.
(b)
255
10.
(b)
Ctrl + 9
11.
(d)
An application
12.
(d)
programming knowledge
13.
(a)
Ctrl + F4
14.
(a)
Fill
15.
(a)
File
16.
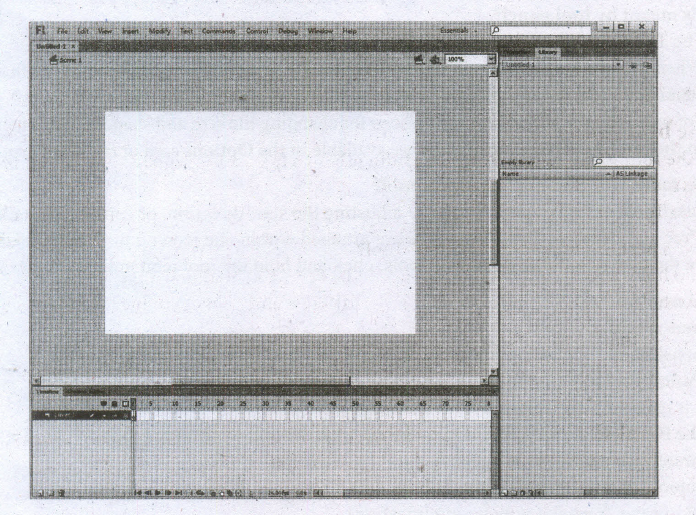
(i) By default, the Flash Stage appears white, but, you can change its background color from the Document settings dialog box using the Modify > Document (Ctrl +J) command.
(ii) To change the view of the Stage, Zoom in and out.
(iii) To help in positing the items on the Stage, you can use the grid, guides and rulers.
17.
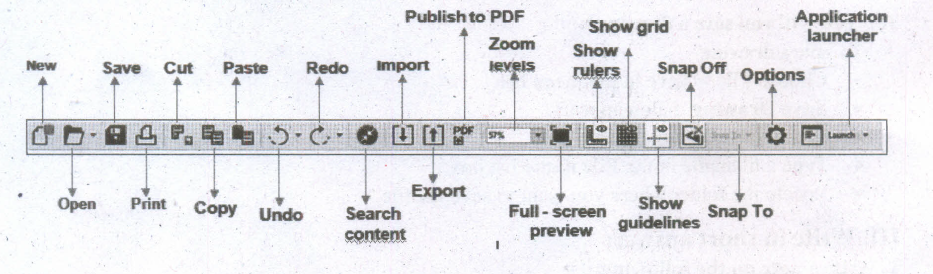
18.
File, Edit, Layout, Type, Element, Utilities, View, Window, Help.
19.
(i) The Close option is used to join the current point to the start point of the first line when two or more continuous lines are drawn.
(ii) If you specify the end point by using the mouse, then click at the start point of the first line or enter C at the Command prompt, as given in the Command prompt below.
Command: LINE
Specify first point: Pick the first point.
Specify next point or [Undo]: Pick the second point.
Specify next point or [Undo]: Pick the third point.
Specify next point or [Close/Undo]: C (The fourth point joins with the first point).
20.
(i) Timeline is the record of every frame, layer and scene that makes up a movie.
(ii) It controls and organizes the movie's content over time using layers and frames.
21.
Compression formats used for this purpose are GIF, TIFF and JPEG.
22.
The property bar is next to Standard toolbar.
(i) It displays the most commonly used functions that are relevant to the active tool.
(ii) Even though it looks like a toolbar, the property bar content changes depending on the tool or task.
23.
Zooming allows you to quickly zoom in on, or get closer to, any object in your document.
24.
To create a new document,
1. Choose File> New in the menu bar. (or) Press Ctrl + N in the keyboard. Now Document Setup dialog box appears.
2. Enter the appropriate settings for your new document in the Document Setup dialog box.
3. Click on OK button.
25.
(i) The Tools panel contains a collection of tools.
(ii) When you move the mouse pointer on a tool, its name appears, Some tools in the Tools panel have additional options that allow you to modify their use.
(iii) For example, the Brush tool has options for changing the size and shape of the brush head. When the tool is selected, the options are available in the Options area of the Tools panel.
26.
Status bar is the area at the bottom of the document window.
i) It displays information about selected object properties such as type, size, colour, fill type and outline.
ii) The status bar also displays the current mouse position in the document window.
27.
(i) InDesign has-two main type tools: Type and Type on a Path. The Type tool is used to create a rectangle text frame where you can store text in your document.
(ii) The Type on a Path tool is used to add text along the inner or outer edge of a path.
(iii) In addition to the type tools, you can also use the Frame tools-Rectangle, Ellipse, and Polygon-to add text to your document.
(iv) The default font is Minion Pro Regular.
28.
Changing Text Colour:
You can change the colour of the text Your design may look beautiful if you choose a text colour other than black.
To colour characters
(i) Select the text you want to colour.
(ii) Choose Window> Show Colors in Menu bar. The Colors palette appears.
(iii) Click the colour you want to apply to the selected text The characters change to the colour you selected in the palette.
29.
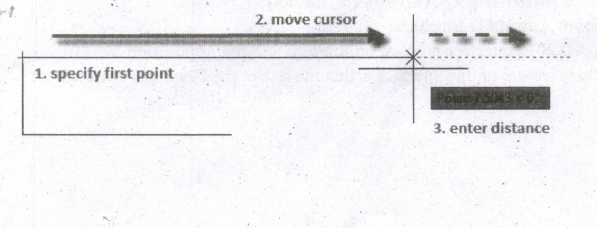
The following prompts are displayed.
Specify first point
(i) Sets the starting point for the line.
(ii) Click a point location.
(iii) With object snaps or grid snap turned on, the points will be placed precisely.
(iv) You can also enter coordinates.
(v) If instead, you press Enter at the prompt, a new line starts from the endpoint of the most recently created line, polyline, or arc.
(vi) If the most recently created object is an arc, its endpoint defines the starting point of the line.
(viii) The line is tangent to the arc.
Specify next point
(i) Specifies the endpoint of the line segment.
(ii) You can also use polar and object snap tracking together with direct distance entry.
Close
Connects the first and last segments.
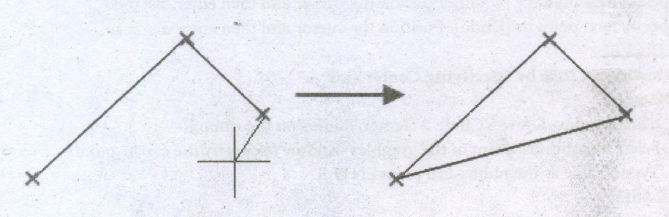
Undo
Removes the most recent segment of a line sequence.
30.
| Hand Tool (H) | Zoom Tool (Z) |
| It is used to move the Stage around the Pasteboard by dragging the Stage. | It is used to change the magnification of an area of the Stage. Clicking an area of the Stage zooms in and holding down Alt Key and clicking zooms out. |
31.
There are two types of spirals. They are
(i) Symmetrical spiral:
A Symmetrical spiral expands evenly so that the distance between each revolution is equal.
(ii) Logarithmic spiral:
A Logarithmic spiral expands with increasingly larger distances between revolutions.
32.
Creating an Object:
(i) Shapes can add visual interest to a document and serve as a background for text.
(ii) The tools for creating shapes include the Rectangle, Ellipse, and Polygon tools.
(iii) To select a shape tool, click and hold down the mouse button on the Rectangle tool (or currently selected shape tool) on the Tools panel, and then select the shape tool you want to use.
(iv) With a shape tool selected, you can create a shape manually by dragging in the document, or you can click in the document to open the shape's dialog box and define its settings.
(v) You use the Swatches panel to add color to the fill and stroke (border) of your shape, and the Stroke panel to change the weight (thickness) and style of the stroke.
33.
Rejoining split blocks To rejoin the two text blocks
1. Place the cursor on the bottom handle of the second text block, click and drag the bottom handle up to the top.
2. Then place the cursor on the bottom handle of the first text block, and click and drag the bottom handle down if necessary.
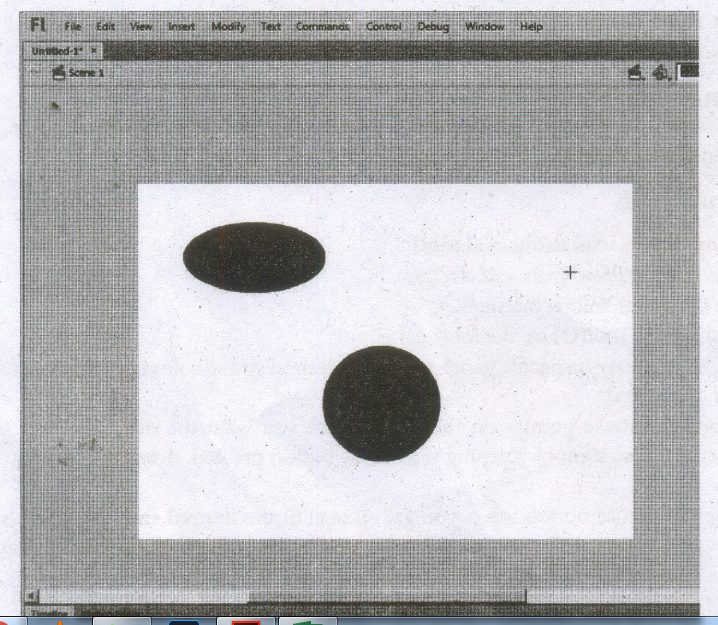
34.
This tool is used to draw ovals and circles.
To use the Oval tool, follow the steps.
1. Click the Oval Tool( O) on the tools panel.
2. From the Property Inspector panel, select the desired stroke colour, thickness, style and fill colour of the oval.
3. Position the mouse pointer on the stage where you want the oval. The mouse pointer changes to a plus sign(+). Keeping the mouse button pressed, drag the mouse to draw the oval.
4. Release the mouse button when you get an oval of the desired size. You can also draw a circle using the Oval Tool by just pressing and holding the Shift key while dragging the mouse.
35.
Here are some general guidelines for taking good portraits:
(i) Use longer focal lengths instead of shorter (telephoto instead of wide angle). This will make your subjects face more natural and less bulbous.
(ii) Use a wide aperture for shallow depth of field. This will focus attention on your subject and not your background.
(iii) Avoid distracting backgrounds.
(iv) Try to achieve even illumination by exploiting natural light. If you can't use natural light, then use studio lights and/or multiple flashes and/or a bounce flash.
(v) Avoid taking pictures where part of your subject's face is in shadow unless you really know what you're doing.
(vi) Avoid using a single flash pointing directly at the subject. This will create harsh shadows on either the subject of the area behind the subject.
36.
(i) When you press Ctrl-P, InDesign displays the Print dialog box.
(ii) There are so many features packed into this dialog box that Adobe had to break it up into eight different panes, each listed along the left side of the dialog box:
(iii) General, Setup, Marks and Bleeds, Output, Graphics, Color Management, Advanced, and Summary.
Printers:
(i) Before you go anywhere in the Print dialog box, you've got to make one or two important decisions.
(ii) First, you must choose from the options on the Printer pop-up menu, which lists the printers you have installed on your computer.
(iii) When you choose a printer, InDesign looks to the printer driver to see what PPD (PostScript Printer Description) file is associated with that printer, and it displays it-grayed out-in the PPD pop-up menu. In the case of a non-PostScript device, InDesign leaves this pop-up menu blank.
General:
The General pane of the Print dialog box contains basic printing features: which pages do you want to print, how many copies do you want, and how do you want them to come out of the printer.
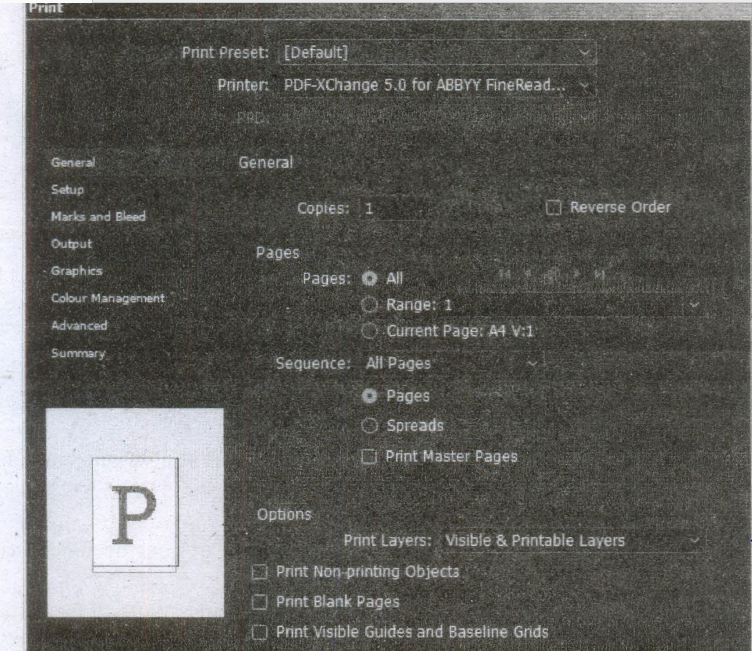

Copies:
(i) Enter the number of copies of page you want to print in the Copies field. You can print up to 9999 copies of your publication.
Collate:
(i) When you turn on the Collate option, InDesign prints the range of pages you've specified, in order, for each copy of the publication you print. This makes for much slower printing.
(ii) When you print multiple copies of a page, your printer only needs to process each page once (and then prints multiple copies of the page using the same image);
(iii) when you turn on the Collate option, your printer must process each page once for every copy of the print job.
Reverse Order:
(i) When you print a multipage document, do you want the first page to come out first or last? Turning on the Reverse Order check box tells InDesign to print the last page first, then print "backwards" to the first page.
(ii) You'll want to turn this on if your pages come out of the laser printer face up.
Page Ranges:
(i) Turn on the All Pages option to print all of the pages in the publication.
(ii) To print a range of pages, turn on the Rang option. Enter the page range in the Range field as shown in the following Table.
| jka To print | dfdN Enter M | Example |
| A continuous range of pages | first page - last page | 12-21. |
| Up to a specific page | -last page | -5 |
| From a page to the end of the document | first page - | 5- |
| Non-contiguous pages | page, page | 1, 3 |
| Mixed page ranges | page, range | -3, 6-9, 12, 15- |
| Pages by section | section.page | Sec1:1, Sec2:5 |
Sequence:
(i) To print even and odd pages, select the All Pages option from the Sequence pop-up menu; to print even pages, select Even Pages Only; and to print odd pages select Odd Pages Only.
(ii) These choices affect all page ranges, including page ranges you've entered in the Range field.
Print Master Pages:
(i) Sometimes you need to print your master pages instead of your document pages. No problem: Just turn on the Print Master Pages check box.
(ii) When you do this, you cannot specify page ranges. InDesign prints all the master pages in the document.
Print Blank Pages:
(i) What happens when you print a three-page document that has nothing. on page 2? By default, only pages 1 and 3 print out. If you want the blank page 2 to print, too, you'd better turn on the Print Blank Pages check box.
Print:
(i) Finally press the Print button to print the document.
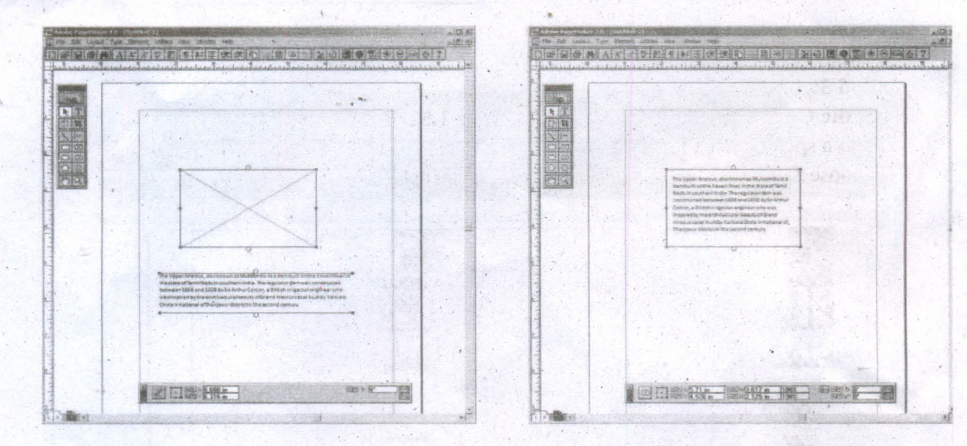
37.
After created text in a text block, if you want to convert it to a frame. You can do this by using these steps.
(i) Draw the frame of your choice using one of the PageMaker's Frame tool.
(ii) Select the text block you want to insert in the frame.
(iii) Click the frame while pressing the Shift key. Now both elements will be selected.
(iv) Choose Element > Frame > Attach Content on the Menu bar.
(v) Now the text appears in the frame.
38.
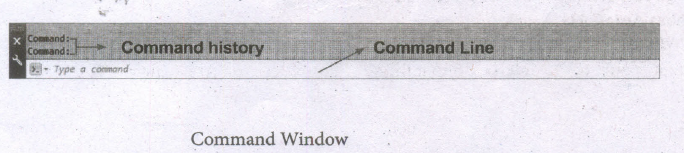
Command Window
(i) The command window is normally located at the bottom of the application window, just above the statusbar.
(ii) This window normally contains three lines of text and the first two lines list the immediate command history,
(iii) The bottom line is the command line. If you do not see the command window, press Ctrl + 9 to make it appear.
(iv) You can enter a command manually at the command line.
(v) You can type at the cursor position on the command line, that is, the Command: prompt.
(vi) If you just type the first letter of a command, it will list all the commands starting with that letter.
(vii) Note: Always press ENTER after you type values on the command line.
(viii) You can drag this window to a different place on the screen and resize it.
(ix) When you enter a command, AutoCAD doesn't care if you use UPPERCASE or lowercase characters, or a combination of either.
(x) If you make a mistake typing on the command line, press the BACKSPACE key to correct.
(xi) You can press ESC at any time. If you press ESC while an operation is in progress, it terminates the command.
(xii) To repeat the command you previously entered in AutoCAD, press ENTER (or the spacebar) at the 'Command:' prompt.
(xiii) As an alternative, right-click to display the cursor menu, and then select the Repeat option.
39.
(i) The remarkable advancement in the entertainment industry is due to the Multimedia Technology mainly
(ii) This technology is needed in all mode of entertainment like radio, TV, online gaming, video on demand etc.
(iii) Video on demand or movies on demand is a service that provides movies to television sets on an individual basis at homes.
(iv) Movies are stored in a central server and transmitted through a communication network.
(v) A set-top box connected to the communication network converts the digital information to analog signals and inputs it to the television set.
40.
(i) Animation is the process displaying still images so quickly so that they give the impression of continuous movement.
(ii) In animation the screen object is a vector image in animation. Using numerical transformations the movement of that image along its paths is calculated for their defining coordinates.
(iii) The least frame rate of at least 16 frames per second gives the impression of smoothness and for natural looking it should be at least 25 frames per second.
(iv) Animations may be in two or three dimensional.
(v) The two dimensional animation, bring an image alive, that occur on the flat X and Y axis of the screen.
(vi) While in three dimensional animation it occurs along the three axis X, Y and Z. Animation tools are very powerful and effective.
(vii) The two basic types of animations are Path animation and Frame animation.
Path Animation:
(i) Path animation involves moving an object on a screen that has a constant background.
(ii) e.g. a cartoon character, may move across the screen regardless of any change in the background or the character.
Frame Animation:
(i) In frame animations, multiple objects are allowed to travel simultaneously and the background or the objects also changes.
41.
Drawing Grids
Using Graph Paper tool, you can draw a grid and set the number of rows and columns. A grid is a grouped set of rectangles that you can break apart.
To draw a grid,
1. Click and hold the Polygon tool. A flyout menu will appear.
2. Select the Graph Paper tool from the flyout menu.
3. Now type values in the top and bottom portions of the Columns and rows box on the property bar. The value you type in the top portion of the Columns and rows box specifies the number of columns; the value you type in the bottom portion specifies the number of rows.
4. Click on anywhere in the drawing area where you want the grid to appear.
5. Drag diagonally to draw the required grid.
If you want to draw the grid from its center point outward, hold down Shift key as you drag; if you want to draw a grid with square cells, hold down Ctrl key as you drag.
42.
Follow these steps to place text into a document:
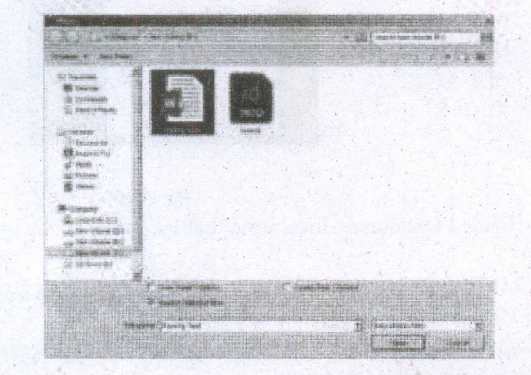
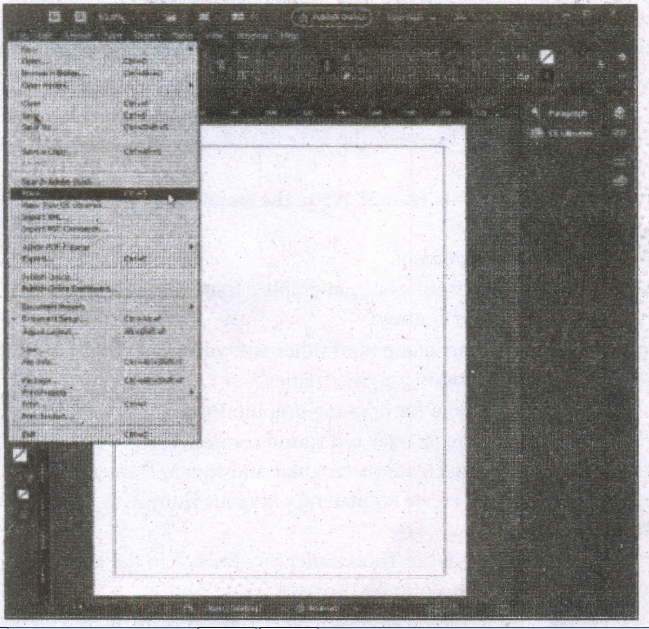
1. Choose File> Place in the menu bar, Place dialog box appears.
2. Locate the text file you want to place, select it and click the Open button on the right side of the Place dialog box.
Place option in the File Menu
Place dialog box
The loaded text cursor
Text Frame
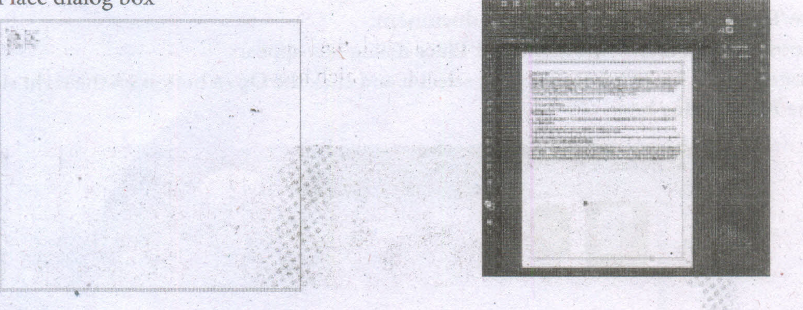
3. Your cursor changes to the loaded text cursor, indicating that the text is ready to be placed into your document.
4. Either click to place the text (filling the current column from the point at which you clicked to the end of the page) or click and drag to create a new text frame.
5. If a text frame cannot contain all the text placed within it, a red plussign overflow symbol appears on the lower-right border of the text frame.
(i) Clicking this overflow symbol loads the remaining text into your cursor for placement in an additional text frame.
(ii) To place this text, just click or click and drag to create a new text frame with the additional text.
(iii) This new text frame is linked to the previous text frame.
(iv) When linked, text flows freely between the two frames if you change the size of the frames or the formatting of the text. .
43.
Tool Toolbox Cursor Use
| Pointer Tool | Used to select, move, and resize text objects and graphics |
| Text tool | Used to type, select, and edit text. |
| Rotating tool | Used to select and rotate objects |
| Cropping tool | Used to trim imported graphics. |
| Line tool | Used to draw straight lines in any direction. |
| Constrained line tool | Used to draw vertical or horizontal lines. |
| Rectangle frame tool | Used to create rectangular placeholders for text and graphics. |
| Ellipse tool | Used to draw circles and ellipses. |
| Ellipse frame tool | Used to create elliptical placeholders for text and graphics. |
| Polygon tool | Used to draw polygons. |
| Polygon frame tool | Used to create polygonal placeholders for text and graphics. |
| Hand tool | Used to scroll the page (an alternative to the scroll bar) |
| Zoom tool | Used to magnify or reduce an area of the page |

12th Standard Syllabus & Materials
12th Standard
TN 12th Computer Applications வலையமைப்பு வடமிடல் Sample Question Papers Study Material - QB365 Set A
NEW12th Standard
TN 12th Computer Applications களப்பெயர் முறைமை (DNS) Sample Question Papers Study Material - QB365 Set A
NEW12th Standard
TN 12th Computer Applications வலையமைப்பு எடுத்துக்காட்டுகள் மற்றும் நெறிமுறைகள் Sample Question Papers Study Material - QB365 Set A
NEW12th Standard
TN 12th Computer Applications கணினி வலையமைப்பு ஓர் அறிமுகம் Sample Question Papers Study Material - QB365 Set A



Tamilnadu Stateboard 12th Standard Subjects

Maths

Chemistry

Physics

Biology

Computer Science

Business Maths and Statistics

Economics

Commerce

Accountancy

History
Computer Applications
Biology
Computer Technology
Computer Applications
Computer Science
Business Maths and Statistics
Commerce
Economics
Maths
Chemistry
Physics
Computer Technology
History
Accountancy

Tamil

English

French
Tamilnadu Stateboard Standards
