
 100% FREE ACCESS
12th Standard Syllabus & Materials
12th Standard
TN 12th Maths Applications of Matrices and Determinants Sample Question Papers Study Material - QB365 Set A
NEW12th Standard
TN 12th Computer Applications மின்னணு தரவு பரிமாற்றம் Sample Question Papers Study Material - QB365 Set A
NEW12th Standard
TN 12th Computer Applications மின் - வணிக பாதுகாப்பு அமைப்புகள் Sample Question Papers Study Material - QB365 Set A
NEW12th Standard
TN 12th Computer Applications மின்னணு செலுத்தல் முறைகள் Sample Question Papers Study Material - QB365 Set A
NEW12th Standard
TN 12th Computer Applications மின் - வணிகம் Sample Question Papers Study Material - QB365 Set A
NEW12th Standard
TN 12th Computer Applications திறந்த மூல கருத்துருக்கள் Sample Question Papers Study Material - QB365 Set A

Published on: 05/06/2021
QB365 provides detailed and simple solution for every book back questions in class 12 Computer Technology subject.It will helps to get more idea about question pattern in every book back questions with solution.
Download Tamil Nadu 12th Standard Computer Technology question papers, model tests, one-mark questions, important questions, and public exam papers in PDF format. Free study materials and answer keys for TN State Board students.
Questions + Answers key
Take MCQ Computer Technology Test
1.
Write briefly about Command window.
2.
Describe some of the tools displayed in Tools Panel.
3.
Explore the opportunities Animation filed movie industry.
4.
Explain in detail Process of Multimedia.
5.
Write the steps to draw a grid.
6.
Write the steps to draw a polygon.
7.
Write the steps to create type on a path.
8.
Write the steps to create a new document in InDesign.
9.
How can you convert text in a text block to a frame?
10.
Explain the tools in PageMaker toolbox.
1.
Command Window
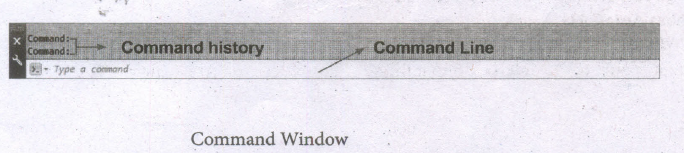
(i) The command window is normally located at the bottom of the application window, just above the statusbar.
(ii) This window normally contains three lines of text and the first two lines list the immediate command history,
(iii) The bottom line is the command line. If you do not see the command window, press Ctrl + 9 to make it appear.
(iv) You can enter a command manually at the command line.
(v) You can type at the cursor position on the command line, that is, the Command: prompt.
(vi) If you just type the first letter of a command, it will list all the commands starting with that letter.
(vii) Note: Always press ENTER after you type values on the command line.
(viii) You can drag this window to a different place on the screen and resize it.
(ix) When you enter a command, AutoCAD doesn't care if you use UPPERCASE or lowercase characters, or a combination of either.
(x) If you make a mistake typing on the command line, press the BACKSPACE key to correct.
(xi) You can press ESC at any time. If you press ESC while an operation is in progress, it terminates the command.
(xii) To repeat the command you previously entered in AutoCAD, press ENTER (or the spacebar) at the 'Command:' prompt.
(xiii) As an alternative, right-click to display the cursor menu, and then select the Repeat option.
2.
The Flash Tools panel includes the tools you need to create, select, or edit graphics on the Stage.
(i) The double arrows at the top of the Tools panel are used to collapse the panel to icon only view, or to expand the panel and see all the tools.
(ii) By default, the toolbar is on the right side of your screen.
(iii) The single capital letter in parentheses indicates tile keyboard shortcuts to select those tools.
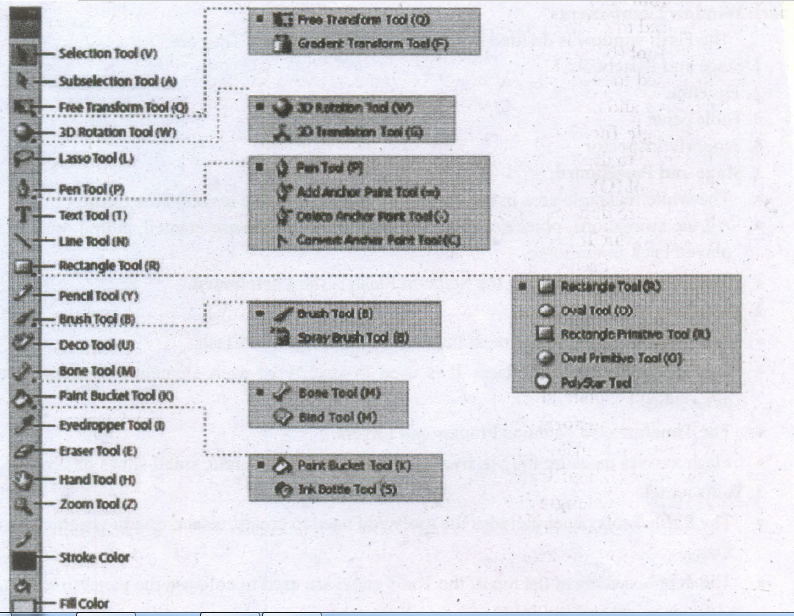
3D Rotation Tool (W)
It is used to create 3D effects by rotating movie clips in 3D space on the Stage.
3D Translation Tool (G)
It is used to create 3D effects by moving movie clips in 3D space on the Stage. The 3D Rotation and the 3D Translation tools are grouped within one icon on the Tools panel.
Lasso Tool (L)
It is used to select objects or parts of objects by drawing a freehand.
Pen Tool (P)
It is used to draw lines and curves by creating a series of dots, known as anchor points, that are automatically connected. Other tools used to add, delete, and convert the anchor points created by the Pen tool are grouped with the Pen tool.
Text Tool (T)
It is used to create and edit text.
Line Tool (N)
It is used to draw straight lines. You can draw vertical, horizontal, and 45° diagonal lines by pressing and holding Shift key while drawing the line.
Rectangle Tool(R)
It is used to draw rectangular shapes. Press and hold Shift key to draw a perfect square.
Oval Tool (O)
It is used to draw oval shapes. Press and hold Shift key to draw a perfect circle.
Subselection Tool (A)
This tool is used to select, drag, and reshape an object. We know that vector graphics are composed of lines and curves (each of which is a segment) connected by anchor points. When you select art object with this tool, it displays the anchor points and allows you to use them to edit the object.
Free Transform Tool (Q)
It is used to rotate, scale, skew, and distort objects.
Gradient Transform Tool (F)
It is used to transform a gradient fill by adjusting the size, direction, or center of the fill. The Free and Gradient Transform tools are grouped within one icon on the Tools panel.
Primitive Rectangle and Oval (R)
It is used to draw objects with properties such as corner radius or inner radius, that can be changed using the Properties panel.
PolyStar Tool
It is used to draw polygons and stars. The Rectangle, Oval, Primitive, and PolyStar tools are grouped within one tool on the Tools panel.
3.
(i) The remarkable advancement in the entertainment industry is due to the Multimedia Technology mainly
(ii) This technology is needed in all mode of entertainment like radio, TV, online gaming, video on demand etc.
(iii) Video on demand or movies on demand is a service that provides movies to television sets on an individual basis at homes.
(iv) Movies are stored in a central server and transmitted through a communication network.
(v) A set-top box connected to the communication network converts the digital information to analog signals and inputs it to the television set.
4.
1. Conceptual Analysis and Planning
(i) The process of multimedia making begins with a conceptual ignition point.
(ii) Conceptual analysis identifies a appropriate theme, budget arid content availability on that selected theme.
(iii) Additional criteria like copyright issues also are considered in this phase.
2. Project design:
(i) Once the theme is finalized objectives, goals, and activities are drawn for the multimedia project.
(ii) General statements are termed as goals.
(iii) The specific statements in the project is known as the objectives.
(iv) Activities are series of actions performed to implement an objective.
(v) These activities contribute to the Project design phase.
3. Pre-production:
(i) Based on the planning and design, it is necessary to develop the project.
(ii) The following are the steps involved in pre-production:
4. Budgeting:
(i) Budgeting for each phases like consultants, hardware, software, travel, communication and publishing is estimated for all the multimedia projects.
5. Multimedia Production Team:
(i) The production team for a highend multimedia project requires a team efforts,
(ii) The team comprises of members playing various roles and responsibilities like Scriptwriter, Production manager, Editor, Graphics Architect, Multimedia Architect and Web Master.
5.
Drawing Grids
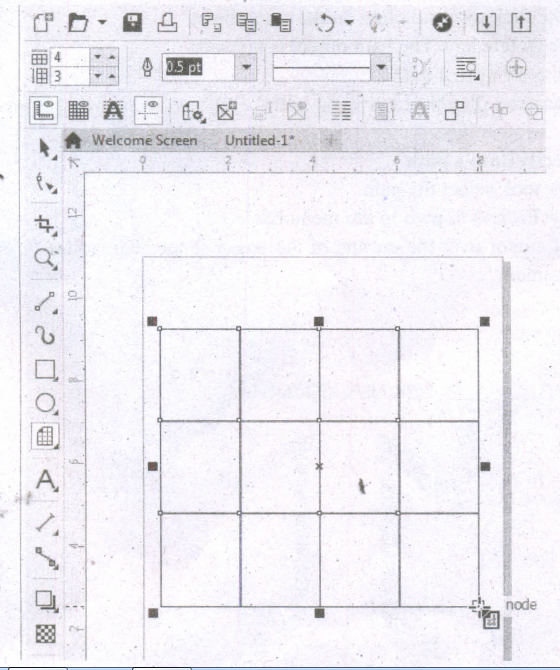
Using Graph Paper tool, you can draw a grid and set the number of rows and columns. A grid is a grouped set of rectangles that you can break apart.
To draw a grid,
1. Click and hold the Polygon tool. A flyout menu will appear.
2. Select the Graph Paper tool from the flyout menu.
3. Now type values in the top and bottom portions of the Columns and rows box on the property bar. The value you type in the top portion of the Columns and rows box specifies the number of columns; the value you type in the bottom portion specifies the number of rows.
4. Click on anywhere in the drawing area where you want the grid to appear.
5. Drag diagonally to draw the required grid.
If you want to draw the grid from its center point outward, hold down Shift key as you drag; if you want to draw a grid with square cells, hold down Ctrl key as you drag.
6.
Creating Polygons
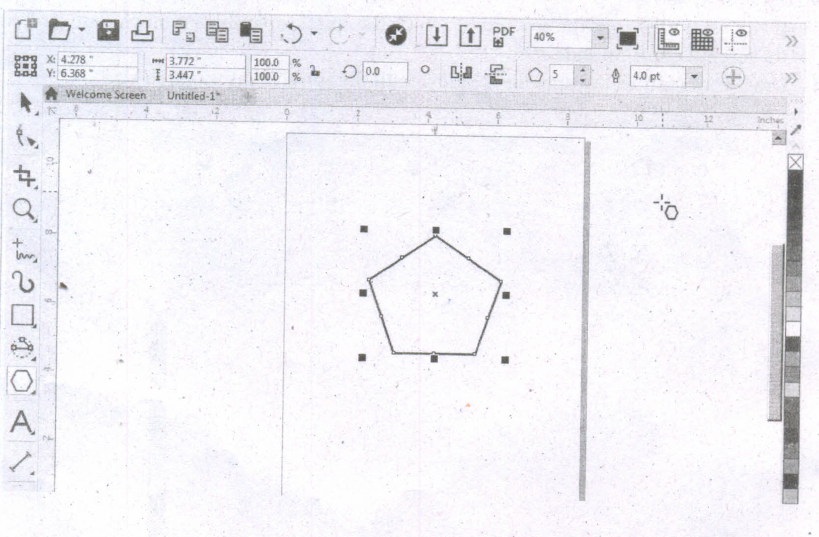
1. To draw a polygon Cabo known as pentagon: a five-sided figure, select the Polygon tool in the toolbox. The mouse pointer changes to a crosshair with a small polygon beneath it.
2. Click on anywhere in the drawing area and drag the mouse pointer.
3. Release the mouse button where you like the end of the polygon.
4. To increase the number of sides of your polygon, select the polygon you have drawn using the Pick tool.
5. Place the mouse pointer on the Number of Points on Polygon text box and type the number of sides you like for you polygon. You can also set the number of sides for your polygon and then draw it.
7.
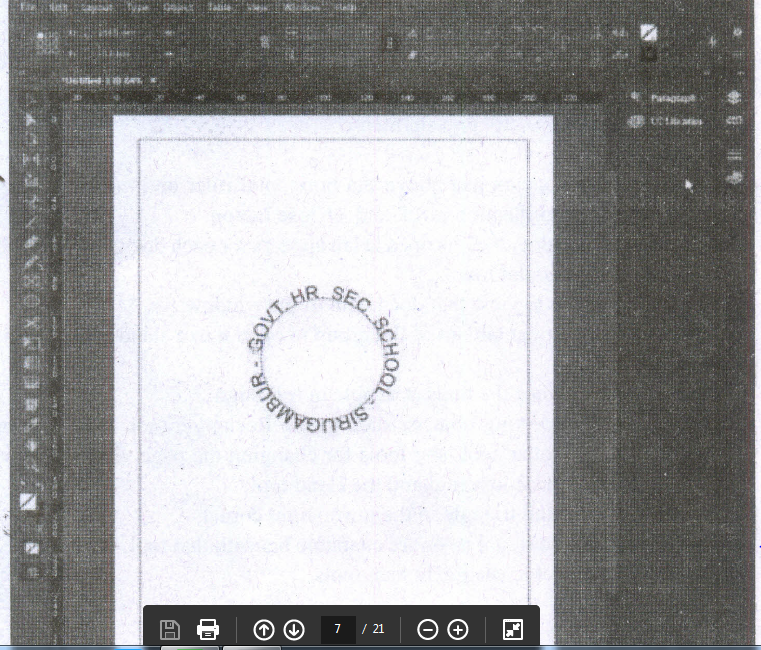
Creating Path Type
(i) With the Type on a Path tool, you can add type along the inner or outer edge of a path.
(ii) You can place the text on either side of the path, but not on both.
(iii) If you initially place it on the inner part of the path, you can always move it to the outer part of the path later.
(iv) When you select text on a path, brackets appear that you can drag to adjust the position and placement of the text.
Create Type on a Path
1. Select the Type on a Path tool on the Tools panel.
2. Click on the edge of the path (closed or open) to which you want to add type. A flashing insertion point appears in the text frame. Any fill or stroke on the object is removed.
3. Type some text. The text automatically wraps to the shape of the text frame. Don't press Enter key. The type appears along the edge of the object, conforms to its shape, and removes the fill and stroke. If the overflow symbol appears, deselect the text frame, select the Direct Selection tool on the Tools panel, and then drag a corner to reshape the text frame.
4. Select a Selection tool or select the Type tool again.
8.
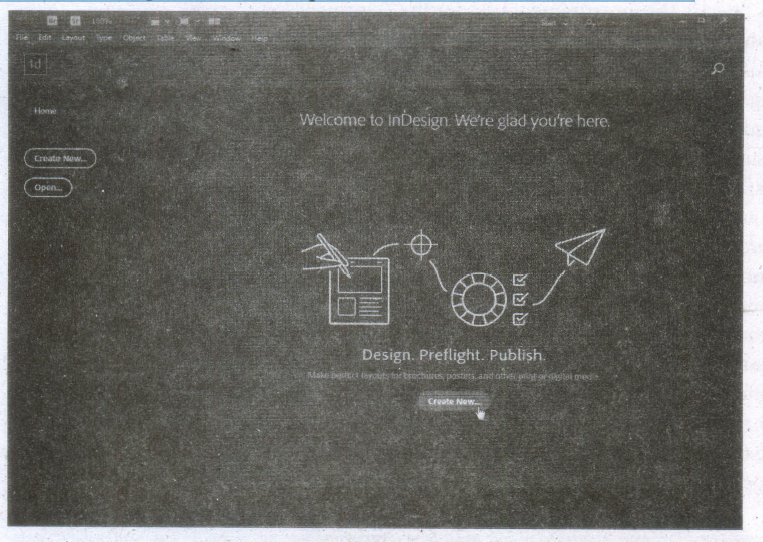
Starting Adobe InDesign CC
1. Choose Start> All Programs> Adobe lriDesign CC 2019 (or)
Click on the InDesign short cut on the desktop.
2. Welcome to InDesign window will open. Now click on Create New ... button.
3. Now a New Document window will open.
When You create a new document, you have the opportunity to set many options in the New Document dialog box.
To set the basic options for a new document:
i) In the New Document dialog box, click a category tab: Print, Web, or Mobile.
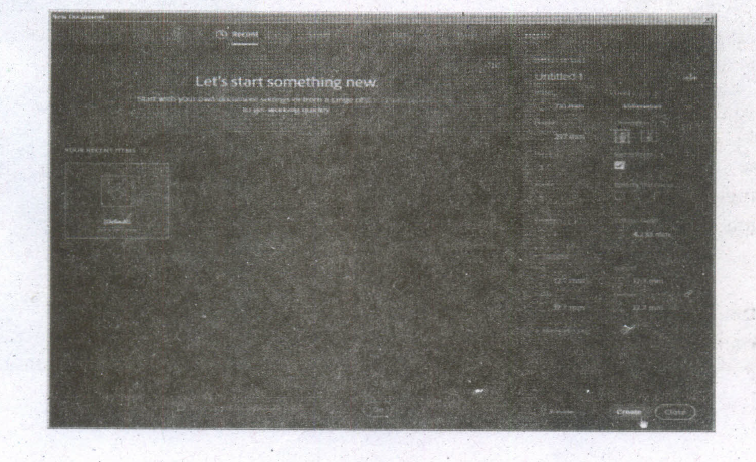
Specify the following options.for the selected preset:
Width and Height: Specify the size of the document.
Units: Specify the measurement unit for the document.
Orientation: Specify a page orientation for the document: Landscape or Portrait.
Pages: Specify the number M pages to create in the document.
Facing pages: If you're creating a single-sided document-like an advertisement, poster, or handbill-leave Pacing Pages turned off. Turn it on for books and magazines, which usually have both left-hand and right-hand pages.
Start#: Specify which number the document starts on. If you specify an even number (such as 2) with Pacing Pages selected, the first spread in the document begins witha two-page spread.
Primary Text Frame: Select this option to add a primary text frame on the master page.
Columns: Specify the number of columns to add in the document.
Column Gutter: Specify the amount of whitespace between columns.
Margins: Specify the margins for each side of the document. To use. different values for different sides, delink the dimensions by clicking the chain icon.
Bleed and Slug: Specify the position of the bleed and slug along each side of the document. To use different values for different sides, delink the dimensions by clicking the chain icon.
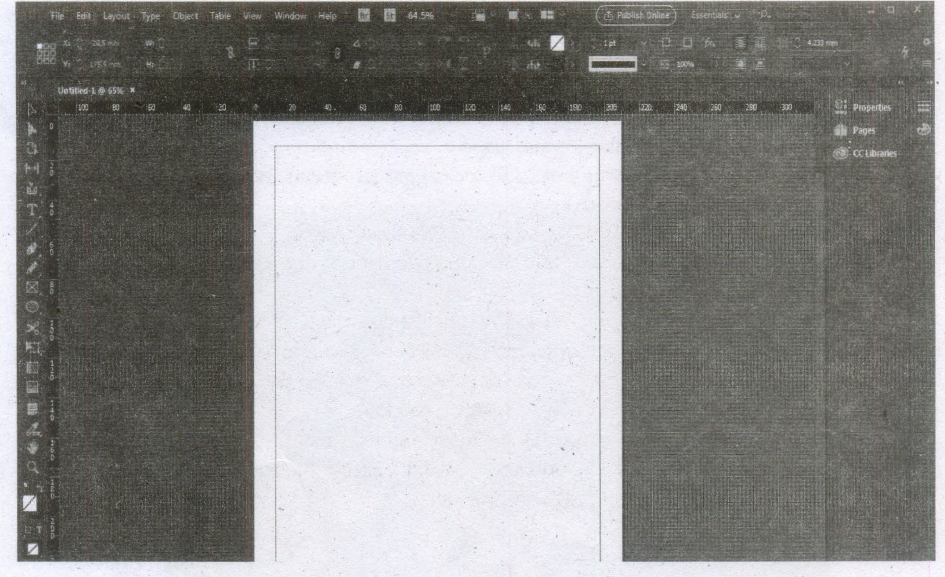
4. Click the Create button to open a document with the preset settings.
9.
Converting text in a Text block to a Frame
After created text in a text block, if you want to convert it to a frame. You can do this by using these steps.
1. Draw the frame of your choice using one of the Pagemaker's Frame tool.
2. Select the text block you want to insert in the frame.
3. Click the frame while pressing the Shift key. Now both elements will be selected.
4. Choose Element > Frame > Attach Content on the Menu bar.
5. Now the text appears in the frame.
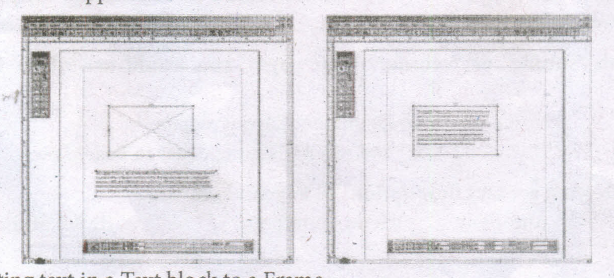
Converting text in a Text block to a Frame
10.
Tool Toolbox Cursor Use
| Pointer Tool | Used to select, move, and resize text objects and graphics |
| Text tool | Used to type, select, and edit text. |
| Rotating tool | Used to select and rotate objects |
| Cropping tool | Used to trim imported graphics. |
| Line tool | Used to draw straight lines in any direction. |
| Constrained line tool | Used to draw vertical or horizontal lines. |
| Rectangle frame tool | Used to create rectangular placeholders for text and graphics. |
| Ellipse tool | Used to draw circles and ellipses. |
| Ellipse frame tool | Used to create elliptical placeholders for text and graphics. |
| Polygon tool | Used to draw polygons. |
| Polygon frame tool | Used to create polygonal placeholders for text and graphics. |
| Hand tool | Used to scroll the page (an alternative to the scroll bar) |
| Zoom tool | Used to magnify or reduce an area of the page |

12th Standard Syllabus & Materials
12th Standard
TN 12th Computer Applications வலையமைப்பு வடமிடல் Sample Question Papers Study Material - QB365 Set A
NEW12th Standard
TN 12th Computer Applications களப்பெயர் முறைமை (DNS) Sample Question Papers Study Material - QB365 Set A
NEW12th Standard
TN 12th Computer Applications வலையமைப்பு எடுத்துக்காட்டுகள் மற்றும் நெறிமுறைகள் Sample Question Papers Study Material - QB365 Set A
NEW12th Standard
TN 12th Computer Applications கணினி வலையமைப்பு ஓர் அறிமுகம் Sample Question Papers Study Material - QB365 Set A



Tamilnadu Stateboard 12th Standard Subjects

Maths

Chemistry

Physics

Biology

Computer Science

Business Maths and Statistics

Economics

Commerce

Accountancy

History
Computer Applications
Biology
Computer Technology
Computer Applications
Computer Science
Business Maths and Statistics
Commerce
Economics
Maths
Chemistry
Physics
Computer Technology
History
Accountancy

Tamil

English

French
Tamilnadu Stateboard Standards


