
 100% FREE ACCESS
12th Standard Syllabus & Materials
12th Standard
TN 12th Maths Applications of Matrices and Determinants Sample Question Papers Study Material - QB365 Set A
NEW12th Standard
TN 12th Computer Applications மின்னணு தரவு பரிமாற்றம் Sample Question Papers Study Material - QB365 Set A
NEW12th Standard
TN 12th Computer Applications மின் - வணிக பாதுகாப்பு அமைப்புகள் Sample Question Papers Study Material - QB365 Set A
NEW12th Standard
TN 12th Computer Applications மின்னணு செலுத்தல் முறைகள் Sample Question Papers Study Material - QB365 Set A
NEW12th Standard
TN 12th Computer Applications மின் - வணிகம் Sample Question Papers Study Material - QB365 Set A
NEW12th Standard
TN 12th Computer Applications திறந்த மூல கருத்துருக்கள் Sample Question Papers Study Material - QB365 Set A

Published on: 13/05/2022
QB365 provides detailed and simple solution for every book back questions in class 12 Computer Technology subject.It will helps to get more idea about question pattern in every book back questions with solution.
latest Book back QuestionsDownload Tamil Nadu 12th Standard Computer Technology question papers, model tests, one-mark questions, important questions, and public exam papers in PDF format. Free study materials and answer keys for TN State Board students.
Questions + Answers key
Take MCQ Computer Technology Test
1.
Write about the rectangle object and the steps to draw a rectangle in AutoCAD.
2.
Write about AutoCAD Interface.
3.
Explain the components used in Flash Window.
4.
Explain in detail about production team Roles and Responsibilities.
5.
Explain in detail Techniques of Animation.
6.
Brief about Fitting text to a path.
7.
How to create a star in CorelDRAW?
8.
Write the steps to draw a spiral.
9.
Write the steps to place text into a document.
10.
Write the steps to draw a star using polygon tool?
1.
(i) One of the most basic shapes used by drafters and designers is the rectangle. You can create a rectangle using the LINE command, but doing so has some disadvantages.
(ii) For example, you would have to take the time to make sure that the corner angles are exactly 90°. Also, each line segment would be a separate object.
(iii) Therefore, AutoCAD 2016 provides the RECTANG command, which allows you to create a rectangle with perfect corners and as a single object.
(iv) Clicking anywhere on a rectangle created with the RECTANG command selects the entire rectangle.
To draw a Rectangle using the cursor to select the corners:
1. Command: RECTANGLE (or) REC (Press Enter Key)
2. The following will appear on the command line:
RECTANGLE
Specify first corner point or [Chamfer/Elevation/Fillet/Thickness/Width]:
Specify the location of the first corner by moving the cursor to a location (P1) and then press the left mouse button.
3. The following will appear on the command line:
Specify other corner point or [Area/Dimensions/Rotation]:
Specify the location of the diagonal corner (P2) by moving the cursor diagonally away from the first corner (P1) and pressing the left mouse button. Now a rectangle will appear.
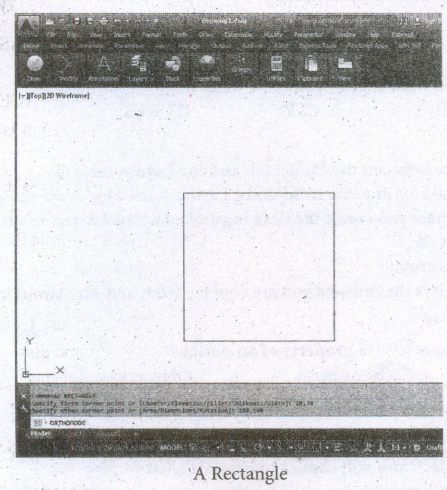
Draw a rectangle defined by diagonal points (20,30) and (150,160).
Command: RECTANGLE ⤶
Specify first corner point or [Chamfer/Elevation/Fillet/Thickness/Width]: 20,30 ⤶
Specify other corner point or [Area/Dimensions/Rotation]: 150,160 ⤶
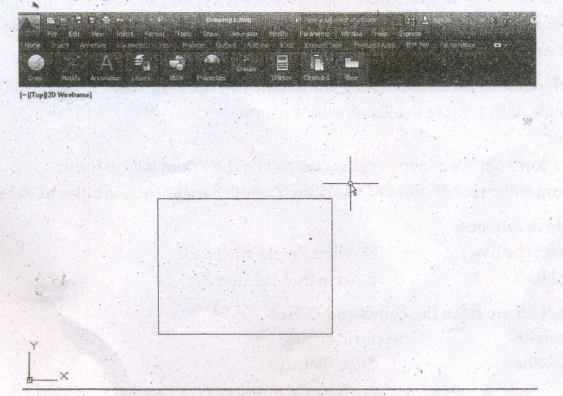
A Rectangle define by diagonal points (20.30) and (150,160)
2.
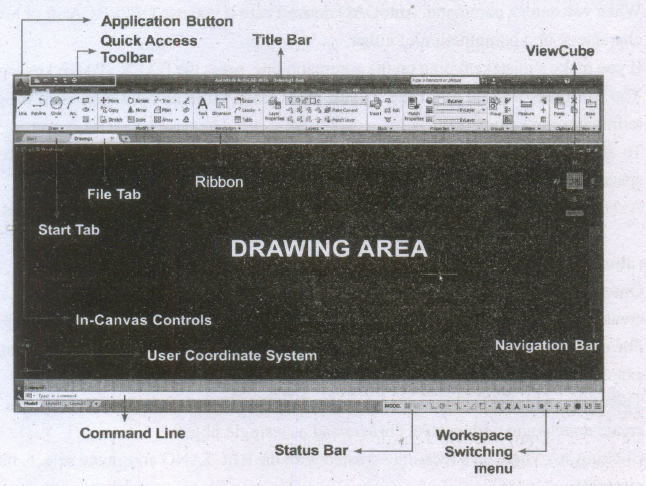
The AutoCAD 2016 interface is based on Ribbons and the Application Menu,
The important feature of this interface is that the size of the Graphical Area will be bigger.
3.
The Flash CS6 workspace includes a variety of tools and other components that you work with to create Flash applications.
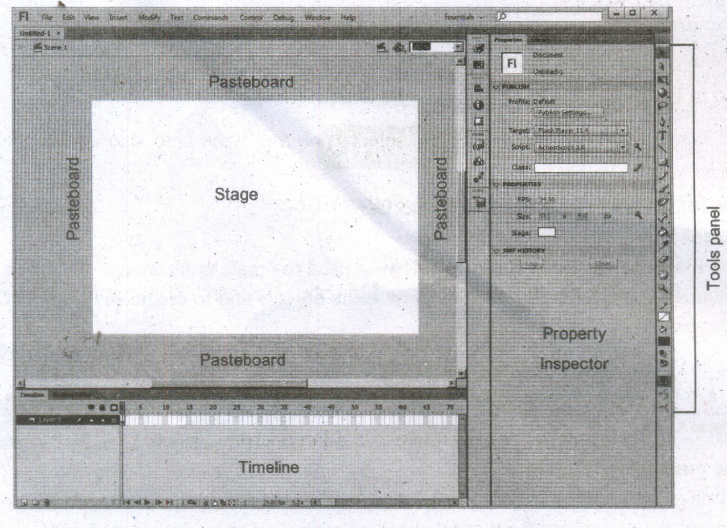
Flash Window Components
The Flash window is divided into four main components. They are
1. Stage and Pasteboard
2. Timeline
3. Tools panel
4. Property Inspector
1. Stage and Pasteboard:
(i) The white rectangle area in the middle of your workspace is called the Stage.
(ii) All the animations, objects and scenes for a Flash movie are created, edited, placed and played back in the stage.
(iii) The gray area surrounding the Stage in Flash is the Pasteboard.
2. Timeline
(i) The time line is one of the most important components of Flash.
(ii) It is located below the Stage. It is used to specify of each element's appearance and animation.
(iii) The Timeline also contains Frames and Layers.
(iv) Flash movies measure time in frames. Frames are the discrete, small slices of time.
3. Tools panel
(i) The Flash Tools panel includes the tools you need to create, select, or edit graphics on the Stage.
(ii) The double arrows at the top of the Tools panel are used to collapse the panel to icon only view, or to expand the panel and see all the tools.
4. Property Inspector
(i) The Property Inspector appears on the right side of your Flash workspace by default.
(ii) It is grouped with the Library panel.
(iii) It displays properties and options for objects selected on the Stage, and also allows you to modify them.
(iv) The object can be text, an image, a line, or any other shape.
4.
(i) Managing team members in a way to get maximum outcome with high degree of efficiency is mandatory in multimedia production.
(ii) The fine quality high-end multimedia production application requires a specialize team comprises of the following members:
Production Manager:
(i) In a multimedia production, the role of production manager is to define, and coordinate, the production of the multimedia project in time and with full quality.
(ii) The production manager should be an expertise in the technology expert, good at proposal writing, good communication skills and budget management skills.
(iii) Also must have experience in human resource management and act as an efficient team leader.
Content Specialist:
(i) Content specialist is responsible for performing all research activities concerned with the proposed application's content.
(ii) Program content refers to projects information, graphics, data or facts presented through the multimedia production.
Script Writer:
(i) Video and film scripts represents a linear sequence of events.
(ii) The script writer visualizes the concepts in three dimensional environments and if needed uses the virtual reality integration into the program.
Text Editor:
(i) The content of a multimedia production always must flow logically and the text should always be structured and correct grammatically.
(ii) Text and narration is an integrated part of the application.
Multimedia Architect:
(i) The multimedia architect integrates all the multimedia building blocks like graphics, text, audio, music, video, photos and animation by using an authoring software.
Computer Graphic Artist:
(i) The role of Computer Graphic Artist is to deal with the graphic elements of the programs like backgrounds, bullets, buttons, pictures editing, 3-D objects, animation, and logos etc.
Audio and Video Specialist:
(i) The roles of these specialists are needed for dealing with narration and digitized videos to be added in a multimedia presentation.
(ii) They are responsible for recording, editing sound effects and digitizing.
Computer Programmer:
(i) The computer programmer writes the lines of code or scripts in the appropriate language.
(ii) These scripts usually develops special- functions like developing the software to give the size and shape of video windows, controlling peripherals and so on.
Web Master:
(i) The responsibility of the web master is to create and maintain an Internet web page.
(ii) They converts a multimedia presentation into a web page.
(iii) Final multimedia product is ready for consultation is a joint effort of the entire team.
(iv) Initially, the production manager identifies the project content, while the web master provides access to a wide range of community through web-services.
5.
(i) Animation is the process displaying still images so quickly so that they give the impression of continuous movement.
(ii) In animation the screen object is a vector image in animation. Using numerical transformations the movement of that image along its paths is calculated for their defining coordinates.
(iii) The least frame rate of at least 16 frames per second gives the impression of smoothness and for natural looking it should be at least 25 frames per second.
(iv) Animations may be in two or three dimensional.
(v) The two dimensional animation, bring an image alive, that occur on the flat X and Y axis of the screen.
(vi) While in three dimensional animation it occurs along the three axis X, Y and Z. Animation tools are very powerful and effective.
(vii) The two basic types of animations are Path animation and Frame animation.
Path Animation:
(i) Path animation involves moving an object on a screen that has a constant background.
(ii) e.g. a cartoon character, may move across the screen regardless of any change in the background or the character.
Frame Animation:
(i) In frame animations, multiple objects are allowed to travel simultaneously and the background or the objects also changes.
6.
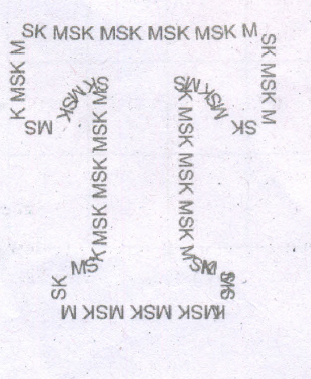
CorelDRAW allows you fit a string of text to any path a straight or curved line, a rectangle, an ellipse, or another letter or text string.
To fit text to a path, use the Fit
Text to Path command in the Text menu.
(i) It becomes available only when you select both a text object and a non-text object at the same time.
(ii) A text string can be fitted to the "path" traced by the second object's outline, as shown in the following examples:
To fit text to a path:
(i) Select the text object and the second object using the Pick tool and the Shift key.
(ii) Choose Fit Text To Path from the Text menu.
(iii) The text is redrawn along the path of the second object.
(iv) You can remove the path object with the Delete command when the text is positioned correctly.
To remove the path object
(i) Select the Shape tool and click on the path object.
(ii) Then Select the Pick tool and click on the path object.
(iii) Now press the Delete key. The path object is deleted.
Entering Text Directly onto a Path
(i) Text can be entered directly onto most paths - curves, rectangles, ellipses, shapes, and stars.
To enter text directly onto a path
(i) Using the Pick tool, select the path.
(ii) Choose Text> Fit text to path in the menu bar.
(iii) Move the text cursor over the outline, of the target shape. The pointer changes to the Fit text to path pointer.
(iv) Click on it.
(v) Type along the path.
7.
Creating Stars
Polygon-tool has a small arrow in the lower-right corner of the tool. That little arrow indicates that this tool has a flyout.
To draw a star,
1. Click on the Polygon tool and hold down the mouse key. A flyout menu will appear showing you other tools.
2. Click on the Star tool from the flyout menu.
3. Click on anywhere in the drawing area and drag the mouse pointer.
4. Release the mouse button where you would like the end of the star.
8.
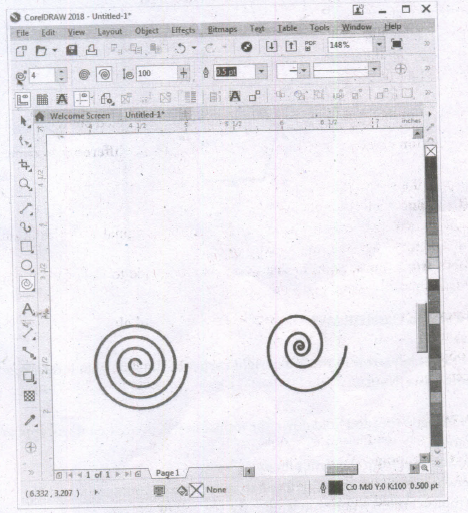
To draw a spiral,
(i) Click and hold the Polygon tool. A flyout menu will appear.
(ii) Click on the Spiral tool from the flyout menu.
(iii) Now you should type a value in the Spiral revolutions box on the property bar to set the number of full-circle revolutions to appear in the new spiral object.
(iv) Next, click one of the following buttons on the property bar:
1. Symmetrical spiral
2. Logarithmic spiral
If you want to change the amount by which the spiral expands as it moves outward, move the Spiral expansion slide. Drag diagonally in the drawing window until the spiral is the required size.
9.
Follow these steps to place text into a document:
1. Choose File> Place in the menu bar, Place dialog box appears.
2. Locate the text file you want to place, select it and click the Open button on the right side of the Place dialog box.
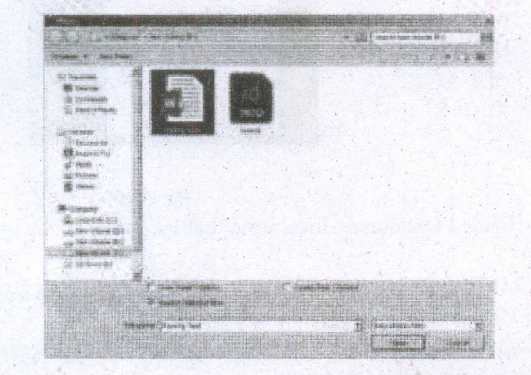
Place option in the File Menu
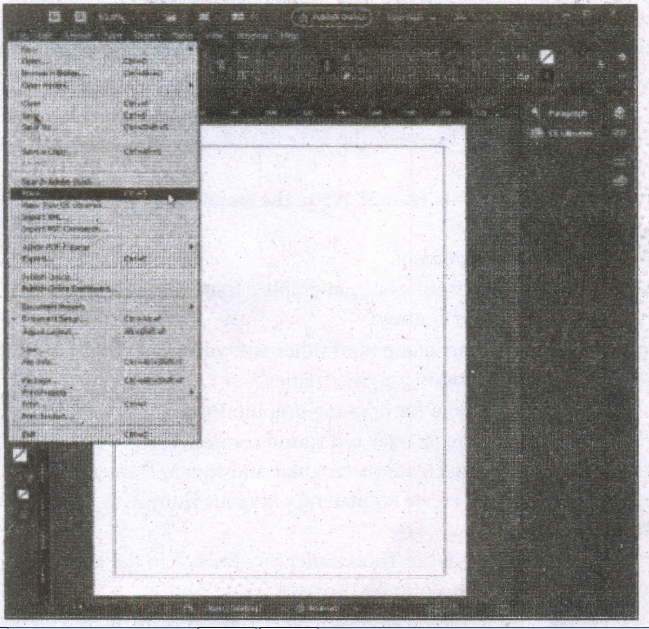
Place dialog box
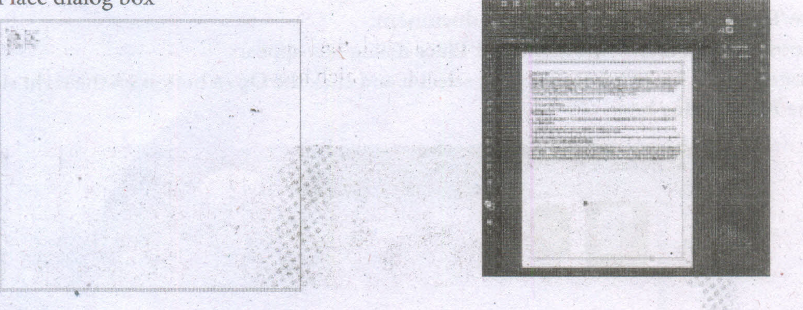
The loaded text cursor
Text Frame
3. Your cursor changes to the loaded text cursor, indicating that the text is ready to be placed into your document.
4. Either click to place the text (filling the current column from the point at which you clicked to the end of the page) or click and drag to create a new text frame.
5. If a text frame cannot contain all the text placed within it, a red plussign overflow symbol appears on the lower-right border of the text frame.
(i) Clicking this overflow symbol loads the remaining text into your cursor for placement in an additional text frame.
(ii) To place this text, just click or click and drag to create a new text frame with the additional text.
(iii) This new text frame is linked to the previous text frame.
(iv) When linked, text flows freely between the two frames if you change the size of the frames or the formatting of the text. .
10.
Drawing a Star using Polygon tool To draw a Star
1. Click on the Polygon tool from the toolbox. The cursor changes to a crosshair.
2. Click and drag anywhere on the screen. As you drag, a Polygon appears.
3. Release the mouse button when the Polygon is of the desired size.
4. Choose Element > Polygon Settings in the menu bar.

12th Standard Syllabus & Materials
12th Standard
TN 12th Computer Applications வலையமைப்பு வடமிடல் Sample Question Papers Study Material - QB365 Set A
NEW12th Standard
TN 12th Computer Applications களப்பெயர் முறைமை (DNS) Sample Question Papers Study Material - QB365 Set A
NEW12th Standard
TN 12th Computer Applications வலையமைப்பு எடுத்துக்காட்டுகள் மற்றும் நெறிமுறைகள் Sample Question Papers Study Material - QB365 Set A
NEW12th Standard
TN 12th Computer Applications கணினி வலையமைப்பு ஓர் அறிமுகம் Sample Question Papers Study Material - QB365 Set A



Tamilnadu Stateboard 12th Standard Subjects

Maths

Chemistry

Physics

Biology

Computer Science

Business Maths and Statistics

Economics

Commerce

Accountancy

History
Computer Applications
Biology
Computer Technology
Computer Applications
Computer Science
Business Maths and Statistics
Commerce
Economics
Maths
Chemistry
Physics
Computer Technology
History
Accountancy

Tamil

English

French
Tamilnadu Stateboard Standards


