
 100% FREE ACCESS
12th Standard Syllabus & Materials
12th Standard
TN 12th Maths Applications of Matrices and Determinants Sample Question Papers Study Material - QB365 Set A
NEW12th Standard
TN 12th Computer Applications மின்னணு தரவு பரிமாற்றம் Sample Question Papers Study Material - QB365 Set A
NEW12th Standard
TN 12th Computer Applications மின் - வணிக பாதுகாப்பு அமைப்புகள் Sample Question Papers Study Material - QB365 Set A
NEW12th Standard
TN 12th Computer Applications மின்னணு செலுத்தல் முறைகள் Sample Question Papers Study Material - QB365 Set A
NEW12th Standard
TN 12th Computer Applications மின் - வணிகம் Sample Question Papers Study Material - QB365 Set A
NEW12th Standard
TN 12th Computer Applications திறந்த மூல கருத்துருக்கள் Sample Question Papers Study Material - QB365 Set A

Published on: 13/05/2022
QB365 provides detailed and simple solution for every
Creative Questions in class 12 Computer Technology Subject.It will helps to get more idea about question pattern in every Creative questions with solution.
Download Tamil Nadu 12th Standard Computer Technology question papers, model tests, one-mark questions, important questions, and public exam papers in PDF format. Free study materials and answer keys for TN State Board students.
Questions + Answers key
Take MCQ Computer Technology Test
1.
How will you draw a oval using oval tool?
2.
Explain Do You Shoot Raw Or Jpeg?
3.
How Can I View Video Files On The Web Site?
4.
What Are The Multimedia Authoring Tools?
5.
Write in detail about the various alignment in formatting paragraph?
6.
Explain in detail about the printing the documents?
7.
How will you work will the pagemaker pages?
8.
Mention the shortcut using keyboard movement keys?
9.
How will you connert text in a text block to a frame?
10.
What are the shortcut keys for the tools in the pagemaker?
1.
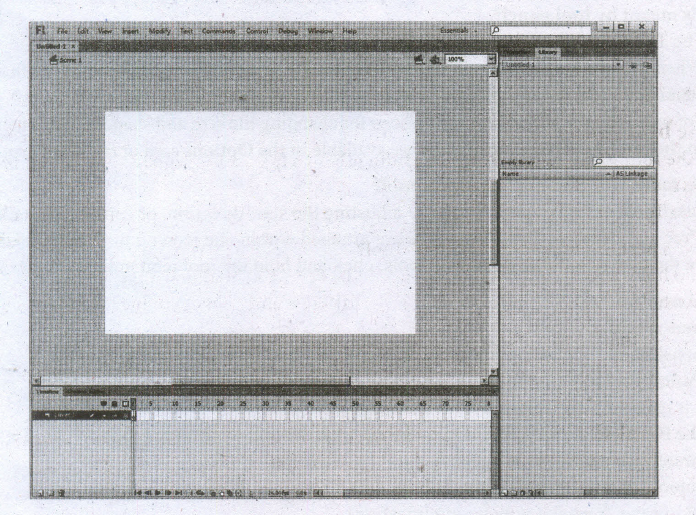
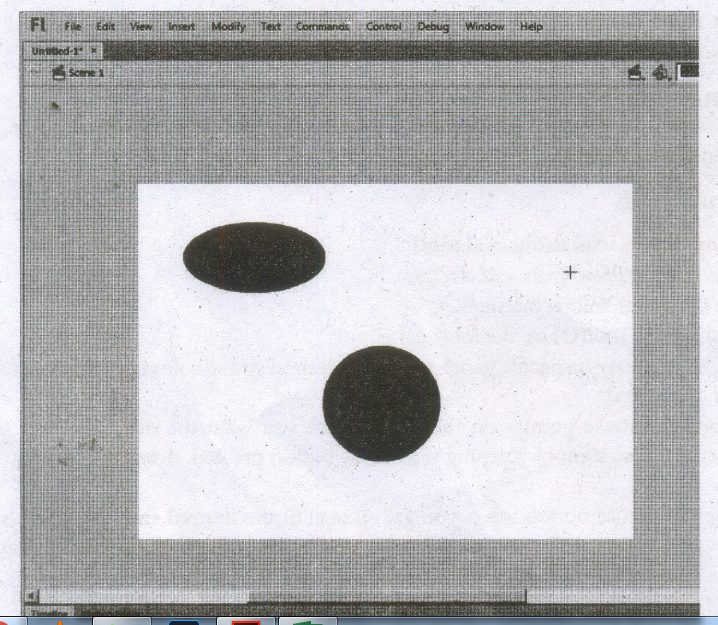
This tool is used to draw ovals and circles.
To use the Oval tool, follow the steps.
1. Click the Oval Tool( O) on the tools panel.
2. From the Property Inspector panel, select the desired stroke colour, thickness, style and fill colour of the oval.
3. Position the mouse pointer on the stage where you want the oval. The mouse pointer changes to a plus sign(+). Keeping the mouse button pressed, drag the mouse to draw the oval.
4. Release the mouse button when you get an oval of the desired size. You can also draw a circle using the Oval Tool by just pressing and holding the Shift key while dragging the mouse.
2.
(i) I shoot entirely in RAW, basically as a just in case, but I extract the JPGs from my RAW files in Photo Mechanic and edit those.
(ii) Most of the. RAW files will never see the light of day, unless there is a great shot that was extremely over-/under-exposed,
(iii) I prefer this method because it allows me to have the security of RAW while getting all the great color, contrast, and vibrancy of an in-camera JPG.
3.
There are two ways to view the online video clips.
Because of variations in browsers and operating systems, both methods might not work for all individuals. However, one of the two methods should work if you have the Windows Media Player installed.
1. Click on the link to the video. Depending on what your plug-in settings are in your browser, Windows Media Player may launch. and begin downloading the video clip. The video should begin to play after enough is downloaded for it to play smoothly.
2. Right click (PC) or click and hold (Mac) the link to the video. Choose "Save Target As .." (It) or "Save Link As ..." (Netscape) to save the file. Make sure that the correct file type is selected in the drop down list below the file name. After the file has been saved to your computer, double click on it to launch it in Windows Media Player. If your computer is not set up to launch the player upon double clicking, first open Windows Media Player and then choose "File" and "Open" to load the video clip. Press the play button to begin playing.
4.
Multimedia authoring tools make it easier to create full scale multimedia projects.
Fortunately, there are assortments of tools available to choose from.
1. Apple Media Tool
2. Astound
3. Asymmetric Multimedia ToolBook1
4. Authorware
5. Cinemation
6. Course Builder
7. CT Professional
8. Digital Chisel
9. Director
10. Director Multimedia Studio
11. FireWalker
12. Formula Graphics
13. HM-Card Hypermedia Authoring System
14. HyperCard
15. HyperPlus
16. Hyperstudio
17. HyperWriter
18. IconAuthor
19. Klik & Play
20. MediaLink
21. MM100
22. MovieWorks Interactive
23. mPower
24. mTropolis
25. Oracle Media Objects
26. Ozone
27. Pegasus
28. PowerMedia for Visual Basic
29. Quest
30. Shockwave
31. ShowBasic
32. Special Delivery
33. SuperCard
5.
| Type of alignment | Description | |
 |
Align left | Lines are aligned on the left border of a text box. |
 |
Align center | Lines are centered between the left and right borders of a text box. |
 |
Align right | Lines are aligned on the right border of a text box. |
 |
Justify with last line aligned left | Lines are evenly distributed so that they align on both the right and left borders of a text frame. The last line in the paragraph is aligned on the left border. |
 |
Justify with last line aligned right | Lines are evenly distributed so that they align on both the right and left borders of a text frame. The last line in the paragraph is aligned on the right border. |
 |
Justify with last line aligned centered |
Lines are evenly distributed so that they align on both the right and left borders of a text frame. The last line in the paragraph is centered. |
 |
Justify all lines | Lines are evenly distributed so that they align on both the right and left borders of the text box. |
 |
Align towards spine | Used with left and right pages; text in a text box on a left page is right-aligned and any text that flows onto a right page is left-aligned. |
 |
Align away from spine | Used with left and right pages; text in a text box on a left page is left-aligned and any text that flows onto a right page is right-aligned. |
6.
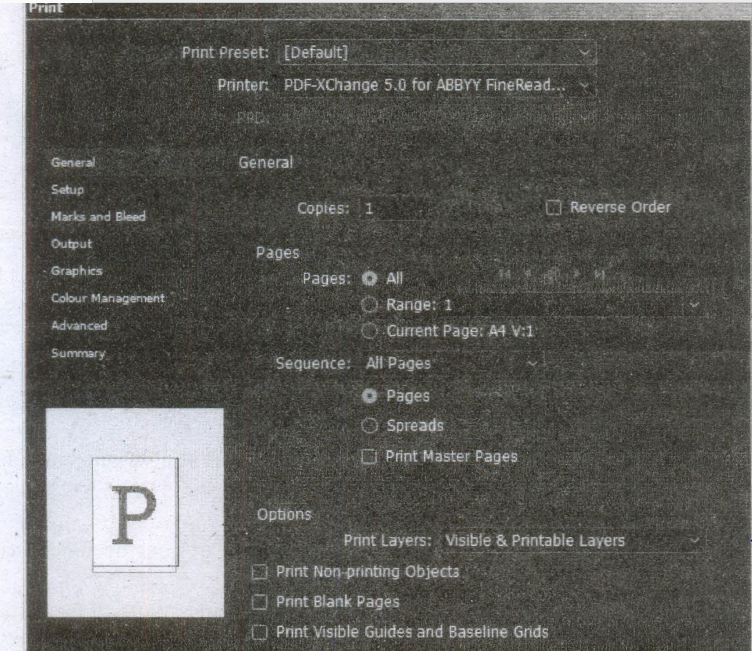
(i) When you press Ctrl-P, InDesign displays the Print dialog box.
(ii) There are so many features packed into this dialog box that Adobe had to break it up into eight different panes, each listed along the left side of the dialog box:
(iii) General, Setup, Marks and Bleeds, Output, Graphics, Color Management, Advanced, and Summary.
Printers:
(i) Before you go anywhere in the Print dialog box, you've got to make one or two important decisions.
(ii) First, you must choose from the options on the Printer pop-up menu, which lists the printers you have installed on your computer.
(iii) When you choose a printer, InDesign looks to the printer driver to see what PPD (PostScript Printer Description) file is associated with that printer, and it displays it-grayed out-in the PPD pop-up menu. In the case of a non-PostScript device, InDesign leaves this pop-up menu blank.
General:
The General pane of the Print dialog box contains basic printing features: which pages do you want to print, how many copies do you want, and how do you want them to come out of the printer.

Copies:
(i) Enter the number of copies of page you want to print in the Copies field. You can print up to 9999 copies of your publication.
Collate:
(i) When you turn on the Collate option, InDesign prints the range of pages you've specified, in order, for each copy of the publication you print. This makes for much slower printing.
(ii) When you print multiple copies of a page, your printer only needs to process each page once (and then prints multiple copies of the page using the same image);
(iii) when you turn on the Collate option, your printer must process each page once for every copy of the print job.
Reverse Order:
(i) When you print a multipage document, do you want the first page to come out first or last? Turning on the Reverse Order check box tells InDesign to print the last page first, then print "backwards" to the first page.
(ii) You'll want to turn this on if your pages come out of the laser printer face up.
Page Ranges:
(i) Turn on the All Pages option to print all of the pages in the publication.
(ii) To print a range of pages, turn on the Rang option. Enter the page range in the Range field as shown in the following Table.
| jka To print | dfdN Enter M | Example |
| A continuous range of pages | first page - last page | 12-21. |
| Up to a specific page | -last page | -5 |
| From a page to the end of the document | first page - | 5- |
| Non-contiguous pages | page, page | 1, 3 |
| Mixed page ranges | page, range | -3, 6-9, 12, 15- |
| Pages by section | section.page | Sec1:1, Sec2:5 |
Sequence:
(i) To print even and odd pages, select the All Pages option from the Sequence pop-up menu; to print even pages, select Even Pages Only; and to print odd pages select Odd Pages Only.
(ii) These choices affect all page ranges, including page ranges you've entered in the Range field.
Print Master Pages:
(i) Sometimes you need to print your master pages instead of your document pages. No problem: Just turn on the Print Master Pages check box.
(ii) When you do this, you cannot specify page ranges. InDesign prints all the master pages in the document.
Print Blank Pages:
(i) What happens when you print a three-page document that has nothing. on page 2? By default, only pages 1 and 3 print out. If you want the blank page 2 to print, too, you'd better turn on the Print Blank Pages check box.
Print:
(i) Finally press the Print button to print the document.
7.
(i) The main purpose of PageMaker is composing pages. You can insert new pages into a document, remove existing pages, move between pages, and sort pages in a large document.
Going to a specific Page:
PageMaker provides several methods for navigating the pages in your publication.
Method 1:
(i) You can move from one page to another by using the Page up and Page down keys on your keyboard.
(ii) This is probably the navigation methods you will use most often.
Method 2:
(i) You can move from one page to another by using the page icons. at the left bottom of the screen. Click on the page icon that corresponds to the page that you want to view. The page is displayed.
Method 3:
Using the Go to Page dialog box. Refer Figure 1.52 and 1.53
To go to a specific page in a document.
(i) Choose Layout > Go to Page in the menu bar (or) Press Alt + Ctrl + G in the keyboard.
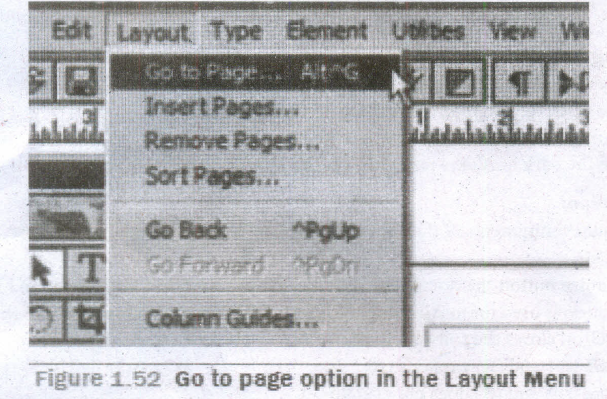
Go to page option in the Layout Menu
Now the Go to Page dialog box appears.
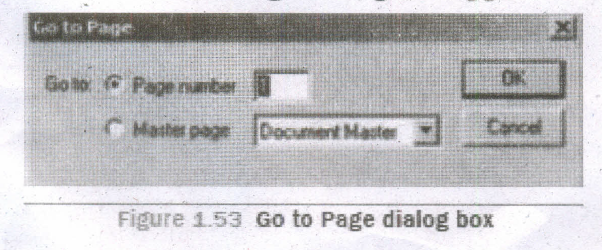
Go to Page dialog box
(i) In the dialog box, type the page number that you want to view.
(ii) Then click on OK button. The required page is displayed on the screen.
8.
Table 1.1 Keyboard Movement Keys
| Move | Press |
| One character the left | Left Arrow |
| One character to the right | Right Arrow |
| One word to the left | Ctrl+ Left Arrow |
| One word to the right | Ctrl + Right Arrow |
| Up one line | Up Arrow |
| Down one line | Down Arrow |
| To the end of a line | End |
| To the beginning of a line | Home |
| Up one paragraph | Ctrl + Up Arrow |
| Down one paragraph | Ctrl + Down Arrow |
9.
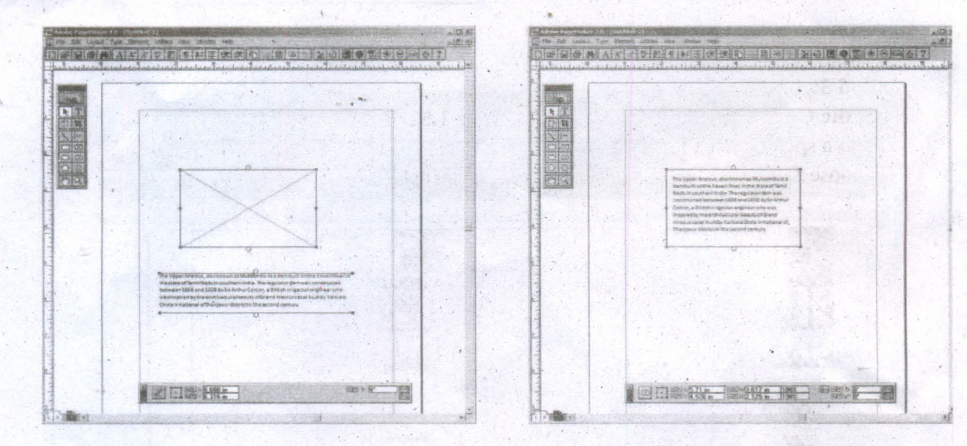
After created text in a text block, if you want to convert it to a frame. You can do this by using these steps.
(i) Draw the frame of your choice using one of the PageMaker's Frame tool.
(ii) Select the text block you want to insert in the frame.
(iii) Click the frame while pressing the Shift key. Now both elements will be selected.
(iv) Choose Element > Frame > Attach Content on the Menu bar.
(v) Now the text appears in the frame.
10.
Table 1.1 Keyboard Shortcuts
| S. No. | Tools | Keyboard Shortcut |
| 1. | Pointer Tool | F9 |
| 2. | Rotating Tool | Shift + F2 |
| 3. | Line Tool | Shift + F3 |
| 4. | Rectangle Tool | Shift + F4 |
| 5. | Ellipse Tool | Shift + F5 |
| 6. | Polygon Tool | Shift + F6 |
| 7. | Hand Tool | Shift + Alt + Drag Left mouse button |
| 8. | Text Tool | Shift + AIt + F1 |
| 9. | Cropping Tool | Shift + Alt + F2 |
| 10. | Constrained Line Tool | Shift + Alt + F3 |
| 11. | Rectangle Frame Tool | Shift + Alt + F4 |

12th Standard Syllabus & Materials
12th Standard
TN 12th Computer Applications வலையமைப்பு வடமிடல் Sample Question Papers Study Material - QB365 Set A
NEW12th Standard
TN 12th Computer Applications களப்பெயர் முறைமை (DNS) Sample Question Papers Study Material - QB365 Set A
NEW12th Standard
TN 12th Computer Applications வலையமைப்பு எடுத்துக்காட்டுகள் மற்றும் நெறிமுறைகள் Sample Question Papers Study Material - QB365 Set A
NEW12th Standard
TN 12th Computer Applications கணினி வலையமைப்பு ஓர் அறிமுகம் Sample Question Papers Study Material - QB365 Set A



Tamilnadu Stateboard 12th Standard Subjects

Maths

Chemistry

Physics

Biology

Computer Science

Business Maths and Statistics

Economics

Commerce

Accountancy

History
Computer Applications
Biology
Computer Technology
Computer Applications
Computer Science
Business Maths and Statistics
Commerce
Economics
Maths
Chemistry
Physics
Computer Technology
History
Accountancy

Tamil

English

French
Tamilnadu Stateboard Standards


