
 100% FREE ACCESS
12th Standard Syllabus & Materials
12th Standard
TN 12th Computer Applications மின்னணு தரவு பரிமாற்றம் Sample Question Papers Study Material - QB365 Set A
NEW12th Standard
TN 12th Computer Applications மின் - வணிக பாதுகாப்பு அமைப்புகள் Sample Question Papers Study Material - QB365 Set A
NEW12th Standard
TN 12th Computer Applications மின்னணு செலுத்தல் முறைகள் Sample Question Papers Study Material - QB365 Set A
NEW12th Standard
TN 12th Computer Applications மின் - வணிகம் Sample Question Papers Study Material - QB365 Set A
NEW12th Standard
TN 12th Computer Applications திறந்த மூல கருத்துருக்கள் Sample Question Papers Study Material - QB365 Set A
NEW12th Standard
TN 12th Computer Applications வலையமைப்பு வடமிடல் Sample Question Papers Study Material - QB365 Set A

Published on: 01/10/2019
CorelDRAW 2018
Download Tamil Nadu 12th Standard Computer Technology question papers, model tests, one-mark questions, important questions, and public exam papers in PDF format. Free study materials and answer keys for TN State Board students.
Questions + Answers key
Take MCQ Computer Technology Test
1.
What do you achieve by welding objects? Write the steps to weld objects.
2.
How to create duplication objects and Cloning objects? Write the difference between them.
3.
How will you assign a fill colour and outline colour to an object?
4.
What do you do to convert a line into an arrow?
5.
To correct your mistake in CorelDRAW what should you do? What is the keyboard shortcut to do it?
6.
Flyout of which tool has star tool in it? What is that tool’s keyboard shortcut?
7.
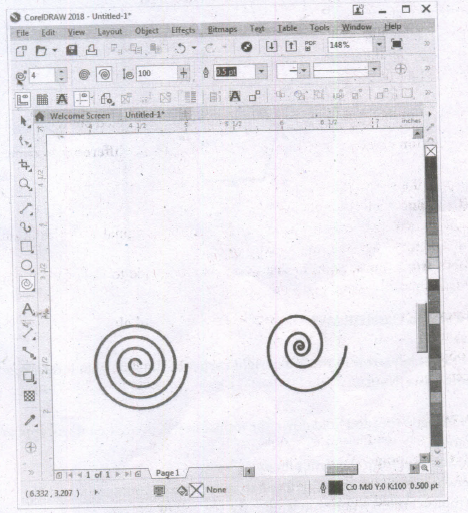
What are the two types of spirals? Explain.
8.
Write the steps to draw a circle in CorelDRAW.
9.
Write the steps to draw a rectangle in CorelDRAW.
10.
What are the differences between Vector graphics and bitmaps?
11.
Brief about Fitting text to a path.
12.
Write the steps to draw a grid.
13.
How to create a star in CorelDRAW?
14.
Write the steps to draw a spiral.
1.
(i) By welding you can create irregular shapes.
(ii) The welded objects take on the outline and fill of the object that was selected last.
(iii) Welded objects can revert to their original individual objects only by using the Undo button.
To weld objects sing Property Bar
(i) Select the objects with the Pick tool by holding the Shift key.
(ii) Choose Object > Shaping > Weld in the menu bar (or)
(iii) Click on Weld button on the Property bar.
(iv) The objects will be welded and will become a single outline object.
2.
Cloning Objects
(i) To create a clone of a selected object.
Choose Edit > Clone from the menu bar.
(ii) The clone will be offset slightly to the upper right of the original and placed on top as shown below. The new copy is automatically selected.
(iii) Cloning differs from duplication in that most changes made to the original object (the "master") are automatically applied to the clone.
3.
To fill colour to any object:
(i) Select the object using the Pick tool.
(ii) Click on any colour on the Color palette.
(iii) The selected colour will be applied to the object.
(iv) Right click on any colour on the Color palette.
(v) The outline colour of the selected object will change to the selected colour.
4.
To add arrowhead to a line
(i) Using the Freehand tool draw a line.
(ii) Select the line.
(iii) Click the drop-down button on the End Arrowhead Selector on the Property tool bar.
(iv) Then click the desired arrow tip.
Now the line appears with an arrow.
You can set the line style, width, and the colour of the line using the Properties bar.
5.
To specify the Undo settings
1. Choose Tools > Options in the menu bar.
2. In the Workspace list of categories, click General
3. In the Undo levels area, type a value in one or both of the following boxes:
(i) Regular - specifies the number of actions that can be reversed when you use the Undo command with vector objects.
(ii) Bitmap effects - specifies the number of actions that can be reversed when you work with bitmap effects.
The keyboard shortcut is
(i) To Undo an action, press Ctrl + Z.
6.
(i) Flyout of polygon tool has star tool in it.
(ii) The tool's keyboard shortcut is (Y).
7.
There are two types of spirals. They are
(i) Symmetrical spiral:
A Symmetrical spiral expands evenly so that the distance between each revolution is equal.
(ii) Logarithmic spiral:
A Logarithmic spiral expands with increasingly larger distances between revolutions.
8.
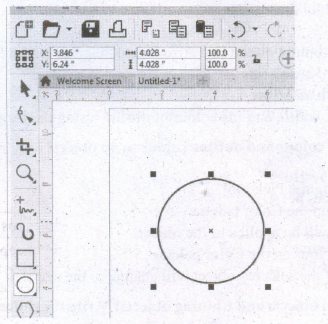
Creating Circles
(i) To draw a circle, select the Ellipse tool in the toolbox.
(ii) The mouse pointer changes to a crosshair with a small ellipse beneath it.
(iii) Click on anywhere in the drawing area and hold down the Ctrl key while dragging the mouse pointer.
(iv) Release the mouse button where you like the end of the circle.
9.
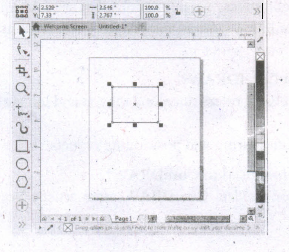
Drawing a Rectangle
(i) To draw a rectangle, select the Rectangle tool in the toolbox. The mouse pointer changed to a crosshair with a small rectangle beneath it.
(ii) Click and drag anywhere in the drawing area. As you drag, a rectangle appears.
(iii) Release the mouse button when the rectangle is of the desired size.
(iv) Now a rectangle will appear on the screen.
10.
| Vector graphics | Bitmaps |
| Vector graphics are made of lines and curves. | Bitmaps are also known as raster images. |
| They are generated from mathematical descriptions. | They are composed of small squares called pixels |
| These graphics are ideal for logos and illustrations. |
11.
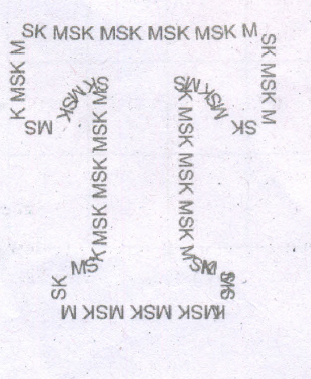
CorelDRAW allows you fit a string of text to any path a straight or curved line, a rectangle, an ellipse, or another letter or text string.
To fit text to a path, use the Fit
Text to Path command in the Text menu.
(i) It becomes available only when you select both a text object and a non-text object at the same time.
(ii) A text string can be fitted to the "path" traced by the second object's outline, as shown in the following examples:
To fit text to a path:
(i) Select the text object and the second object using the Pick tool and the Shift key.
(ii) Choose Fit Text To Path from the Text menu.
(iii) The text is redrawn along the path of the second object.
(iv) You can remove the path object with the Delete command when the text is positioned correctly.
To remove the path object
(i) Select the Shape tool and click on the path object.
(ii) Then Select the Pick tool and click on the path object.
(iii) Now press the Delete key. The path object is deleted.
Entering Text Directly onto a Path
(i) Text can be entered directly onto most paths - curves, rectangles, ellipses, shapes, and stars.
To enter text directly onto a path
(i) Using the Pick tool, select the path.
(ii) Choose Text> Fit text to path in the menu bar.
(iii) Move the text cursor over the outline, of the target shape. The pointer changes to the Fit text to path pointer.
(iv) Click on it.
(v) Type along the path.
12.
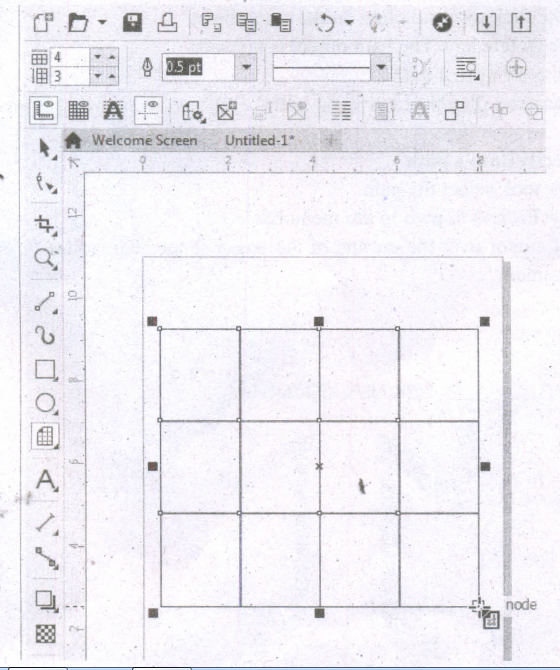
Drawing Grids
Using Graph Paper tool, you can draw a grid and set the number of rows and columns. A grid is a grouped set of rectangles that you can break apart.
To draw a grid,
1. Click and hold the Polygon tool. A flyout menu will appear.
2. Select the Graph Paper tool from the flyout menu.
3. Now type values in the top and bottom portions of the Columns and rows box on the property bar. The value you type in the top portion of the Columns and rows box specifies the number of columns; the value you type in the bottom portion specifies the number of rows.
4. Click on anywhere in the drawing area where you want the grid to appear.
5. Drag diagonally to draw the required grid.
If you want to draw the grid from its center point outward, hold down Shift key as you drag; if you want to draw a grid with square cells, hold down Ctrl key as you drag.
13.
Creating Stars
Polygon-tool has a small arrow in the lower-right corner of the tool. That little arrow indicates that this tool has a flyout.
To draw a star,
1. Click on the Polygon tool and hold down the mouse key. A flyout menu will appear showing you other tools.
2. Click on the Star tool from the flyout menu.
3. Click on anywhere in the drawing area and drag the mouse pointer.
4. Release the mouse button where you would like the end of the star.
14.
To draw a spiral,
(i) Click and hold the Polygon tool. A flyout menu will appear.
(ii) Click on the Spiral tool from the flyout menu.
(iii) Now you should type a value in the Spiral revolutions box on the property bar to set the number of full-circle revolutions to appear in the new spiral object.
(iv) Next, click one of the following buttons on the property bar:
1. Symmetrical spiral
2. Logarithmic spiral
If you want to change the amount by which the spiral expands as it moves outward, move the Spiral expansion slide. Drag diagonally in the drawing window until the spiral is the required size.

12th Standard Syllabus & Materials
12th Standard
TN 12th Computer Applications களப்பெயர் முறைமை (DNS) Sample Question Papers Study Material - QB365 Set A
NEW12th Standard
TN 12th Computer Applications வலையமைப்பு எடுத்துக்காட்டுகள் மற்றும் நெறிமுறைகள் Sample Question Papers Study Material - QB365 Set A
NEW12th Standard
TN 12th Computer Applications கணினி வலையமைப்பு ஓர் அறிமுகம் Sample Question Papers Study Material - QB365 Set A
NEW12th Standard
TN 12th Computer Applications PHP-உடன் MySQL-ஐ இணைத்தல் Sample Question Papers Study Material - QB365 Set A



Tamilnadu Stateboard 12th Standard Subjects

Maths

Chemistry

Physics

Biology

Computer Science

Business Maths and Statistics

Economics

Commerce

Accountancy

History
Computer Applications
Biology
Computer Technology
Computer Applications
Computer Science
Business Maths and Statistics
Commerce
Economics
Maths
Chemistry
Physics
Computer Technology
History
Accountancy

Tamil

English

French
Tamilnadu Stateboard Standards
