
 100% FREE ACCESS
11th Standard Syllabus & Materials
11th Standard
TN 11th Tamil இயற்கை வேளாண்மை,சுற்றுச்சூழல் -செய்யுள் - மனோன்மணீயம் Important Questions And Answers Study Material - QB365 Set A
NEW11th Standard
TN 11th Tamil என்னுயிர் என்பேன் -துணைப்பாடம் - இசைத்தமிழர் இருவர் Important Questions And Answers Study Material - QB365 Set A
NEW11th Standard
TN 11th Tamil மொழி கலை -செய்யுள் - ஒவ்வொரு புல்லையும் Important Questions And Answers Study Material - QB365 Set A
NEW11th Standard
TN 11th Tamil பீடு பெற நில் - இலக்கணம் - பகுபத உறுப்புகள் Important Questions And Answers Study Material - QB365 Set A
NEW11th Standard
TN 11th Tamil பீடு பெற நில் - துணைப்பாடம் - வாடிவாசல் Important Questions And Answers Study Material - QB365 Set A
NEW11th Standard
TN 11th Tamil பீடு பெற நில் - செய்யுள் - குறுந்தொகை Important Questions And Answers Study Material - QB365 Set A

Published on: 21/03/2019
11th Public Exam March 2019 Creative Five Mark Question Test
Download Tamil Nadu 11th Standard Computer Applications question papers, model tests, one-mark questions, important questions, and public exam papers in PDF format. Free study materials and answer keys for TN State Board students.
Questions + Answers key
Take MCQ Computer Applications Test
1.
Explain while loop with suitable example do .... while loop.
2.
Explain while loop with suitable example.
3.
Write about Tamil Office Automation Applications.
4.
Write a HTML code using to test logical operators.
5.
Write a HTML code using relational operator to compare two data.
6.
What is digital signature? Explain function of digital signature with suitable diagram.
7.
Explain public key encryption.
8.
Explain the working of Firewall server.
9.
Explain Cracking in detail.
10.
Explain Hacking in detail.
11.
List the computer crimes and their functions.
12.
Tabulate C55 - Frequently using background image and paragraph margin formatting Properties and Values.
13.
Write a JavaScript to create on-line quiz.
14.
Write a program in JavaScript to test isNan( ) Function
15.
Write a program in JavaScript for adding two numbers using function.
16.
Explain all the attributes of < IMG > tag with suitable HTML code.
17.
What is subscript and superscript?
18.
Explain Line Breaks and Paragraphs in HTML document.
19.
Explain Heading tag with its attributes.
20.
What are the different browsers? Explain.
21.
Write the rules of naming variables in Javascript program.
22.
Explain the lexical structure of a Javascript program.
23.
Explain the steps to follow to code Javascript language.
24.
Define the following terms
(i) link
(ii) Hyperlink
(iii) Internal link
(iv) Local link
(v) External link
25.
What do you known about
(i) Photoshop
(ii) Picasa
(ill) GIMP
(iv) HTML
(v) W3C
26.
Explain how will you Inserting image with HTML document.
27.
Explain How will you create drop-down list box with an example.
28.
Explain the attributes of < input > tag.
29.
Explain how will you add video and sound in HTML.
30.
Explain scrolling text using < Marquee >.
31.
Explain the four structural tags used in webpage.
32.
Explain how will you edit and reload the source file in a HTML document
33.
Explain the steps to create a webpage.
34.
Explain the function of digital signature.
35.
Explain the different types of encryption.
36.
Write the reasons now web sites typically use cookies.
37.
Explain social engineering with an example.
38.
Write a JavaScript to find the given value is a number or not Using functions and form.
39.
Write a JavaScript to find sum of two numbers using function.
40.
Explain the followingfunctions with an example.
(i) touppercase ( )
(ii) tolowercase ( )
(iii) length()
(iv) parselnt()
(v) parseFloat()
41.
Explain the advantages of email.
42.
Explain the structure of email.
43.
Write a Javascript to display the given number is words using switch-case (Number between only 1 and 5)
44.
Write a Javascript to find whether the given number is even or odd?
45.
Write a Javascript to find whether the given number is positive or negative?
46.
Explain the working of do while loop in Javascript with an example?
47.
Explain the execution of while loop with an example?
48.
Explain with an example the use of break and continue statement in loops?
49.
Explain the most common indicators in Ubuntu OS menu bar.
50.
Write the significant features of Ubuntu OS.
51.
Explain the procedure of shutting down or logging of computer.
52.
Explain the different methods of renaming files and folders.
53.
Explain the different ways of finding a file or Folder.
54.
Explain different ways of creating a new folder.
55.
Explain the elements of Windows.
56.
Explain the different types of icons of windows desktop
57.
Write the important functions of an operating system?
58.
Explain the following in detail.
(a) FIFO (b) SJF (c) Round Robin
59.
Explain File Management.
60.
Explain memory management techniques.
61.
Explain any three secondary storage devices.
62.
Define the following. (a) Bus (b) Data bus (c) Address bus (d) Control Bus
63.
Explain the classification of Microprocessor based on Instruction set?
64.
Convert the following Octal numbers into Binary numbers. - 62478
65.
Convert the given Binary number into its equivalent Decimal, Octal and Hexadecimal number - 1011010
66.
Convert the following Decimal numbers to its equivalent Binary, Octal, Hexadecimal. - 1920
67.
Convert the following Hexadecimal numbers to Binary numbers (A). A6 (B). BE (C). 9BC8 (D). BC9
68.
Convert the Following (101011001)2 \(\rightarrow \) (?16) = (?)8
69.
What is number system? Describe different number systems in detail.
70.
Explain the Derived gates with expression and truth table.
71.
Explain the fundamental gates of expression and truth table
72.
What are Registers? Explain the five Registers that are essential for instruction execution.
73.
Explain booting of computer and its types.
74.
Explain Non-Impact printers with an example.
75.
Explain Impact Printers with an Example.
76.
Explain in detail the different types of Mouse.
77.
Explain any two input and output devices.
78.
Explain the purposes served by outline view in Impress.
79.
Explain view buttons in Impress.
80.
Explain the steps to create a presentation by selecting on empty presentation.
81.
Write the steps to apply standard filter?
82.
Write the steps to do multiple sorting data.
83.
Explain how will you insert a function using Direct Insert method.
84.
Explain how will you generate whole number series.
85.
Explain Reference operator with an example.
86.
Write down the parts of the OpenOffice Calc window.
87.
Explain the features of OpenOffice Calc.
88.
Explain the different techniques to insert tables in a writer.
89.
Explain the steps headed to create a water mark in writer.
90.
Explain the steps to insert a special character in a writer.
91.
How will you check the spelling mistakes after the document typed.
92.
Explain the types of indenting the text.
93.
Explain the four types of paragraph alignment
94.
Explain how move and copy the text in the document.
95.
Explain the steps followed to save the document.
96.
Explain the cursor movement keys used in Openoffice Writer document.
97.
Explain any five menus in the Openoffice Writer Menu bar.
98.
Write about the drawing toolbar.
1.
The do .... while loop is like a while loop, except that the loop expression is tested at the end of the loop rather than at the beginning. This means that the body of the loop is always executed at least once.
The syntax is:
do
{
body of the loop
} while (expression);
An important difference between while and do..while statement is in the do..while loop body of the loop always executed at least once before the condition can be executed. In a while loop, first condition will be evaluated and then only based on the result of the condition the body of the loop will be executed or not.
Example:
< Htrnl >
< Head >
< Title > Program - To test do..while
statement in JavaScript < /Title >
< /Head >
< Body >
< script language="javascript"
type= "text/javascri pt" >
document.write("< h2 > Using do..while
Statement < /h2 >'');
var no2=0;
do
{
document. write( no2+" ");
no2=no2+2;
}while(no2<=10);
< /script >
< /Body >
< /Html >
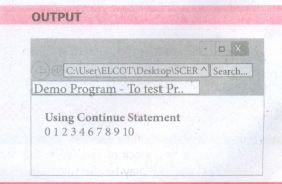
2.
while loop
In JavaScript while loop is most basic loop. The purpose of a while loop is to execute a statement / block of statement repeatedly as long as an expression is true.
The while statement creates a loop that executes a specified statement as long as the test condition evaluates to true. The condition is evaluated before executing the statement.
The syntax is:
while (condition)
{
body of the loop
}
Example:
< Html >
< Head >
< Title >P rogram - To test while
statement in JavaScript < /Title >
< /Head >
< Body >
< script language="javascript" type="text/
javascript" >
document.write("< h2 > Using while
Statement < /h2 >'');
var no2=0;
whlle(no2 <=5)
{
document. write( no2+" ");
no2=no2+1;
}
< /script >
< /Body >
< /Html >
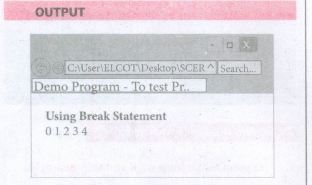
To execute a while statement, the interpreter first evaluates expression. If the value of the expression is true the interpreter executes the statement and repeats, jumping back to the top of the loop and evaluating expression again. In the above example let us see how the while command is executed,
1. Initial value of the variable no2 is set to 0.
2. The expression in the while statement is executed.
3. If the condition is true then body of the loop will be executed once otherwise body of the loop will be skipped and control will jump to next statement to end of the loop.
4. Then the. value of the control variable is executed and control jumps to condition again go to step 3.
3.
Famous Office automation software like Microsoft Office, Open Office etc., provides complete Tamil interface facility. These softwares are downloadable and installed in your computer After installation, our office automation software environment will completely changed to Tamil. Menu bars, names of icons, dialog boxes will be shown in Tamil. Moreover, you can save files With Tamil names and create folders with Tamil names.
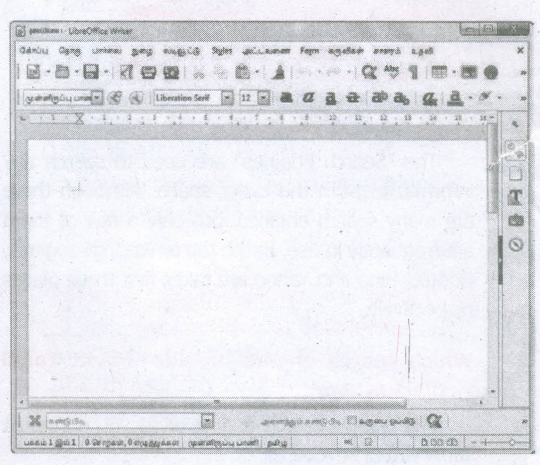
Apart from that Tamil Libra Office, Tamil Open Office, Azhagi Unicode Editor, Ponmozhi, Menthamiz, Kamban, Vani are office automation software working exclusively for Tamil. These applications are designed to work completely in Tamil.
4.
HTMLCODE:
< Head >
< Title > Demo Program - To test Logical Operators in JavaScript < /Title >
< /Head >
< Body >
< script language="javascript" javascript" >
var value1 = 522, value2=10;
document.write("< br >Data1 : "+value1);
document.write("< br >Data2 : "+value2);
var res1=((value1 > 100) && (value1 > 601));
var res2=((value1 > 100) II (value1 > 601));
var res3=(!(value1!=value2));
document.write("< br > < br > Whether Datal> 100 AND Data1 > 601 : "+res1);
document. write(" < br > < br > Whether Data1>600 OR Data1 > 601 : "+res2);
document.write("< br >Whether !Data1 != Data" : "+res3);
< /script >
< /Body >
< /Html >
Interested and these activities bring him profit, money, prestige and power. < /p > < p > In economic sense, the term business means works, efforts and acts of people, which are connected with the production of wealth and activities, which are directed with the object of making profit. < /p > < p > Production and distribution of goods to consumers for a profit constitute business. < /p >
5.
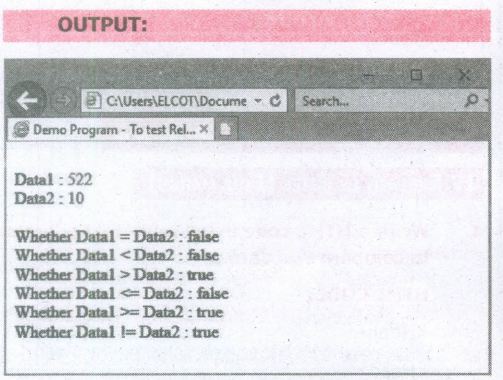
HTML CODE:
< Html >
< Head >
< Title >Demo Program - To test Relational(Comparison) Operators in JavaScript
< /Title >
< /Head >
< Body >
< script language="javascript" type="text/ javascript" >
Chaptervar
value1 = 522, value2=10;
document.write("< br >Data1 : "+value1);
document.write("< br >Data2 : "+value2);
document. write(" < br > < br > Whether Data 1 = Data2 : "+(value1==value2));
document.write("< br > Whether Datal < Data2 : "+(value1 < value2));
document.write("< br >Whether Datal> Data2 : "+(value1 > value2));
document.write("< br > Whether Datal <= Data2 : "+(value1 < =value2));
document.write("< br > Whether Datal > = Data2 : "+(value1 > =value2));
document.write("< br > Whether Datal != Data2 : "+(value!=value2));
< /script >
< /Body >
< /Html >
6.
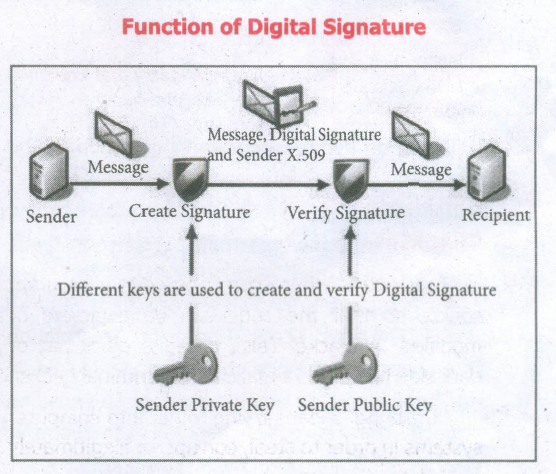
Digital Signature:
1. Digital signatures are based on asymmetric cryptography and can provide assurances of evidence to origin, identity and status of a; electronic document, transaction or message, a well as acknowledging informed by the signer.
2. To create a digital signature, signing softwar- (email) creates a one-way hash of the electron data to be signed. The user's private key tencrypt the hash, returning a value that is unit to the hashed data.
3. The encrypted hash, along with other information such as the hashing alqorithrn, forms the digital signature. Any change in the data, even to a single bit, results in a different hash value. This attribute enables others to validate the integrity of the data by using the signer's public key to decrypt the hash.
4. If the decrypted hash matches a second computed hash of the same data, it proves that the data hasn't changed since it was signed. If the two hashes don't match, the data has either been tampered with in some way (indicating a failure of integrity) or the signature was created with a private key that doesn't correspond to the public key presented by the signer (indicating a failure of authentication).
7.
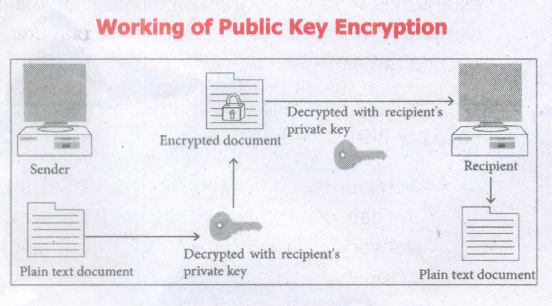
PUBLIC KEY ENCRYPTION:
1. Public key encryption is also called Asymmetric encryption. It uses the concept of a key value pair, a different key is used for the encryption and decryption process. One of the keys is typically known as the private key and the other is known as the public key.
2. The private key is kept secret by the owner and the public key is either shared amongst authorized recipients or made available to the public at large.
3. The data encrypted with the recipient's public key can only be decrypted with the corresponding private key.
8.
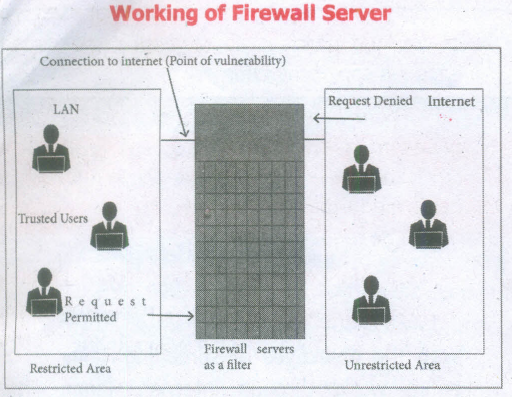
Firewall Server:
A firewall is a computer network security-based system that monitors and controls the incoming and outgoing network traffic based on predefined security rules. A firewall commonly establishes a block between a trusted internal computer network and entrusted computer outside the network.
They are generally categorized as network-based or host-based.
1. Network-based firewalls are positioned on the gateway computers of LANs [local area Network], WANs [Wide Area Network], and intranets,
2. Host-based firewalls are positioned on the network node itself. The host-based firewall may be a service as a part of the operating system or an agent application such as endpoint security or protection.
9.
CRACKING:
1. Cracking is where someone edits a program source so that the code can be exploited or modified. A cracker (also called a black hat or dark side hacker) is a malicious or criminal hacker
2. "Cracking" means trying to get into computer systems in order to steal, corrupt, or illegitimately view data.
3. A cracker is someone who breaks into someone else's computer system, often on a network, bypassing passwords or licenses in computer programs
4. Software cracking is the most often used of cracking which is nothing but removing tl, encoded copy protection.
5. There is another type of cracking called password cracking. This is mainly used to crack the passwords. Password cracking can be performed either by using an automated program or can be manually realized.
6. One more interesting fact apout cracking is social engineering. It is a method of getting passwords and information using human weakness
7. The other method that uses social engineering crackers is password guessing.
8. They find your personal information from some personal datal facts and try to guess a password
9. Usually a cracker maintains knowledge of the vulnerabilities he or she finds and exploits them for personal advantage, not revealing them to either to the general public or to the manufacturer.
10.
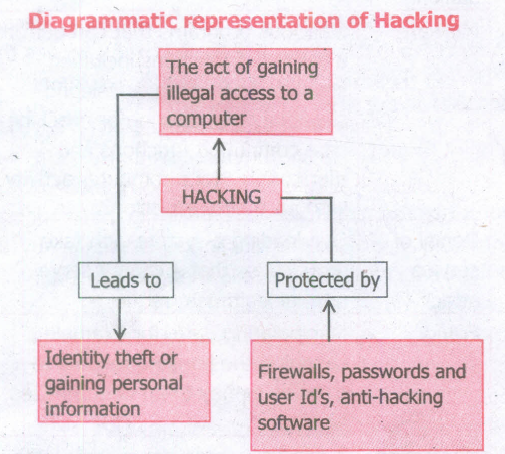
HACKING:
Hacking is intruding into a computer system to steal personal data without the owner's permission or knowledge (like to steal a password). It is also gaining unauthorized access to a computer system, and altering its contents. It may be done in pursuit of a criminal activity or it may be a hobby
11.
| Crime | Function |
| Crime Function | Hacking, threats, and blackmailing towards a business or a person |
| Cyberstalking | Harassing through online |
| Malware | Malicious programs that can perform a variety of functions including stealing, encrypting or deleting sensitive data, altering or hijacking core computing functions and monitoring user's computer activity without their permission |
| Denial of service attack | Overloading a system with fake requests so that it cannot serve normal legitimate requests |
| Fraud | Manipulating data, for example changing the banking records to transfer money to an unauthorized account. |
| Harvesting | A person or program collects login and password information from a legitimate user to illegally gain access to others account(s). |
| Intellectual property theft | Stealing practical or conceptual information developed by another person or company |
| Salami slicing | Stealing tiny amounts of money from each transaction |
| Scam | Tricking people into believing something that is not true |
| Spam | Distribute unwanted e-mail to a large number of internet users |
| Spoofing | It is a malicious practice in which communication is sent from an unknown source disguised as a source known to the receiver. |
12.
| Formatting | Properties | Values | Example |
| Background Image | Background-Image | URL ("image name with extension'') | Body { background-image: url ("Flower.gif''); } |
| Background-repeat | norepeat | Body { background-image: url ("Flower.gif''); background-repeat: norepeat; } |
|
| Background-position | Direction | Body { background-image: url ("Flower.gif''); background-repeat: norepeat; background-position: right top; } |
|
| Paragraph Margin | Margin-top Margin-bottom Margin-left Margin-right | Margin size in pixels | P { Margin-top: 50px; Margin-left : 50px; } |
13.
HTML CODE
< html >
< head >
< title >On-line Qulze-c/title >
< script type="text/JavaScript":;'\
function checkAnswer ( )
{
var myQuiz = document.getElementByld
("myQuiz'') ;
if . ( document.getElementById("myQuiz'').
elements[O] .checked)
alert("Congratulations, Your Answer is correct'');
else
alert("Your Answer is incorrect, Pleasetry Again'');
}
< /script >
< /head >
< body >
< form id="myQuiz" action="JavaScript:check
Answert ( )" >
< p > Which is not a Programming
Language:. < br >
< input type="radio" name="radiobutton"
value=''Word'' / >
< label > MS-Word< /Iabel >
< input type="radio" name="radiobutton"
value="Cobol" / >
< label > COBOL< /Iabel >
< input type="radio" name="radiobutton"
value="CPP" / >
14.
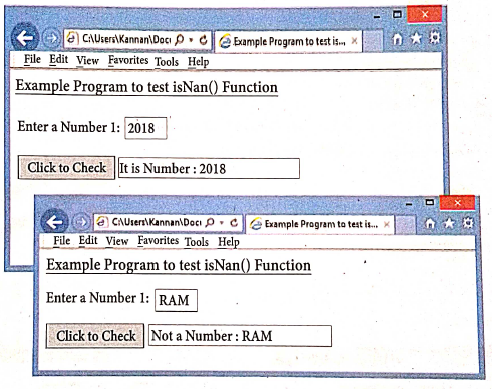
HTMLCODE
< html>
< title > Example Program to test isNan() Function < title >
< head>
< body.>
< h4 >< u >Example Program to test isNan() Function< /u >< /h4 >
< script language="JavaScript" >
function checknum()
{
var n=documentform1.text1.value;
if(isNaN(n)==true)
{
documentform1.text2.value="Not a
Number: "+n;
}
else
{
documentJorm1.text2.value='1t is
Number: "+n;
}
}
< /scrip t>
< form name="form1" >
Enter a Number 1:
< input type="text" name="text1" size=3 >
< br >< br >
< input type="button" value="Click to Check" onClick= "checknum()" >
< input type="text" name="text2" size=30 >
< br >
< /form >
< /body >
< /html >
15.
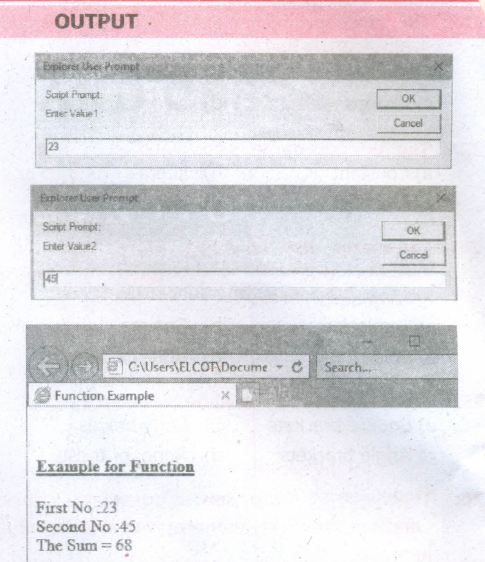
HTML CODE
< htm l>
< head >
< title >Function Example</title >
< script type = "textjJavaScript ">
< !--
var input1 = window.promptC'Enter valuer :': "0'');
var input2 = window.promptC'Enter Value2 :': "0'');
var vi = parselnt(inputl);
var v2 = parselnt(input2);
var s = sum(v1,v2);
document. writelru" < br > < h4 > < u >Example for
Function</u> < /h4 >'');
document.writelnC'First No :" + vi + " <br>
Second No :" + v2 + "<br> The Sum > " + s);
function sum(x, Y)
{
var s=x+v;
return s;
}
//=>
< /scrip t>
< /head >
< body >
< /body >
< /html >
16.
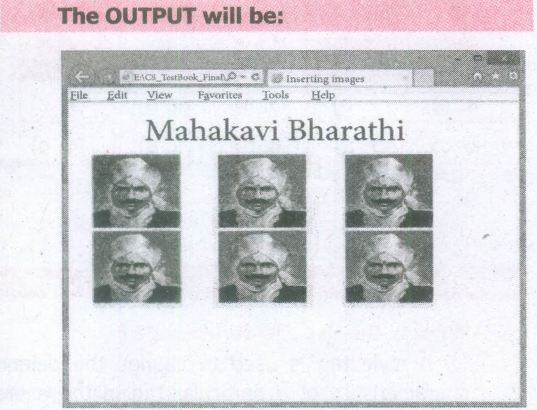
Attributes of < img > tag:
Other than src, the < img > tag has many attributes the enable to control how the image is presented on the page.
Alt (Alternative Text)
The alt attribute within < img > tag is used to describe the image, so that some text is conveyed even when the image cannot be displayed.
Ex:
< img src = bharathiyar.gif alt = "National Poet of India" >
Width and Height:
Width and Height attributes are used to set the width and height of an image. The values of these attributes should be either pixels or percentage of its actual size. If these attributes are not specified, the browser displays the image in its original size.
Vspace (Vertical Space) and Hspace (Horizontal Space):
Vspace and Hspace attributes are used to set Vertical and Horizontal space between the images.
An HTML code to demonstrate < img > attributes:
< html >
< head >
< title > Inserting Images < /title >
< /head >
< body >
< h1 align = center > Mahakavi Bharathi
< /h1 >
< img src = bharathiyar.gif alt = "National
Poet of' India" Width = 20% Height = 25% vpace = 20 Hspace = 20 >
< img src = bharathiyar.gif alt = "National
Poet of India" Width = 20% Height = 25% vpace = 20 Hspace = 20 >
< img src = bharathiyar.gif alt = "National
Poet of India" Width = 20% Height = 25% vpace = 20 Hspace = 20 > < br >
< img src = bharathiyar.gif alt = "National
Poet of 'India" Width = 20% Height = 25% vpace = 20 Hspace = 20 >
< img src = bharathiyar.gif alt = "National
Poet of India" Width = 20% Height = 25% vpace = 20 Hspace = 20 >
< img src = bharathiyar.gif alt = "National
Poet of India" Width = 20% Height = 25% vpace = 20 Hspace = 20 > < br >
< /body >
< /html >
17.
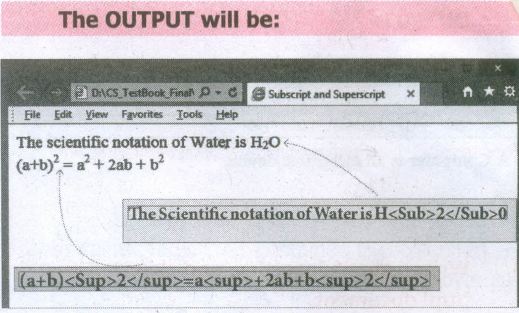
Subscript and Superscript:
A Subscript is a way to display a character or a number below the normal line of type. For example: The scientiftc notation for water is H2O. It should be written as H2O. Here, 2 is appearing below the normal line. This is called subscript.
A Superscript is also a way to show a character or a number above the normal line of type. For example: The familiar algebra equation "a plus b the whole square" should be written as (a+b)2. Here, the square value 2 is appearing above the normal line. This is called superscript.
Usually, the subscript and the superscript character or number is smaller than the rest of the text.
In HTML, the < sub > and < sup > tags are used to create subscript and superscripts respectively. The text or number given between < sub > and < /sub > will be displayed as subscript. Same as subscript, the text or number given between < sup > and < /sup > will be displayed as superscript.
HTML CODE:
< html >
< head >
< title > Subscript and Superscript
< /title >
< /head >
< body >
The scientific notation of Water is
H< sub > 2 < /sub > O < br >
(a+b) - < sup > 2 < /sup > = a< sup >2
< /sup > + 2ab + b-< sup >2 < /sup >
< /body >
< /html >
18.
Browser applications are having some special rules for displaying text. They do not recognize returns, tabs or even more than one space between words. If we create an HTML document with multiple lines of text, browser will display it as a single line.
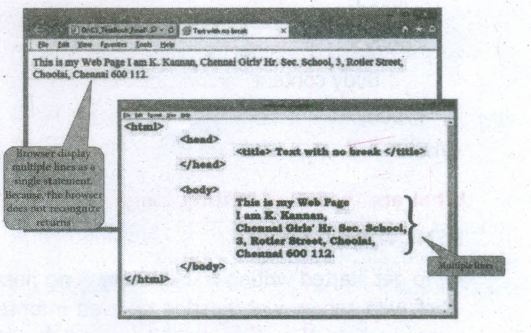
The
tag is used for line break. The < br > is an empty tag, does not have close tag and attribute. It should be placed at the end of a line.
.JPG)
In HTML, paragraphs are created using the < p > tag. The content what we type between < p > and < /p > is identified as a paragraph and display as a paragraph by the browser. Because, the browser does not recognize returns.
HlTML code to create a p ragraph:
< html >
< head >
< title > Paragraph < /title >
< /head >
< body >
< hi align=center > Business < /hi >
< p > Business may be defined as any activity in which a man is very much interested and these activities bring him profit, money, prestige and power. < /p > < p > In economic sense, the term business means works, efforts and acts of people, which are connected with the production of wealth and activities, which are directed with the object of making profit.< /p > < p > Production and distribution of goods to consumers for a profit constitute business. < /p >
< /body >
< /html >
.JPG)
Changing Paragraph alignment
In HTML documents there are four paragraph alignments viz. Left, Right, Center and Justify. The text that we type between < p > and < /p > is by default aligned to left. To change the alignment of a paragraph align attribute can be used with < p > tag.
The tag to specify the alignment to paragraphs:
Where alignment can either be Right, Center or Justify. Note that, left is the default alignment.
.JPG)
19.
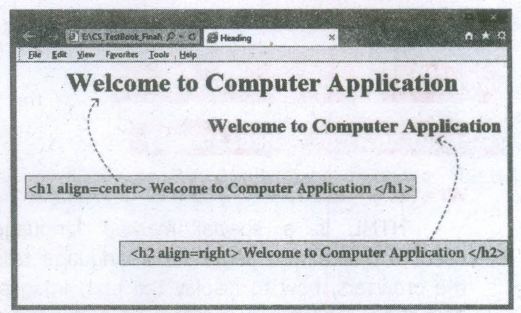
Headings are used to include titles to sections of a web page. HTML has six levels of headings viz. < hi > to < h6 >. The number with h indicates the level of heading. Header tags are display the body text as bolder and larger in size according to its level.
The syntax of heading tags:
< h ... > Heading text < /h ... >
Attribute of Headings tag :
Align is an attribute to set right, center and justify alignment to headings. Left if the default alignment, so that it is not supported in latest version of HTML. Justify alignment is not supported by older browsers.
The tag is to specify the alignment to headings:
< h# align = value >
Where # is the level number, value may be Right, Center or Justify. Justify alignment only used for paragraphs.
HTML code with Heading and align attributes:
< html >
< head >
< title > Heading < /title >
< /head >
< body >
< hi align=center > Welcome to Computer Application < /hi >
< hi align=right > Welcome to Computer
Application < /h2 >
< /body >
< /html >
20.
Familiar Internet Browser:
i) Google Chrome is a freeware familiar web browser developed by Google Inc. It is best for its speed, simplicity, security, privacy and custornlzatlon features. Google Chrome supports on Android 4.0 or higher, iOS 6.0 or higher, Mac OSX 10.6 or higher and Windows (XP or higher) and Linux system.
ii) Mozila Firefox is a free and open source web browser developed by Mozilla Foundation and Mozilla Corporation. Firefox is default browser in Ubuntu. It supports Windows, Mac OS X, Linux and Android system.
iii) Internet Explorer commonly known as Microsoft Internet Explorer or Windows Internet Explorer is the first or default browser for a Windows Pc. It is developed by Microsoft.
iv) Safari is a web browser developed by Apple Inc and comes with OS X and iOS. Some version of safari browser also supports in Windows Operating System. Exclusively used in Apple Mac system.
21.
Rules for naming variable:
(i) The first character must be a letter or an underscore ( _ ). Number cannot be as the first character
(ii) The rest of the variable name cap include any letter, any number, or the underscore. You can't use any other characters, including spaces, symbols, and punctuation marks.
(iii) JavaScript variable names are case sensitive.
(iv) That is, a variable named Register Number is treated as an entirely different variable than one named register number.
(v) There is no limit to the length of the variable name.
(vi) JavaScript's reserved words cannot be used as a variable name. All programming languages have a supply of words that are used internally by the language and that. cannot be used for variable names
22.
The lexical structure of a programming language is the set of elementary rules that specifies how to write programs in that language. It is the lowest - level syntax of a language. The Lexical structure specifies variable names, the delimiter characters for comments, and how 'one program statement is separated from the next.
(i) Though JavaScript is a case-sensitive language. It is good programming practice to type the command in lowercase.
(ii) JavaScript ignores spaces that appear between tokens (identifiers, operators, punctuator, constants and keywords) in programs.
(iii) JavaScript supports two styles of comments. Any text follow a " // " and the end of a line is treated as a single line comment and is ignored by JavaScript. Any text between the characters " /* *I " is also treated as a multiline comment.
(iv) JavaScript uses the semicolon (;) to separate statements. Many JavaScript programmers use semicolons to explicitly mark the ends of statements
(v) A literal is a data value for variable that appears directly in a program.
(vi) An identifier is simply a name. In JavaScript, identifiers are used to name variables, functions and to provide labels for certain loops in JavaScript code.
(vii) In JavaScript certain keywords are used as reserved words, These words cannot used as identifiers in the programs
23.
Steps to follow to code JavaScript Language :
(i) Enter HTML and JavaScript code using any text editor.
(ii) Save the latest version of this code.
(iii) Use any browser to see the result. For example: Internet Explorer, Google Crome, etc.,
(iv) If this is a new document, open the file via browser's Open Menu.
(v) If the document is already loaded in the Memory, to reload the file into the browser use "Refresh" or press F5 button.
24.
(i) Link : Make connection with a part of the content of same document or an external document.
(ii) Hyperlink : A link from a' hypertext document.
(iii) Internal Link : Connecting with another part of the same document.
(iv) Local Link : Internal Link.
(v) External Link : Connection with another hypertext document.
25.
(i) Photoshop: Familiar Photo editing tool developed by adobe.
(ii) Picasa: Free image organizer and editing tool developed by Lifescape.
(iii) GIMP: Open source image editing tool.
(iv) HTML5 : Latest version of HTML authorized by w3c.
(v) W3C: The World Wide Web Consortium; an International standards organization for the www.
26.
The < IMG > tag along with the attribute src (Source) is used to add images in HTML document.
General format:
< img src = image_name _with_extension >
(OR)
< img src = URL >
Example: < img src =image 1.gif >
Src attribute is the main attribute used to specify the file name of the image to be inserted. If the image is not in the current working folder, the image file name should clearly specify with the path of the file or URL, where the file is available
Example: < img src = "D:\images\animals\cat.jpeg'' >
Alt (Alternative Text): The alt attribute within < img > tag is used to describe the image, so that some text is conveyed even when the image cannot be displayed.
Example: < img src = bharathiyar.gif alt = "National Poet of India" >
Width and Height: Width and Height attributes ate used to set the width and height of an image. The values of these attributes should be either pixels or percentage of its actual size. If these attributes are not specified, the browser displays the image in its original size.
Vspace (Vertical Space) and Hspace (Horizontal Space): Vspace and Hspace attributes are used to set Vertical and Horizontal space between the images.
Align: The align attribute used to aligns the image with respect to the base line of the text. This attribute has the following values.
(i) Bottom - Aligns the bottom of the image with the baseline of the text. This is the default setting.
(ii) Middle - Aligns the middle of the image with the baseline of the text.
(iii) Top - Aligns the top of the image with the baseline of the text.
Left and Right values of Align attribute: Using left and right values with align attribute, displayed. the image on the left and right side of the text.
27.
The < select > tag is used to create dropdown list box in HTML.
It provides a list of various options as a dropdown list.
This element is more helpful when a number of options are to be displayed in a limited space. The < option > tag.is used to specify list items
Attributes of < Select > tag:
Name - Provide the name to the control, which is sent to the server.
Size - Determine the style of dropdown list box.
Size = 1 dropdown list box
Size = 2 List box
Multiple -Allows user to select multiple values.
Attributes of < Option > tag:
Selected - Indicate default selection
Value - Value to be submitted to server
< Select name = area size= 2 >
< option value = CHN > Chennai < /option >
< option value = MDR selected > Madurai < /option >
< option value = CBO > Coimbatore < /option >
< option value = KKM > Kanyakumari < /option >
< /Select > < /p >
28.
Attributes of < input > tag:
(i) Type: This attribute is used define the type of control to be created by < input > tag.
(ii) Name: This attribute of < input > tag is used to assign a name to the input controls. When the form is submitted, the data values are passed to the server along with the names of the controls.
(iii) Value: This attribute is used to define default value to some controls.
(iv) Size: This is used to set the width of the input text in terms of characters. It is applicable only for textbox and password boxes.
(v) Maxlength: This attribute of < input > tag is used to set the length of the input character (number of characters to be inputted) to the textbox and password boxes.
29.
(i) Video and Sound are the core part of the modern web pages. In HTML, a video or audio content may be included as Inline or external data. The inline refers to audio or video files are handled as part of the page. These media files play the audio or video when the page is visible in the browser window. The external refers, linking external audio or video files as url.
(ii) The < embed > tag is used to attach an audio or video file easily within webpage. This tag includes the controls of the multimedia automatically in the browser. The < noembed > tag may be used as an alternate to display some other media file, in the case of the browser does not support < embed > tag.
(iii) Src is the primary attribute used with < embed > tag. The src attribute used to specify the name of the media file with its source location. Other attributes such as alt, height, width and align are used as it is used with < img >.
General Format:
< embed src = audio / video file name with location > < /embed >
Background music:
(i) Music can be played in the background to a webpage, while the page is viewed. This is known as 'inline' sound or movie.
(ii) The < bgsound > tag is used to attach an inline sound file in HTML. The src attribute is used to define the location of the media file. Volume attribute used to adjust volume control. The loop attribute defines the duration of play. The 'infinite' value causes the audio play as long as the page is in view.
General Format:
< bgsound src=music file name with location >
30.
In HTML, a piece of text or image can be moved horizontally or vertically by using < marquee > tag. This feature makes a web page as more attractive.
(i) General format: < marquee > Text or image to be scroll < /marquee >
Attributes of < marquee >
(ii) Height and Width: These attributes are used to set height and width of the marquee. The values should be either in pixels or in percentage of browser window.
(iii) Direction: This is used to specify the direction of the movement of text or image. The text or image will move towards right to left by default. So, the default direction is left. The Possible values are up', 'down', 'left' or 'right'
(iv) Behaviour: This attribute is used to specify the type of scrolling. The values are scroll', 'slide' and 'alternate'.
(v) Scroll delay: This attribute is used to define the time delay between each jump. The time unit should be in seconds
(vi) Scrollamount: This is used to define the speed of the scroll.
(vii) Loop: This is for defining how many times the marquee element should repeat on the screen. The default value is 'infinite', which means the marquee element scrolls endlessly.
(viii) Bgcolor: This is used to specify the background color to the marquee elements.
(ix) Hspace and Vspace: This is for defining the horizontal and vertical space around the marquee. The value can be in pixels or percentage.
An HTML code to demonstrate marquee:
< html >
< head >
< title > Marquee < /title >
< /head >
< body >
< marquee > < b > The Government of
Tamilnadu < /b >, Directorate of School
Education < /marquee >
< marquee direction=right > Welcome
to < b > The State Council of Educational
Research and Training < /b >, Tamilnadu
< /marquee >
< /body >
< /html >
31.
| Opening Tag | Closing Tag | Description |
|---|---|---|
| < html > | < /htrnl > | The < html > tag identified the document as an HTML document. All HTML documents should begins with < htrnl > and end with < /htrnl >. |
| < head > | < /head > | The < head > tag contains information about the document, including its title, scripts used, style definition and document descriptions |
| < title > | < /title > | The < title > tag contains the title of the document. The title specified between opening and closing tags appears in the title bar / page tab of the browser. < title > tag should be placed within < head > tag. |
| < body > | < /body > | The < body > tag encloses all the tags, attributes and information to be displayed in the web page. < body > tag should be entered below the < /head > tag. |
32.
Source file can be edit only through the text editor. So, to edit the source file, open the source file with a text editor. When you edit a source file, no need to close browser in which displaying the HTML document. The following steps are to be followed to open a source file
(i) Go to the folder in which yonr source files are located.
(ii) According to you default browser, your source file icon is displayed.
(iii) Right click on the source file that you want to edit.
(iv) From the pop-up menu, select Open With ⟶ Notepad.
(v) Source file will be opened in text editor.
(vi) Make the changes and save the file using File ⟶ Save or Ctrl + S.
Reload / Refresh the changes:
(i) After modify and save the source file, minimize your source file.
(ii) Go to the browser.
(iii) Click Refresh (Internet Explorer) / Reload Current Page (Firefox) / Reload this page (Chrome) icons on the address bar.
(iv) Press Ctrl + R or F5 will be used to refresh / reload the modifications
33.
Creating a Webpage :
Step 1: Open a text editor Windows7:
Start ⟶ All Programs Accessories ⟶ Notepad⟶Linux: Applications ⟶ Accessories ⟶ Text Editor.
Step 2: In the appearing Note pad / Text Editor, type the HTML document.
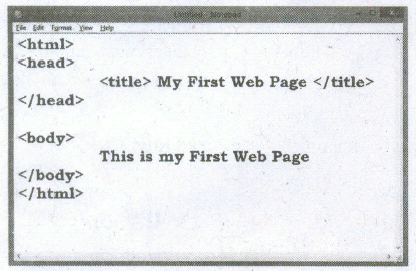
Step 3: Save the file as HTML
(i) Click File ⟶ Save (or) Press Ctrl + S
(ii) Save as dialog box appears.
(iii) In "File Name" text box, type a file name with .htm or .htmlextension.
(iv) Select "All Files" from "Save as type" list box. Click "Save" button.
34.
Digital signature :
(i) Digital signatures are based on asymmetric cryptography and can provide -assurances of evidence to origin, identity and status of an electronic document, transaction or message, as well as acknowledging informed by the signer.
(ii) To create a digital signature, signing software (email) creates a one-way hash of the electronic data to be signed.
(iii) The user's private key to encrypt the hash, returning a value that is unique to the hashed data. The encrypted hash, along with other information such as the hashing algorithm, forms the digital signature. Any change in the data, even to a single bit, results in a different hasp value.
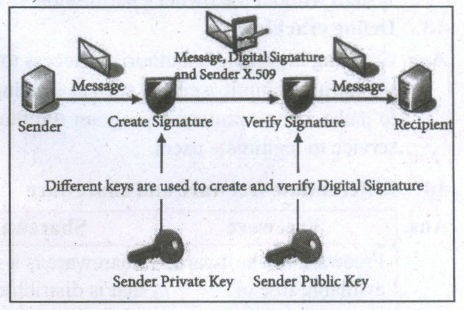
(iv) This attribute enables others to validate the integrity of the data by using the signer's public key to decrypt the hash. If the decrypted hash matches a second computed hash of the same data, it proves that the data hasn't changed since it was signed.
(v) If the two hashes don't match, the data has either been tampered with in some way (indicating a failure of integrity) or the signature was created with a private key that doesn't correspond to the public key presented by the signer (indicating a failure of authentication).
35.
Types of Encryption :
There are two types of encryption schemes as listed below:
i. Synunetric Key encryption,
ii. Public Key encryption.
Symmetric Key Encryption :
Symmetric encryption is a technique to use the same key for both encryption and decryption. The main disadvantage of the symmetric key encryption is that all authorized persons involved, have to exchange the key used to encrypt the data before they can decrypt it. If anybody intercepts the key information, they may read all message. Depicts the working of symmetric key encryption.
Public Key Encryption:
Public key encryption is also called Asymmetric encryption. It uses the concept of a key value pair, a different key is used for the encryption and decryption process. One of the keys is typically known as the private key and the other is known as the public key. The private key is kept secret by the owner and the public key is either shared amongst authorized recipients or made available to the public at large. The data encrypted with the recipient's public key can only be decrypted with the corresponding private key. public key encryption.
36.
Web sites typically use cookies for the following reasons:
(i) To collect demographic information about who has visited the Web site.
(ii) Sites often use this information to track how often visitors come to the site and how long they remain on the site.
(iii) It helps to personalize the user's experience on the Web site.
(iv) Cookies can help store personal information about users so that when a user subsequently returns .to the site, a more personalized experience is provided.
37.
(i) Social engineering:
A misuse of an individual's weakness, achieved by making them to click malicious links, or by physically accessing the computer through tricks. Phishing and pharming are examples of social engineering.
(ii) Phishing:
Phishing is a type of computer crime used to attack, steal user data, including login name, password and credit card numbers. It occurs when an attacker targets a victim into opening an e-mail or an instant text message. The attacker uses phishing to distribute malicious links or attachments that can perform a variety of functions. including the extraction of sensitive login credentials from victims.
(iii) Pharming:
Pharming is a scamming practice in which malicious code is installed on a personal computer or server, misdirecting users to fraudulent web sites without their knowledge or permission.Pharming has been called "phishing without a trap" It is another way hackers attempt to manipulate users on the Internet. It is a cyber attack intended to redirect a website's traffic to a fake site.
38.
< html >
< title >Example Program to test isNan( ) Function< /title >
< head > < /head >
< body >
< h4 >< u >Example Program to test isNan() Function
< /u >< /h4 >
< script language=" JavaScript" >
function checknum( )
{
var n=document.form 1.text1.value;
if(isNaN(n)=true)
{
document.form1.text2.value="Not a Number:"+n;
}
else
{
document.forml.text2.value="It is Number: "+n;
}
}
< /script >
< form name="forml" >
Enter a Number1:
< input type="text" name=rtext1" size=3 >
< br >< br >
< input type=t'button" value="Click to Check" onClick="checknum( )" >
< input type="text" name="text2" size=30 >
< br >
< /form >
< /body >
< /html >
39.
< html >
< head >
< title > Function Example < /title >
< script type = "text/JavaScript'' >
var input 1 = window.prompt("Enter Valuel :", "0");
var input2=Window.prompuEnter Value2:","0");
var v1=parselnt(input1);
var v2=parselnt(input2);
var s=sum(v1,v2);
document. writeln(" < br > < h4 >< u > Example for
Function< /u >< /h4 >");
document. writeln("First No: "+v 1+< br > Second
No:"+ v2+"< br >The Sum = " + s);
function sum(x, y)
{
var s=x+y;
return s;
}
< /script >
< /head >
< body >
< /body >
< /html >
40.
| Function | Description | Example | Result |
| toUpperCase() | Used to convert given string into uppercase | x="java" x.toUpperCase(); |
JAVA |
| toLowerCase() | Used to convert given string into lowercase | x="JAVA" x.toLowerCase(); |
java |
| length | Used to find length of the given string | x="JAVA" x.length(); |
4 |
| parselnt() | Used to convert the given float value into an integer | parselnt(34.234); | 34 |
| parseFloat() | Used to convert the given string into a integer | parseInt("34.23"); | 34.23 |
41.
The main advantages of email are listed below:
Free delivery:
Sending an e-mail is virtually free, outside the cost of Internet service. There is no need to buy a postage stamp to send a letter.
Global delivery:
E-mail can be sent to nearly anywhere around the world, to any country.
Instant delivery:
An e-mail can be instantly sent and received by the recipient over the Internet.
File attachment:
An e-mail can include one or more file attachments, allowing a person to send documents, pictures, or other files with an e-mail.
Long-term storage:
E-mails are stored electronically, which allows for storage and archival over long periods of time.
Environmentally friendly:
Sending an e-mail does not require paper (Paperless), cardboard, or packing tape, conserving paper resources.
42.
Structure of email: Click the Compose button and then writing an e-mail contents.
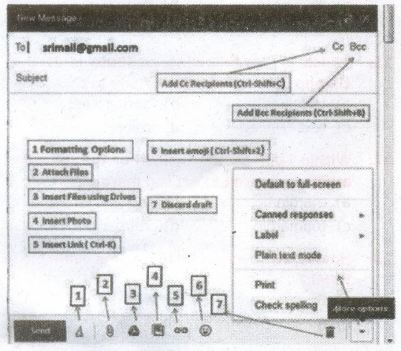
When sending an e-mail message, several fields are required to be filled:
(i) The To field is where you type the e-mail address of the person who is the recipient of your message.
(ii) The From filed should contain you e-mail address.
(iii) If you are replying to a message, the To and From fields are automatically filled out; if it's a new message, you'll need to enter them manually.
(iv) The Subject should consist of a few words describing the e-mail's contents. The Subject lets the recipient see what the e-mail is about, without opening and reading the full e-mail. This field is optional.
(v) The CC (Carbon Copy) field allows you to specify recipients who are not direct addressees (listed in the "To" field). This field is optional.
(vi) The BCC (Blind Carbon Copy) field is similar to CC, except the recipients are secret. Each BCC recipient will receive the e-mail, but will not see who else received a copy. The addressees(anyone listed in the "To" field) remain visible to all recipients. This field is optional.
(vii) Finally, the Message Body is the location you type your main message. It often contains your signature at the bottom; similar to a handwritten letter.
43.
< Html >
< Body >
< script language="Javascript" type="text/ javascript" > .
var N=0;
var N = promt ("Enter the Number","0");
switch (N)
{
case 1 :
document.write ("One");
break;
case 2 :
document.write ("Two");
break;
case 3 :
document.write ("Three");
break;
case 4 :
document.write ("Four");
break;
case 5 :
document.write ("Five");
break;
default:
document.write ("Invalid! Enter between 1 and 5");
}
< /script >
< /body >
< /Html >
44.
< Html >
< Body >
< script language="javascript" type="text/ javascript" >
var N=0;
var N = promt ("Enter the number","0");
if(N%2==0)
{
alert ("The Number is Even").
}
else {
alert ("The Number is Odd")
}
< /script >
< /body >
< /Html >
45.
< Html >
< Body >
< script . 'language="javascript" type="text/ javascript" >
var N=0;
var N = promt ("Enter the number","0");
if(N > 0)
{
alert ("The Number is Positive ")
}
else {
alert ("The Number is Negative")
}
< /script >
< /body >
< /Html >
46.
The do ..while loop is like a while loop, except that the loop expression is tested at the end of the loop rather than at the beginning. This means that the body of the loop is always executed a,t least once. The syntax is:
do
{
body of the loop
} while (expression);
An important difference between while and do ..
while statement is in the do ..while loop
body of the loop always executed at least once before the condition can be executed. In a while loop, first condition will be evaluated and then only based on the result of the condition the body of the loop will be executed or not.
Using do ..while loop
< Html >
< Head >
< Title >Program - To test do ..while statement in
JavaScript < /Title >
< /Head >
< Body >
< script language="javascript" type="text/ javascript" >
document.write("< h2 > Using do ..while
Statement < /h2 >");
var no2=0; do
{
document. write(no2+"");
no2=no2+2;
}while(no2< = 10);
< /script >
< /Body >
< /Html >
47.
In JavaScript while loop is another most basic loop. The purpose of a while loop is to execute a statement /block of statement repeatedly as long as an expression is true.
The while statement creates a loop that executes a specified statement as long as the test condition evaluates to true. The condition is evaluated before executing the statement.
The syntax is:
while (condition)
{
body of the loop
}
Using while loop:
< Html >
< Head >
< Title >Program - To test while statement in
JavaScript < /Title >
< /Head >
< Body >
< script language=;"javascript" type="text/ javascript" >
document.write("< h2 > Using while Statement < /h2 >");
var no2=0; while(no2< =5)
{
document. write(no2+"");
no2=no2+1;
}
< /script >
< /Body >
< /Html >
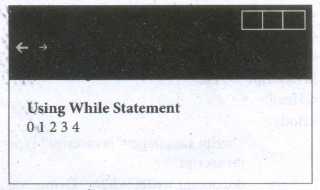
To execute a" while statement, the interpreter first evaluates expression. If the value of the expression is true the interpreter executes the statement and repeats, jumping back to the top of the loop and evaluating expression again. In the above example let us see how the while command is executed,
1. Initial value of the variable no2 is set to 0
2. The expression in the while statement IS executed.
3. If the condition is true then body of the loop will be executed once otherwise body of the loop will be skipped and control will jump to next statement to end of the loop.
4. Then the value of the control variable is executed and control jumps to condition again go to step 3.
48.
JavaScript also supports statements used to modify flow control, specifically break and continue.
The break statement will terminate the loop early.
For example:
for(var n=0;n < =10;n++)
{
if(n==5)
{
break;
}
document, write (n+" < br >");
}
In the above example, which writes out the value of nstarting from 0, when n is equal to 5 the break statement is executed and the loop is terminated.
The continue statement will skip back to the loop condition check. When the continue statement is executed, the current iteration of the enclosing loop is terminated, and the next iteration begins.
For example,
for(var .n=:0;n < =10;n++)
{
if(n==5)
{
continue;
}
document, write (n+" < br >");
}
In the above example, which writes out the value of n starting from 0, when n is equal to 5 the continue statement is executed and the continue statement continues the loop without printing the value.
49.
The most common indicators in the Menu bar are:

(i) Network indicator (or) manages network connections, allowing you to connect quicly and easily to a wired or wireless network.
(ii) Text entry settings shows the current keyboard layout (such as En, Fr, Ku, and so on). If more than one keyboard layout is shown, it allows you to select a keyboard layout out of those choices. The keyboard indicator menu contains the following menu items: Character Map, Keyboard Layout Chart, and Text Entry Settings.
(iii) Messaging indicator incorporates your social application,s. From here, among others, you can access instant messenger and email clients.
(iv) Sound indicator provides an easy way to adjust the sound volume as well as access your music player and sound settings.
(v) Clock displays the current time and provides a link to your calendar and time and date settings.
(vi) Session indicator is a link to the system settings, Ubuntu Help, and session options (like locking your computer, user/guest session, logging out of a session, restarting the computer, or shutting down completely).
50.
(i) The desktop version of Ubuntu supports all the normal software on Windows such as Firefox, Chrome, VLC, etc.
(ii) It supports the office suite called LibreOffice.
(iii) Ubuntu has an in-built email software called Thunderbird, which gives the user access to email such as Exchange, Gmail, Hot mail, etc.
(iv) There are a host of free applications for users to view and edit photos.
(v) There are also applications to manage share videos.
(vi) It is easy to find content on Ubuntu with the smart searching facility.
51.
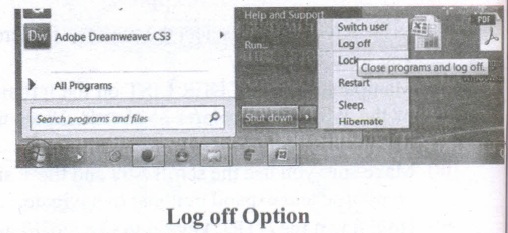
Log Off:
To log off from our computer:
(i) Click on the start button.
(ii) Select log off.
(iii) If any open programs asked to be closed then Windows force them to shut down. Any unsaved information will be last.
Shut Down:
To shut down our computer:
(i) Click on the start button.
(ii) Select shut down.
(iii) Then see the shut down windows dialog box opens.
(iv) If any open programs asked to be closed then Windows, force them to shut down. Any unsaved information will be lost.
52.
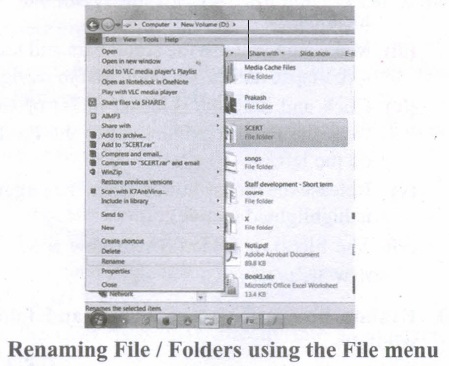
Method 1
Using the FILE Menu:
(i) Select the File or Folder you wish to Rename.
(ii) Click on the File menu and select Rename.
(iii) Type in the new name. While renaming a file keep the same file extension (e.g. ".doc") as it earlier had, otherwise, the file will no longer be associated with the program that created it.
(iv) To finalise the renaming operation, press Enter the file or folder name.
Method 2
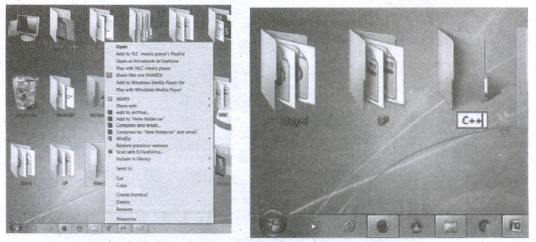
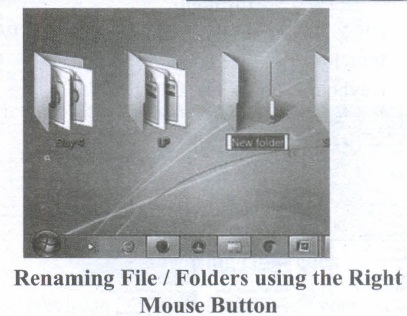
Using the Right Mouse Button:
(i) Select the file or folder you wish to rename.
(ii) Click the right mouse button while still pointing to the file.
(iii) Select Rename from the shortcut menu.
(iv) Type in the new name.
(v) To finalise the renaming operation, press enter or click away from the rectangle that surrounds the file or folder name.
Method 3
Using the Left Mouse Button
(i) Select the file or folder you wish to rename.
(ii) Wait a moment then click again (not in quick succession like a double click). A surrounding rectangle will appear around the name;
(iii) Type in the new name.
(iv) To finalise the renaming operation, press enter or click away from the rectangle that surrounds the file or folder-name.
53.
Finding Files and Folders : You can use the search box on the Start menu to quickly search a particular folder or file in the computer or in a specific drive.
To find a file or folder:
(i) Click the Start button, the search box appears at the bottom of the start menu.
(ii) Type the name of the file or the folder you want to search. Even if you give the part of the file or folder name, it will display the list of files or folders starting with the specified name.
(iii) The files or the folders with the specified names will appear, if you click that file, it will directly open that file or the folder.
(iv) There is another option called "See more results" which appears above the search box.
(v) If you click it, it will lead you to a Search Results dialog box where you can click and open that file or the folder.
Searching Files or folders using Computer icon :
(i) Click Computer lcon from desktop or from Start menu.
(ii) The Computer disk drive screen will appear and at the top right corner of that screen, there is a search box option.
(iii) Type the name of the file or the folder you want to search. Even if you give the part of the file or folder name, it will display the list of files or folders starting with the specified name.
(iv) Just click and open that file or the folder.
54.
There are two ways in which a new folder is created:
Way I:
(i) Locate and select the folder on the drive where you want to create a new folder. The folder must be selected before continuing. In figure (selecting a folder to create a folder under it) the folder Mathi is selected to create a New Folder under it.
(ii) Click on File menu, select New, then select Folder.
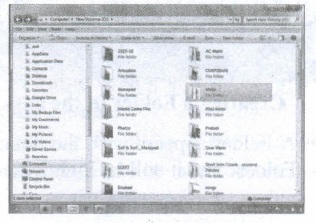
Selecting a folder to create a folder under it.
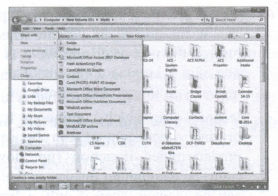
Creating a Folder using, File Menu
(i) Type in the folder name and press Enter to finalize (you can also click away from the new folder, outside its surrounding rectangle to finalize).
jpg.jpg)
Typing name to the newly created Folder
(ii) In this case, the folder name is given as "Test Folder".
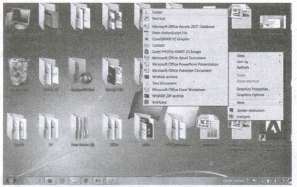
Way II: In order to create a folder in the desktop:
(i) On the Desktop, right click and select New option from the pop-up menu.
(ii) From the sub-menu, select Folder option. (Refer figure 5.23 to know the procedure)
(iii) A Folder appears with the default name "New Folder" and it will be highlighted.
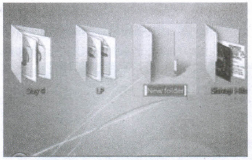
(iv) Type the name you want.
(v) Click anywhere else in the window or else press Enter key.
(vi) The name of the folder changes to what you have typed.
55.
(i) The Title Bar and control buttons - The title bar will display the name of the program and the name of the document that has been currently opened and also contains control buttons like Minimize, MaximizelRestore and Close buttons.
(ii) The Menu bar - The menu bar is seen under the title bar. Menus in the menu bar can be accessed through shortcuts involving the Alt key and the mnemonic letter that appears underlined in the menu title. Additionally, pressing Alt or F 10 brings the focus on the first menu of the menu bar.
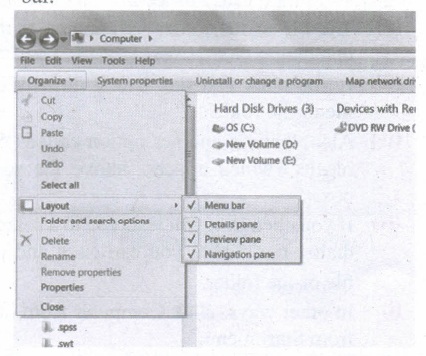
(iii) In Windows 7, in the absence of the menu bar, you have to click organize and in the sub menu list, click the layout option from it and then select the desired item from that list.
(iv) The Workspace: The Workspace is the area in the document window where you enter or type the text of document. It is the point of insertion for typing within the document.
(v) The Scroll bars: A scrollbar is an interaction technique in which continuous text, pictures, or any other content can be scrolled in a predetermined direction (up, down, left, or right) on a computer display so that all contents can be viewed, even if only a fraction of the content can be seen on a device's screen at a time. Refer figure 5.10 to view the Scroll bars.
(vi) Corners and borders: The corners and borders of the windows help to drag and hence help to resize the Windows. The mouse cursor changes to a double arrow when positioned over a border or a corner. Drag the border or corner in the direction indicated by the double arrow to the desired shape.
(a) The corners can be resized diagonally by dragging it across any of the corners. It will resize the window on all the sides simultaneously.
(b) On the other hand, the borders will let you to resize the window by either dragging it in left side, right side, from the top or from the bottom of the window.
(c) It will change the size of the window at one side only depending on the side in which the dragging is made.
56.
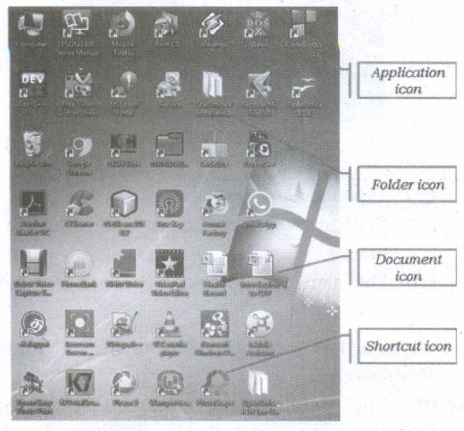
Application Icons:
(i) These icons are representing Software package's logo. Double-click over this icon, the related application gets invoked.
(ii) Shortcut Icons: These icons point to a particular application or file or folder. By double clicking over them the related application or file or folder will open. This represents the shortcut form to open a particular application.
(iii) Document Icons: Active document window which is a window within an application window is called as the document icon.
57.
The important functions of an operating System.
(i) Memory Management
(ii) Processor Management
(iii) Device Management
(iv) File Management
(v) Security
(vi) Control over system performance
(vii) Job accounting
(viii) Error detecting aids
(ix) Coordination between other software and users
58.
(a) FIFO (First In First Out)Scheduling :
(i) This algorithm is based on queuing technique. Assume that a student is standing in a queue (Row) to get grade sheet from his/her teacher.
(ii) The other student who stands first in the queue gets his/her grade sheet first and leaves from the queue (Row). Followed by the next student in the queue gets it corrected and so on. This is the basic logic of the FIFO algorithm.
(iii) Technically, the process that enters the queue first is executed first by the CPU, followed by the next and so on. The processes are executed in the order of the queue (row).
(b) SJF (Shortest Job First)Scheduling:
(i) This algorithm works based on the size of the job being executed by the CPU.
(ii) Consider two jobs A and B.
(iii) 1) A = 6 kilo bytes 2) B = 9 kilo bytes.
(iv) First the job "A" will be assigned and then job "B" gets its turn.
(c) Round RobinScheduling :
(i) The Round Robin (RR) scheduling algorithm is designed especially for time sharing systems.
(ii) Jobs (processes) are assigned and processor time in a circular method.
(iii) For example take three jobs A, B, C. First the job A is assigned to CPU then job B and job C and then again A, Band C and so on.
59.
(i) File management is an important function of OS which handles the data storage techniques. The operating System manages the files, folders and directory systems on a computer.
(ii) Any type of data in a computer is stored in the form of files and directories/folders through File Allocation Table (FAT).
(iii) The FAT stores general information about files like filename, type (text or binary), size, starting address and access mode (sequential/indexed / indexed-sequential/direct/relative).
(iv) The file manager of the operating system helps to create, edit, copy, allocate memory to the files and also. updates the FAT.
(v) The OS also takes care of the files that are opened with proper access rights to read or edit them. There are few other file management techniques available like Next Generation File System (NTFS) and ext2(Linux).
60.
Memory Management:
(i) Memory Management is the process of controlling and coordinating computer's main memory and assigning memory block (space) to various running programs to optimize overall computer performance.
(ii) The Memory management involves the allocation of specific memory blocks to individual programs based on user demands. At the application level, memory management ensures the availability of adequate memory for each running program at all times.
(iii) The objective of Memory Management process is to improve both the utilization of the CPU and the speed of the computer's response to its users via main memory. For these reasons, the computers must keep several programs in main memory that associates with many different Memory Management schemes.
(iv) The Operating System is responsible for the following activities in connection with memory management.
(v) Keeping track of which portion of memory are currently being used and who is using them.
(vi) Determining which processes (or parts of processes) and data to move in and out of memory.
(vii) Allocation and de-allocation of memory blocks as needed by the program in main memory. (Garbage Collection).
61.
Hard disk :
(i) Hard disk is a magnetic disk on which you can store data. The hard disk has the stacked arrangement of disks accessed by a pair of heads for each of the disks.
(ii) The hard disks come with a single or double-sided disk.
Compact Disk (CD) :
.png)
(i) A CD or CD-ROM is made from 1.2 millimetres thick, polycarbonate plastic material. A thin layer of aluminium or gold is applied to the surface.
(ii) CD data is represented as tiny indentations known as "pits", encoded in a spiral track moulded into the top of the polycarbonate layer. The areas between pits are known as "lands".
(iii) A motor within the CD player rotates the disk. The capacity of an ordinary CD- ROM is 700MB.
Digital Versatile Disc (DVD):
.png)
(i) A DVD (Digital Versatile Disc or Digital Video Disc) is an optical disc capable of storing up to 4.7 GB of data, more than six times what a CD can hold.
(ii) DVDs are often used to store movies at a better quality. Like CDs, DVDs are read with a laser. The disc can have one or two sides, and one or two layers of data per side; the number of sides and layers determines how much it can hold.
(iii) A 12 em diameter disc with a single-sided, single layer has 4.7 GB capacity, whereas the single-sided, double layer has 8.5 GB capacity.
(iv) The 8 em DVD has 1.5 GB capacity. The capacity of a DVD-ROM can be visually determined by noting the number of data sides of the disc. Double-layered sides- are usually gold-coloured, while single-layered sides are usually silver-coloured, like a CD.
62.
(a) Bus:
A bus is a collection of wires used for communication between the internal components of a computer.
(b) Data bus:
(i) Data busis a collection of wires to carry data in bits.
(ii) A data bus is used to transfer data between the memory and the CPU.
(iii) The data bus is bidirectional.
(c) Address bus:
(i) Address bus is a collection of wires to carry data in bits.
(ii) The address bus is used to point a memory location.
(iii) The address bus is unidirectional.
(d) Control bus:
(i) Control bus is a control line/collection of wires to control the operation/functions.
(ii) The control bus controls both read and write operations.
63.
(i) The size of the instruction set is another important consideration while categorizing microprocessors.
(ii) Initially, microprocessors had very small instruction sets because complex hardware was expensive as well as difficult to build.
(iii) As technology had developed to overcome these issues, more and more complex instructions were added to increase the functionality of the microprocessor,
(iv) Let us learn more about the two types of microprocessors which are based on their instruction sets.
(v) RISC stands for Reduced Instruction Set Computers. They have a small set of highly optimized instructions.
(vi) Complex instructions are also implemented using simpler instructions, thus reducing the size of the instruction set.
(vii) Examples of RISC processors are Intel P6, Pentium IV, AMD K6 and K7.
(viii) CISC stands for Complex Instruction Set Computers. They support hundreds of instructions. Computers supporting CISC can accomplish a wide variety of tasks, making them ideal for personal computers.
(ix) Examples of CISC processors are Intel 386 & 486, Pentium, Pentium II and III, and Motorola 68000.
64.
62478
\(\overset { 6 }{ \underset { 110 }{ \downarrow } } \) \(\overset { 2 }{ \underset { 010 }{ \downarrow } } \) \(\overset { 4 }{ \underset { 100 }{ \downarrow } } \) \(\overset { 7 }{ \underset { 111 }{ \downarrow } } \)
62478 = 1100101001112
65.
10110102
Decimal Equivalent;
= 1 x 26 + 0x25 + 1 x24 + 1 x 23 + 0 x22 + 1 x 21 +0 x20
= 64 + 16 + 8 + 2 = 9010
Octal Equivalent;
= \(\overline { \overset { 10 }{ \overset { \downarrow }{ 1 } } } \) \(\overline { \overset { 110 }{ \overset { \downarrow }{ 3 } } } \)\(\overline { \overset { 110 }{ \overset { \downarrow }{ 2 } } } \)
= 1328
Hexadecimal Equivelent;
= \(\overline { \overset { 101 }{ \overset { \downarrow }{ \overset { 5 }{ \overset { \downarrow }{ 5 } } } } } \) \(\overline { \overset { 1010 }{ \overset { \downarrow }{ \overset { 10 }{ \overset { \downarrow }{ A } } } } } \)
=5416
10110102 =9010 =1328 =5A16
66.
192010 = ?2
.png)
= 111100000002
= 111100000002 = ?8
= \(\overline { \underset { \overset { \downarrow }{ 3 } }{ 11 } } \) \(\overline { \underset { \overset { \downarrow }{ 6 } }{ 110 } } \) \(\overline { \underset { \overset { \downarrow }{ 0 } }{ 000 } } \) \(\overline { \underset { \overset { \downarrow }{ 0 } }{ 000} } \)
= 36008
= 111100000002 = ?16
= \(\overline { \underset { \overset { \downarrow }{ 7 } }{ 111 } } \) \(\overline { \underset { \overset { \downarrow }{ 8 } }{ 1000 } } \) \(\overline { \underset { \overset { \downarrow }{ 0 } }{ 0000} } \)
= 78016
= 192010 = 111100000002 = 36008 = 78016
67.
(A) A616
\(\begin{matrix} A & 6 \\ \downarrow & \downarrow \\ \begin{matrix} 10 \\ \begin{matrix} \downarrow \\ 1010 \end{matrix} \end{matrix} & \begin{matrix} 6 \\ \begin{matrix} \downarrow \\ 0110 \end{matrix} \end{matrix} \end{matrix}\)
A616=101001102
(B) BE16
\(\begin{matrix} B & E \\ \downarrow & \downarrow \\ \begin{matrix} 11 \\ \begin{matrix} \downarrow \\ 1010 \end{matrix} \end{matrix} & \begin{matrix} 14 \\ \begin{matrix} \downarrow \\ 1110 \end{matrix} \end{matrix} \end{matrix}\)
BE16=101111102
(C) 9BC816
\(\begin{matrix} 9 & B \\ \downarrow & \downarrow \\ \begin{matrix} 9 \\ \begin{matrix} \downarrow \\ 1001 \end{matrix} \end{matrix} & \begin{matrix} 11 \\ \begin{matrix} \downarrow \\ 1011 \end{matrix} \end{matrix} \end{matrix}\begin{matrix} C & 8 \\ \downarrow & \downarrow \\ \begin{matrix} 12 \\ \begin{matrix} \downarrow \\ 1100 \end{matrix} \end{matrix} & \begin{matrix} 8 \\ \begin{matrix} \downarrow \\ 1000 \end{matrix} \end{matrix} \end{matrix}\)
9BC816=100011011110010002
(D) BC916
\(\begin{matrix} B & C & 9 \\ \downarrow & \downarrow & \downarrow \\ \begin{matrix} 11 \\ \downarrow \\ 1011 \end{matrix} & \begin{matrix} 12 \\ \downarrow \\ 1100 \end{matrix} & \begin{matrix} 9 \\ \downarrow \\ 1001 \end{matrix} \end{matrix}\)
BC916=1011110010012
68.
(101011001)2 in hexadecimal Form
= 1 \(\overline { 0101 } \) \(\overline { 1001 } \)
(101011001)2 = (159)16
(101011001)2 = (159)16
(101011001)2 octal form
\(\overset { 101 }{ \underset { 5 }{ \downarrow } } \) \(\overset { 011 }{ \underset { 3 }{ \downarrow } } \) \(\overset { 001 }{ \underset { 1 }{ \downarrow } } \)
(101011001)2 = (531)8
Thus(101011001)2 \(\rightarrow \) = (531)8
69.
A number system is a set of digits used to represent the values derived from a common base or radix.
Decimal Number System:
(i) The term Decimal is derived from a Latin prefix deci, which means ten.
(ii) The Decimal number system has ten digits ranging from 0-9. Because this system has ten digits.
(iii) It is also called as a base ten number system or denary number system.
(iv) Decimal number should always be written with a subscript 10.
Binary umber System:
(i) The decimal number system is not convenient to implement in digital system.
(ii) For instance, it is very difficult to design electronic equipment so that it can work with 10 different voltage levels (each one representing one decimal character, 0 through 9).
(iii) On other hand, it is very easy to design simple, accurate electronic circuits that operate with only 2 voltage levels.
(iv) For this reason, almost every digital system utilizes the binary number system (base 2) as the basic number system of its operation;
(v) In a binary system, there are only two symbols or possible digit values, 0 and 1.
Octal Number System:
(i) The octal number system is playing a vital role in digital computer work.
(ii) The octal number system has a base of 8.
(iii) It means that it has eight unique symbols such as 0,1,2,3,4,5,6 and 7.
(iv) Thus, each digit of an octal number can have any value from 0 to 7.
(v) The places to the left of the octal point are positive powers of 8 and places to the right are negative powers of 8.
Hexademical Number System:
(i) The hexadecimal system uses base 16 in digital systems.
(ii) It has 16 possible symbols.
(iii) It uses the digits 0 through 9 plus the letters A, B, C, D, E and F as the 16 different symbols.
(iv) Hexadecimal System is a positional value system, wherein each hexadecimal digit has its own value or weight expressed as a power of 16.
70.
The NOR gate circuit is an OR gate followed by an inverter. Its output is "true" if both inputs are "false" Otherwise, the output is "false". In other words, the only way to get '1 ' as output is to have both inputs ' 0 '. Other wise the output is 0. The logic circuit of the NOR gate is
.png)
The output of NOR gate is
C = \(\overline { \left( A+B \right) } \)
Read this as "C equals NOT of A OR B" or "C equals the complement of A OR B".
For example if both the input are 0
C = \(\left( 0+0 \right) \) = \(\bar { 0 } \) = 1
The truth table for NOR gate is
| Input | Output | |
| A | B | C |
| 0 | 0 | 1 |
| 0 | 1 | 0 |
| 1 | 0 | 0 |
| 1 | 1 | 0 |
NAND Gate:
The NAND gate operates an AND gate followed by a NOT gate. It acts in the manner of the logical operation "AND" followed by inversion. The output is "false" if both inputs are "true", otherwise,' the output is "true". In other words the output of the NAND gate is 0 if and only if both the inputs are 1, otherwise the output is 1. The logic circuit of NAND gate is
.png)
The logical Symbol of the NAND gate is
.png)
The output of the NAND gate is
C = \(\overline { \left( A.B \right) } \)
Read this as "C" equals NOT of A AND B" or "e" equals the complement of A AND B".
For example, if both the inputs are 1
C = \(\overline { \left( 1.1 \right) } \) = \(\bar { 1 } \) = 0
the truth table for NAND gate is
| Input | Output | |
| A | B | C |
| 0 | 0 | 1 |
| 0 | 1 | 1 |
| 1 | 0 | 1 |
| 1 | 1 | 0 |
71.
AND Gate:
The AND gate can have two or more input signals and produce an output signal.
The output is "true" only when both inputs are "true", otherwise, the output is "false". In other words, the output will be 1 if and only if both inputs are 1; otherwise the output is 0. The output of the AND gate is represented by a variable say C, where A and B are two and if input boolean variables. In boolean algebra, a variable can take either of the values '0' or 'I'. The logical symbol of the AND gate is AND gate is
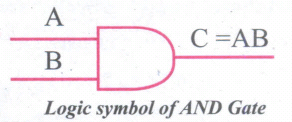
One way to symbolize the action of an AND gate' by writing the boolean function.
C = A AND B
In boolean algebra the multiplication sign stand for the AND operation. Therefore, the output of the AND gate is
C = A.B or
Simply C = A .B
Read this as "C equals A AND B". Since there an two input variables here, the truth table has four entries, because there are four possible inputs: 00 01, 10 and 11
For instance ifboth inputs are 0,
C = A.B
= 0 .0
= 0
The Truth Table For AND Gate is
| Input | Output | |
| A | B | C |
| 0 | 0 | 0 |
| 0 | 1 | 0 |
| 1 | 0 | 0 |
| 1 | 1 | 1 |
OR Gate;
The OR gate gets its name from the face that behaves like the logical inclusive "OR" The output is "true" if either or both of the inputs are "true", both inputs are "false" then the output is "false", other words the output will be 1 if and only if 0, or both inputs are 1; otherwise, the output is 0, the logical symbol of the OR gate is
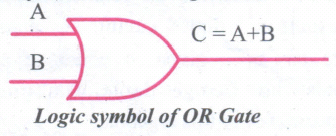
The OR gate output is
C = A or B
We use the + sign to denote the OR function therefore
C = A + B
Read this" C equals A or B
For instance , if both the input are 1
C = A + B = 1 + 1 = 1
The truth table For OR Gate is
| Input | Output | |
| A | B | C |
| 0 | 0 | 0 |
| 0 | 1 | 1 |
| 1 | 0 | 0 |
| 1 | 1 | 1 |
NOT Gate;
The NOT gate, called a logical inverter, has only one input. It reverses the logical state. In other words the output C is always the complement of the input. The logical symbol of the NOT gate is
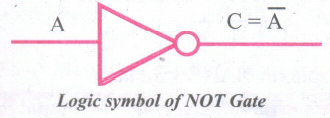
The Boolean function of Not Gate is
C = NOT A
In boolean algebra, the overbar stands for NOT operation. Therefore,
C = \(\bar { A } \)
Read This as " C equals Not A" or "C equals the complement of A''
If A is 0
C = \(\bar { 1 } \) = 0
On the other hand, if A is 1
C = \(\bar { 1 } \) = 0
The truth table for NOT gate is
| Input | Output |
| A | C |
| 1 | 0 |
| 0 | 1 |
72.
Registers:
(i) Registers are the high-speed temporary storage locations in the CPU. Hence, their contents can be handled much faster than the contents of memory.
(ii) Although the number of registers varies from computer to computer, there are some registers which are common to all computers. Five registers that are essential for instruction execution are:
(iii) Program Counter (PC): Contains the address of the next instruction to be fetched.
(iv) Instruction Register (IR): Contains the instruction most recently fetched.
(v) Memory Address Registers (MAR): Contain the address of a location in memory for read and write operations.
(vi) Memory Buffer Register (MBR): It contains the value to be stored in memory or the last value read from memory.
(vii) Accumulator (ACC): An accumulator is a general purpose register used for storing temporary result produced by the arithmetic logic unit.
73.
Booting of computer:
(i) An Operating system (OS) is a basic software that makes the computer to work. When a computer is switched on, there is no information in its RAM.
(ii) At the same time, in ROM, the pre-written program called POST (Power on Self Test) will be executed first. This program checks if the devices like RAM, keyboard, etc., are connected properly and ready to operate. If these devices are ready, then the BIOS (Basic Input Output System) gets executed. This process is called Booting.
(iii) There after, a program called "Bootstrap Loader" transfers OS from hard disk into main memory. Now the OS gets loaded (Windows/Linux, etc.,) and will get executed. Booting process is of two types.
1) Cold Booting
2) Warm Booting
(iv) Cold Booting:
When the system starts from initial state i.e. it is switched on, we call it cold booting or Hard Booting. When the user presses the Power button, the instructions are read from the ROM to initiate the booting process.
(v) Warm Booting:
When the system restarts or when Reset button is pressed, we call it Warm Booting or Soft Booting. The system does not start from initial state arid so all diagnostic tests need not be carried out in this case. There are chances of data loss and system damage as the data might not have been stored properly.
74.
Non-Impact Printers:
(i) These printers do not use striking mechanism for printing. They use electrostatic or laser technology.
(ii) Quality and speed of these printers are better than Impact printers. For example, Laser printers and Inkjet printers are non-impact printers.
Laser Printers:
(i) Laser printers mostly work with similar technology used by photocopiers.
(ii) It makes a laser beam scan back and forth across a drum inside the printer, building up a pattern. It can produce very good quality of graphic images.
(iii) One of the chief characteristics oflaser printer is their resolution - how many Dots perinch(DPI). The available resolution range around 1200 dpi. Approximately it can print 100 pages per minute(PPM).
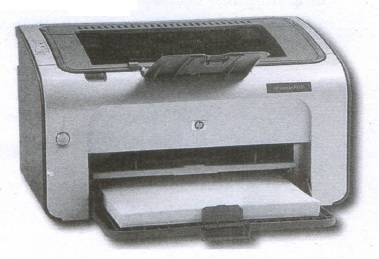
Inkjet Printers:
(i) Inkjet Printers use colour cartridges which combined Magenta, Yellow and Cyan inks to create color tones.
(ii) A black cartridge is also used for monochrome output. Inkjet printers work by spraying ionised ink at a sheet of paper.
(iii) The speed of Inkjet printers generally ranges from 1-20 PPM (Page Per Minute).
(iv) They use the technology offering ink by heating it so that it explodes towards the paper in bubbles or by using piezoelectricity in which tiny electric currents controlled by electronic circuits are used inside the printer to spread ink in jet speed.
(v) An Inkjet printer can spread millions of dots of ink at the paper every single second.
75.
Impact Printers:
(i) These printers print with striking of hammers or pins on ribbon. These printers can print on multi-part (using carbon papers) by using mechanical pressure.
(ii) For example, Dot Matrix printers and Line matrix printers are impact printers.
(iii) A Dot matrix printer that prints using a fixed number of pins or wires. Each dot is produced by a tiny metal rod, also called a "wire" or "pin", which works by the power of a tiny electromagnet or solenoid, either directly or through a set of small levers.
(iv) It generally prints one line of text at a time. The printing speed of these printers varies from 30 to 1550 CPS (Character Per Second).
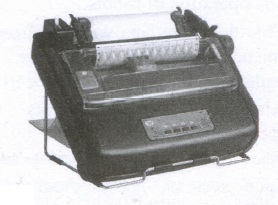
(v) It generally prints one line of text at a time. The printing speed of these printers varies from 30 to 1550 CPS (Character Per Second).
76.
| S.N | Type of Mouse | Mechanism | Developed and Introduced |
| 1 | 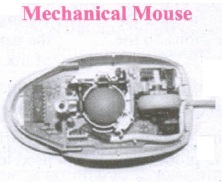 |
|
Telefunken, German Company, 0211011968 |
| 2 | 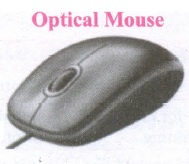 |
|
In 1988, Richard Lyon, Steve Krish independently invented different versions of Optical Mouse. |
| 3 | 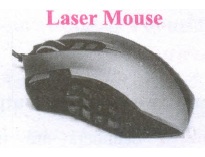 |
|
77.
(i) Scanner :
Scanners are used to enter the information directly into the computer's memory. This device works like a Xerox machine. The scanner converts any type of printed or written information including photographs into a digital format, which can be manipulated by the computer.
(ii) Fingerprint Scanners :
Fingerprint Scanner is a fingerprint recognition device used for computer security, equipped with the fingerprint recognition feature that uses biometric technology. Fingerprint Reader / Scanner is a very safe and convenient device for security instead of using passwords, which is vulnerable to fraud and is hard to remember.
(iii) Monitor :
Monitor is the most commonly used output device to display the information. It looks like a TV. Pictures on a monitor are formed with picture elements called PIXELS. Monitors may either be Monochrome which display text or images in Black and White or can be color, which display results in multiple colors. There are many types of monitors available such as CRT (Cathode Ray Tube), LCD (Liquid Crystal Display) and LED (Light Emitting Diodes). The monitor works with the VGA (Video Graphics Array) card. The video graphics card helps the keyboard to communicate with the screen. It acts as an interface between the computer and display monitor. Usually the recent motherboards incorporate built-in video card.
(iv) Plotter :
Plotter is an output device that is used to produce graphical output on papers. It uses single colour or multi colour pens to draw pictures.
78.
Outline view serves for two purposes.
Making changes in the text of a slide:
(i) Add or delete text in a slide just as in the Normal View.
(ii) Move the paragraphs of text in the selected slide up or down by using the up and down arrow buttons (Move Up or Move Down) on the Text Formatting toolbar.
(iii) Change the outline level for any of the paragraphs in a slide using the left and right arrow buttons (Promote or Demote).
(iv) Both move a paragraph and change its outline level using a combination of these four arrow buttons.
(v) Comparing the slides with outline that another slide is needed, create it directly in the Outline view then return to review all the slides against your outline in the Outline view.
79.
(i) Normal, Outline, Notes, Handout and Slide Sorter, These five tabs are called View Buttons. There are many toolbars that can be used during the slide creation; they are revealed by selecting. them with View \(\rightarrow \) Toolbars.
(ii) The actual Workspace section is below the View Buttons. This is where you assemble the various parts of your selected slide. Each view is designed to ease the completion of certain tasks.
(iii) Normal view is the main view for creating individual slides. Use this view to format and design slides and to add text, graphics and animation effects.
(iv) Outline view shows topic titles, bulleted lists' and numbered lists for each slide in outline format. Use this view to rearrange the order of slides, edit titles and headings, rearrange the order of items in a list and add new slides.
(v) Notes view lets you add notes to each slide that are not seen when the presentation is shown.
(vi) Slide Sorter view shows a thumbnail of each slide in order. Use this view to rearrange the order of slides, produce a timed slide show, or add transitions between selected slides.
(vii) Handout view lets you print your slides for a handout. Youcan choose one, two, three, four, or six slides per page from Tasks pane \(\rightarrow \) Layouts. Thumbnails can be re-arranged in this view by dragging and dropping them.
80.
Using Empty presentation
(i) Select Empty presentation under Type. It creates a presentation from scratch.
(ii) Click Next. The Presentation Wizard step 2 appears.
(iii) Choose a design under Select a slide design. The slide design section gives you two main choices: Presentation Backgrounds and Presentations.
(iv) Each one has a list of choices for slide designs. If you want to use one of these other than the < Original >
(v) < Original >
(vi) Click an item to see a preview of the slide design in the Preview window.
(vii) Select how the presentation will be used under Select an output medium. Generally, presentations are created for computer screen display, so select Screen option.
(viii) Click Next. The Presentation Wizard step 3 appears. In this step, you can choose the desired slide transition from the Effect drop-down menu. Select the desired speed for the transition between the different slides in the presentation from the Speed drop-down menu. Medium is a good choice. Click Create. A new presentation is created.
81.
Step 1:
(i) Select Data ➝ Filter ➝ Standard Filter.
(ii) Now, the entire data is selected and "Standard Filter" dialog box displays.
Step 2:
(i) Select the column heading from the "Filed name" list box for first criteria.
(ii) Select conditional operator such as > , < , = etc., from "Condition" list box.
(iii) Type or select the value of criteria in the "Value" box.
Step 3:
(i) Select the one of the logical operator (And / Or) from "Operator" list box to fix second criteria.
(ii) Follow the step 2, for the next criteria.
Step 4:
Click "OK" to finish.
82.
Multi-sorting data:
Step 1: Select Data ➝ Sort. Name are arranged in Ascending order According to names, other data also rearranged
Step 2: Sort dialog box appears.
Step 3: Select the field name (Student name) in which you want to sort from the "sort by" dropdown list box and then choose order of sorting i.e. Ascending or Descending. Ascending is the default selection.
Step 4: Select another field name (Group Code) from the "Then by" dropdown list box and choose the order of sorting to this column.
Step 5: Click "OK" button. In OpenOffice Calc, multi-sort can be done only for three fields.
83.
Direct Insert method:
If you know the function name and its syntax known, it can be directly typed in any cell of the worksheet.
For example, SUM is the most frequently using function to add a set of values. The syntax of the SUM () is
= SUM (range 1; range 2; range 3 range n)
** (Remember that the meaning of Range explained previously in this chapter)
To find the sum of the values on A1, A2, A3, A4, A4 in AS, Place your cell pointer in AS and directly type the formulae as follows.
= SUM (A1: A4)
While directly typing a function the following points should be kept in mind.
(i) A function should begins with a equal sign.
(ii) Use proper name of the function to be used.
(iii) Within brackets, arguments should be given as per the syntax. Each function has unique argument list.
(iv) After typed a function, "Enter" key must be pressed.
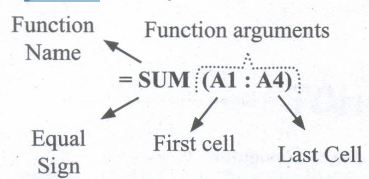
84.
Generating whole number series:
Step 1: In cell A1, type as 1 (one) and press enter
Step 2: click A1 to place the cell pointer
Step 3: Click "Drag Fill Handle" of cell pointer; now the mouse pointer becomes a small +
Step 4: Drag over the cells; While dragging, the generated values will be displayed as tooltip.
Step 5: Leave the mouse pointer. Selected cells will be filled with series of values
85.
Reference operators are used to refer cell ranges. A continuous group of sells is called as "Range". There are three types of reference operators that are used to refer cells in calc; They are
(i) Range Reference Operator,
(ii) Range Concatenation
(iii) Intersection Operator.
Range Reference Operator:
Colon (:) is the range reference operator. It is used to group a range of cells. An expression using a range operator has the following syntax:
reference left: reference right
Where reference left may be a starting cell address of a linear group of cells or upper left comer address of a rectangular group of cells. Reference right may be a last cell address of a linear group or lower right comer address of a rectangular group.
Example:
(i) Linear group of cells A1, A2, A3, A4, A5 will be referred as A1: A5
(ii) Rectangular group of cells A2, A3, A4, ..... B2, B3, B4.... D5, D6 will be referred as A2 : D6. Name box shows the reference A2 : C6 corresponding to the cells included in the drag operation with the mouse to highlight the range.
Reference concatenation operator:
Concatenation means joining together. Tilde (~) symbol is used as a concatenation operator in calc.
An expression using a concatenation' operator has the following syntax:
reference left ~ reference right
Example:
If you want to find the sum of the values from A1 to A6 and C3 to F3. The formula is =SUM(A1 : A6 ~ C3 : F3)
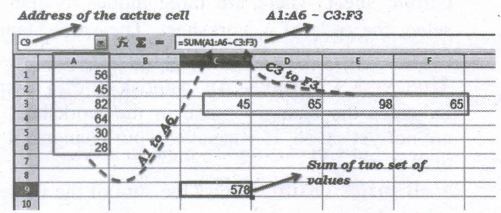
SUM is the function to find the sum of a group values. Later in this chapter you will learn more about functions. So, don't bother about SUM. Just learn the use of concatenation operator.
Intersection Operator:
Intersection operator is used to join two set of groups. It is very similar to Range concatenation operator. The intersection operator is represented by an exclamation mark (!). An expression using the intersection operator has the following syntax:
reference left ! reference right
If the references refer to a single range, the result" is a reference to a single range, containing all cells, which are both in the left reference and in the right reference.
If the references are reference lists, then each list item from the left is intersected with each one from the right and these results are concatenated to a reference list.
The order is to first intersect the first item from the left with all items from the right, then intersect the second item from the left with all items from the right, and so on.
Example: (A2:D3 ! B2:E4)
86.
(i) Title Bar
(ii) Control Buttons
(iii) Menu Bar
(iv) Tools Bar
(v) Name Box / Address Box
(vi) Quick Function Wizard
(vii) Formula Bar / Input Line
(viii) Formatting Properties
(ix) Zoom
(x) Scroll bar
(xi) Status Bar
87.
1. Connecting with Excel: Ability to open, edit, and save Microsoft Excel spreadsheets
2. AutoSum: Helps you to add the contents of a cluster of adjacent cells.
3. List AutoFill: Automatically extends cell formatting when a new item is added to the end of a list.
4. AutoFill: Allows you to quickly fill cells with repetitive or sequential data such as chronological dates or numbers, and repeated text. AutoFill can also be used to copy functions. You can also alter text and numbers with this feature.
5. AutoShapes toolbar: Will allow you to draw a number of geometrical shapes, arrows, flowchart elements, stars and more. With these shapes, you can draw your own graphs.
6. Wizard: Guides you to work effectively while you work by displaying various helpful tips and techniques based on what you are doing.
7. Drag and Drop: It will help you to reposition the data and text by simply dragging the data with the help of a mouse.
8. Charts: It will help you in presenting a graphical representation of your data in the form of Pie, Bar, Line charts and more.
9. PivotTable: It flips and sums data in seconds and allows you to perform data analysis and generating reports like periodic financial statements, statistical reports, etc. You can also analyze complex data relationships graphically.
10. Shortcut Menus: The commands that are appropriate to the task that you are doing will appear by clicking the right mouse button.
11. Functions: which can be used to create formulas to perform complex calculations on data. Database functions, to arrange, store, and filter data
12. Import and export: of spreadsheets in multiple formats, including HTML, CSV, PDF, and PostScript.
88.
To insert a new table, position the cursor where you want the table to appear, then use any of the following methods to open the Insert Table dialog box:
There are two methods to create a table:
Using Table Icon:
To insert a table quickly from the standard tool bar:
(i) Place the cur
(ii) sor where you want the table to appear.
(iii) Click the arrow to the right side of the Table icon.
(iv) In the drop down grid, select the number of rows and columns for the table.
(v) The table will appear at the location of your cursor.
Using the Insert Table Dialog Box:
To insert a table with more control over the settings and properties, use the Insert Table dialog box.
To open the dialog box, select Table ➝ Insert ➝ Table , or Ctrl +F12 or left-click the Table icon. From this dialog box, you can:
(i) Select the number of rows and columns of the table
(ii) Give a Name to the table to later distinguish it in the Navigator
(iii) Select the Heading option to define the first row in the table as the heading
(iv) Select the Repeat heading option to repeat the heading row if the table spans more than one page.
(v) Select the Don't split table option to prevent the table from spanning more than one page
(vi) Select the Border option to surround each cell of the table with a border.
89.
The following are the steps needed to create a watermark :
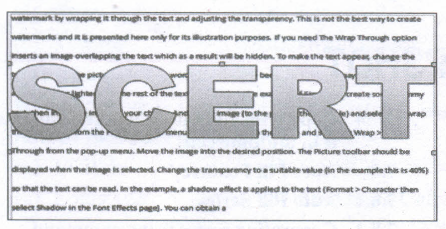
(i) Insert the image or text of your choice
(ii) Anchor the image to the page and
(iii) select the wrap through option from the Format ➝ Wrap menu or right-clicking on the image and selecting Wrap
(iv) Wrap Through from the pop-up menu.
(v) Move the image into the desired position.
(vi) The Picture toolbar should be displayed when the image is selected.
(vii) Change the transparency to a suitable value so that the text can be read.
(viii) In the example, a shadow effect is applied to the text (Format ➝ Character then select Shadow in the Font Effects page).
(ix) You can obtain a better result if you set a graphic's wrap to in Background.
90.
Many symbols which are used in a mathematical equation like alpha(α), beta(β), pi(π) etc., are not available on the standard keyboard. However, representing these characters are very much essential in mathematical equations.
To insert such characters, the procedure given below is followed:
(i) Place the cursor in your document where you want the character to appear
(ii) Click on the Insert ➝ Special character
(iii) The Special character dialog box appears from which the desired symbol can be selected by clicking on the character.
(iv) As you select each character, it is shown on the lower right, along with the numerical code for that character
(v) If you do not find a particular special character you want, try changing the font selection.
(vi) Click the ok button and the character is inserted at the current location.
91.
To perform a separate spelling check on the document (or a text selection) click the Spelling and Grammar button. This checks the document or selection and opens the Spelling dialog box if any misspelled words are found. This can be achieved by clicking the icon.
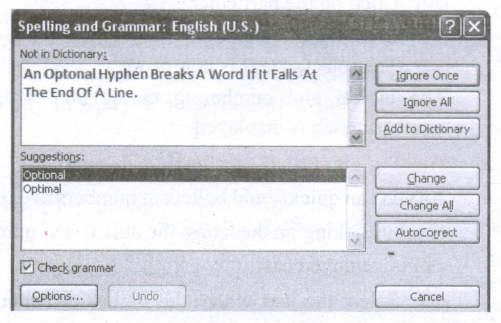
Here are some more features of the spelling tool:
(i) Right-click on a word with a wavy underline, to open a powerful context menu. Correct words can be selected from the suggested words on the menu. The selection will replace the misspelled word with correct word. Other menu options are discussed below.
(ii) The dictionary language can be changed (for example, Spanish, French, or German) from the Spelling dialog box.
(iii) The new words can be added to a dictionary. Click Add in the Spelling dialog box and pick the dictionary to add it to.
(iv) The Options dialog box of the Spelling toolbar a number of different options such as whether to check uppercase words or words with numbers. Words can be added or deleted through this option. Dictionaries also can be added or deleted through custom directories.
92.
(i) Indent is the distance from the left and right margin of a paragraph. It is used to improve the efficiency and readability of the paragraph and makes the paragraph look more attractive.
(ii) There are four types of indents:
1. Left Indent
2. Right Indent
3. First Line Indent and
4. Hanging Indent.
(iii) Left indent:
1. The Left indent controls the space between the paragraph and the left, margin. This is the default indent.
2. Each click on the increase indent icon moves the paragraph 1/2 inch away from the left margin
(iv) Right indent:
1. The Right indent controls the space between the paragraph and the right margin.
2. Each click on the decrease indent icon removes the indent applied by the increase indent that is the earlier indent is removed.
(v) First line indent:
1. A first-line indentation indents the first line of the paragraph. It is the most, common way to start a new paragraph.
2. This indent can be applied by Format ➝ Paragraph➝ indents and paragraph tab, select first line option in the indent group, enter a positive value which results in first line indent.
93.
Paragraph Alignment or justification refers to the way in which the lines of a paragraph are aligned. Paragraph alignment lets you control the appearance of individual paragraphs. There are four types of alignment available in Open office Writer - left alignment, Right-alignment, Center-alignment, and Justify-alignment.
Left-alignment: A paragraph's text is Left aligned when it is aligned evenly along the left margin. This is the default alignment which occurs by default when a paragraph is typed.
Right-alignment: A Paragraph's text is Right aligned when it is aligned evenly along the right margin.
Center-alignment: All the lines in the paragraph are aligned along the same imaginary vertical line at the center of the text area between the margins.
Justify-alignment: All the lines in the paragraph, except the last line, are extended so that the lefthand end of each line is aligned along the left-hand margin of the text area, the right-hand end of each line is aligned along the right-hand margin of the text area, and the lines are all of the same length. This is achieved by inserting additional space between words.
94.
Moving:
To move a text from one location to another
(i) select the text to be moved
(ii) Click Ctrl + X or Cut Icon or Edit➝Cut
(iii) The text is removed from the source location and placed in the clipboard
(iv) Take the insertion pointer to the new location to be moved and Click Ctrl + V or Paste Icon or Edit ➝Paste
The required text is moved to the required location
Copying:
To copy a text from one location to another
(i) select the text to be copied
(ii) Click Ctrl + C or Copy Icon or Edit ➝Copy
(iii) A duplicate copy of the text is made and send to the clipboard
(iv) Take the insertion pointer to the new location to be copied and Click Ctrl + V or Paste Icon or Edit ➝Paste
The required text is copied to the required location.
95.
To save a document for a first time,the following steps are used:
(i) Click File➝ Save ➝ (or) File ➝ Save As(Or) Ctrl + S
(ii) "Save As" dialog box appears
(iii) Select location to store your document.
(iv) The default location to store all documents is "Documents" folder in Windows.
(v) Type your document name in the File Name box.
(vi) All documents in OpenOffice will be stored with odt extension.
(vii) You can store your OpenOffice document as Microsoft Word document or PDF.
(viii) To do so, select file type from Save as type list box. This list box shows variety of formats to be saved.
(ix) Finally, Click "Save" button.
(x) Once the file is saved, your document name will be displayed on the title bar.
96.
| Key | Action |
| ➝ | To move a character right |
| \(\leftarrow\) | To move a character left |
| ↑ | To move one line up |
| ↓ | To move one line down |
| Ctrl + ➝ | One word right |
| Ctrl + \(\leftarrow\) | One word left |
| Ctrl + ↑ | One paragraph up |
| Ctrl + ↓ | One paragraph down |
| Home | To the beginning of line |
| End | To the end of the line |
| Ctrl + Home | To the beginning of the document |
| Ctrl + End | To the end of the document |
| Tab | To move one cell to the right |
| Shift + Tab | To move one cell to left |
| Pg up (Page up) | To scroll one screen up |
| Pg Down (Page Down) |
To scroll one screen down |
97.
File :
The File menu contains the commands of all file management tasks like, Create a new file, Open an existing file, Close the current file, Save a file, Save As another file, print file, Export file etc.
Edit :
The Edit menu contains the editing commands like, cut, copy, paste, Undo, Redo etc.
View :
The View menu contains the commands which are used to modify the environment of write like display of toolbars, web layout, print layout, navigator etc.
Insert :
The Insert menu contains commands for inserting various elements such as pictures, tables, charts, comments, headers, footers, special characters, cross reference etc.
Format :
The Format menu contains the commands of various text and page formatting features like page size, layout, font characteristics, bullets and numbering etc.
98.
OpenOffice writer uses the drawing tools, to create various shapes by using the Drawing toolbar. To use the drawing tools repeatedly, you can move this toolbar to a convenient place on the window. The drawing tool bar can be obtained by clicking View ➝ Toolbars ➝ Drawing.
To use a drawing tool, the steps are as given below:
(i) Click in the document where you want the drawing to be anchored.
(ii) Select the tool from the Drawing toolbar as shown in Figure 6.44 The mouse pointer changes to a drawing-functions pointer.
(iii) Move the cross-hair pointer to the place in the document where you want the graphic to appear and then click-and-drag to create the drawing object.
(iv) Release the mouse button. The selected drawing function remains active, so you can draw another object of the same type.
(v) To cancel the selected drawing function, press the Esc key or click on the Select icon on the Drawing toolbar.
(vi) now change the properties (fill color, line type and weight, anchoring, and others) of the drawing object using either the Drawing Object Properties toolbar or the choices in the dialog box.

11th Standard Syllabus & Materials
11th Standard
TN 11th Tamil பீடு பெற நில் - செய்யுள் - காவடிச்சிந்து Important Questions And Answers Study Material - QB365 Set A
NEW11th Standard
TN 11th Tamil பீடு பெற நில் - உரைநடை - மலை இடப்பெயர்கள் : ஓர் ஆய்வு Important Questions And Answers Study Material - QB365 Set A
NEW11th Standard
TN 11th Tamil மாமழை போற்றுதும் - துணைப்பாடம் - யானை டாக்டர் Important Questions And Answers Study Material - QB365 Set A
NEW11th Standard
TN 11th Tamil மாமழை போற்றுதும் - செய்யுள் - ஐங்குறுநூறு Important Questions And Answers Study Material - QB365 Set A



Tamilnadu Stateboard 11th Standard Subjects

Maths

Commerce

Economics

Biology

Business Maths and Statistics

Accountancy

Computer Science

Physics

Chemistry
Maths
Biology
Economics
Physics
Chemistry

History
Business Maths and Statistics

Computer Science
Accountancy
Computer Applications
History
Computer Technology
Commerce
Computer Applications
Computer Technology

Tamil

English

French
Tamilnadu Stateboard Standards
